Evolve my Data Architecture
2022年12月10日
开启数据架构的演进之旅。
The overall data architect will utilize three AWS accounts. To avoid jumping among AWS console login, I created three temporary Chrome profiles and the corresponding browser windows.
First, prepare 3 AWS accounts under my AWS Organizations. I use Amazon WorkMail to automatically vend out new AWS accounts, so it is really simple and quick to get these AWS accounts.
Account Initialization
对于全新的AWS account,需要进行初始化。官方资料assume了一些配置已经存在或者已经初始化完成,故没有明确指出central account的Lake Formation需要init这个必要的步骤。
第一次登陆Lake Formation的console页面时,会弹出下面下面欢迎语和配置初始化设置界面。保持“Add myself”选中。点击Get started。
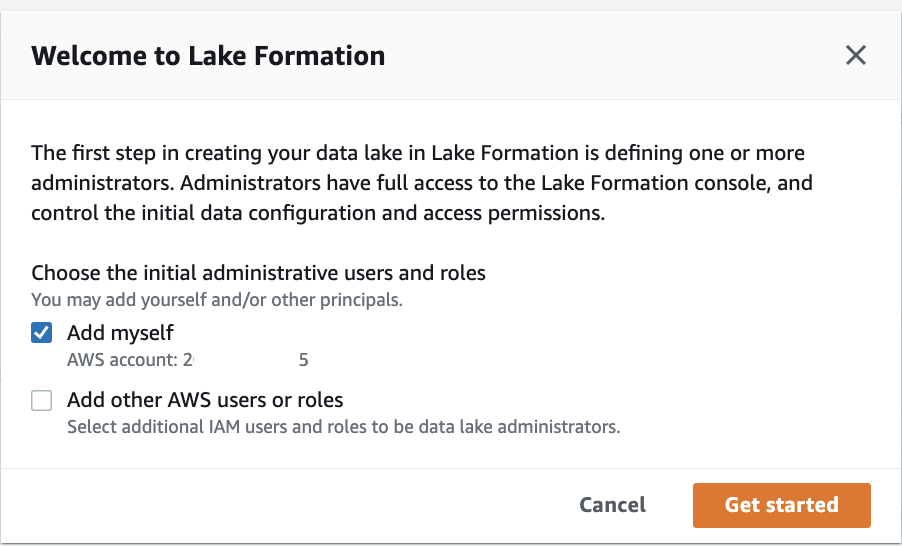
PS: producer account事实上也需要这步操作。
Deploy cloud resource in the order of central, producer, and consumer due to dependencies. 官方资料这里有点儿小问题。
Central account CloudFormation:
To create resources in the central account, complete the following steps:
From the Chrome browser designated for the central account, sign in to the central account’s AWS CloudFormation console in the target Region.
Create a new CloudFormation stack with this template:
https://aws-bigdata-blog.s3.amazonaws.com/artifacts/lakeformationtbac/cfn/tbac-cross-account-central.yaml
It will create DataMeshOwnerUserName, "DataMeshOwner" and ProducerStewardUserName, "ProducerSteward".
For Stack name, enter stack-central.
For DataMeshOwnerUserPassword, enter the password you want for the data lake admin IAM user in the central account.
For ProducerStewardUserPassword, enter the password you want for the producer steward IAM user in the producer account.
For ProducerAWSAccount, enter the producer's AWS Account ID.
Select "I acknowledge that AWS CloudFormation might create IAM resources with custom names".
Create stack.
Collect the value for LFRegisterLocationServiceRole on the stack’s Outputs tab, e.g., "stack-central-LFRegisterLocationServiceRole-1FxxxxOD".
Producer account CloudFormation:
Launch the CloudFormation stack in the producer account
To set up resources in the producer account, complete the following steps:
From the Chrome browser designated for the producer account, sign in to the producer account’s AWS CloudFormation console in the target Region.
Create a new CloudFormation stack with this template:
https://aws-bigdata-blog.s3.amazonaws.com/artifacts/lakeformationtbac/cfn/tbac-cross-account-producer.yaml
For Stack name, enter stack-producer.
For CentralAccountID, copy and paste the value of the central AWS account ID.
For CentralAccountLFServiceRole, copy and paste the value of the LFRegisterLocationServiceRole collected from the stack-central.
For LFDatabaseName, keep the default value of the tbac database name.
For ProducerStewardUserPassword, enter the password you want for the data lake admin IAM user on the producer account.
Select "I acknowledge that AWS CloudFormation might create IAM resources with custom names".
Create stack.
Launch the CloudFormation stack in the consumer account
To create resources in the consumer account, complete the following steps:
From the Chrome browser designated for the consumer account, sign in to the consumer account’s AWS CloudFormation console in the target Region.
Create a new CloudFormation stack with this template:
https://aws-bigdata-blog.s3.amazonaws.com/artifacts/lakeformationtbac/cfn/tbac-cross-account-consumer.yaml
For Stack name, enter stack-consumer.
For ConsumerAdminUserName and ConsumerAdminUserPassword, enter the user name and password you want for the data lake admin IAM user.
For ConsumerAnalyst1UserName and ConsumerAnalyst1UserPassword, enter the user name and password you want for the consumeranalyst1 IAM user.
For ConsumerAnalyst2UserName and ConsumerAnalyst2UserPassword, enter the user name and password you want for the consumeranalyst2 IAM user.
Select "I acknowledge that AWS CloudFormation might create IAM resources with custom names".
Create stack.
Configure Lake Formation cross-account sharing
After create the resources with AWS CloudFormation, perform the following steps in the producer and central account to set up Lake Formation cross-account sharing.
Central governance account
In the central account, complete the following steps:
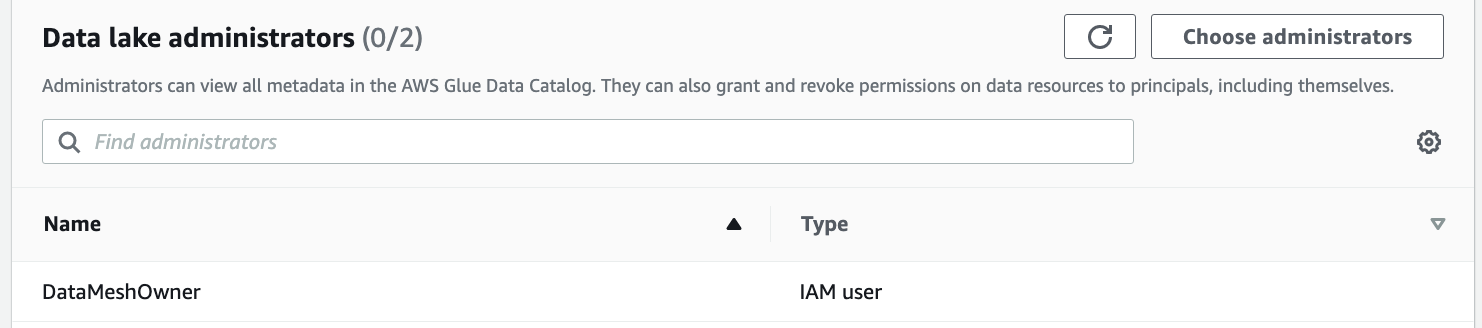
Sign in to the Lake Formation console as admin.
In the navigation pane, expand Permissions, then choose Administrative roles and tasks.
The CloudFormation template added the data mesh owner as the data lake administrator.
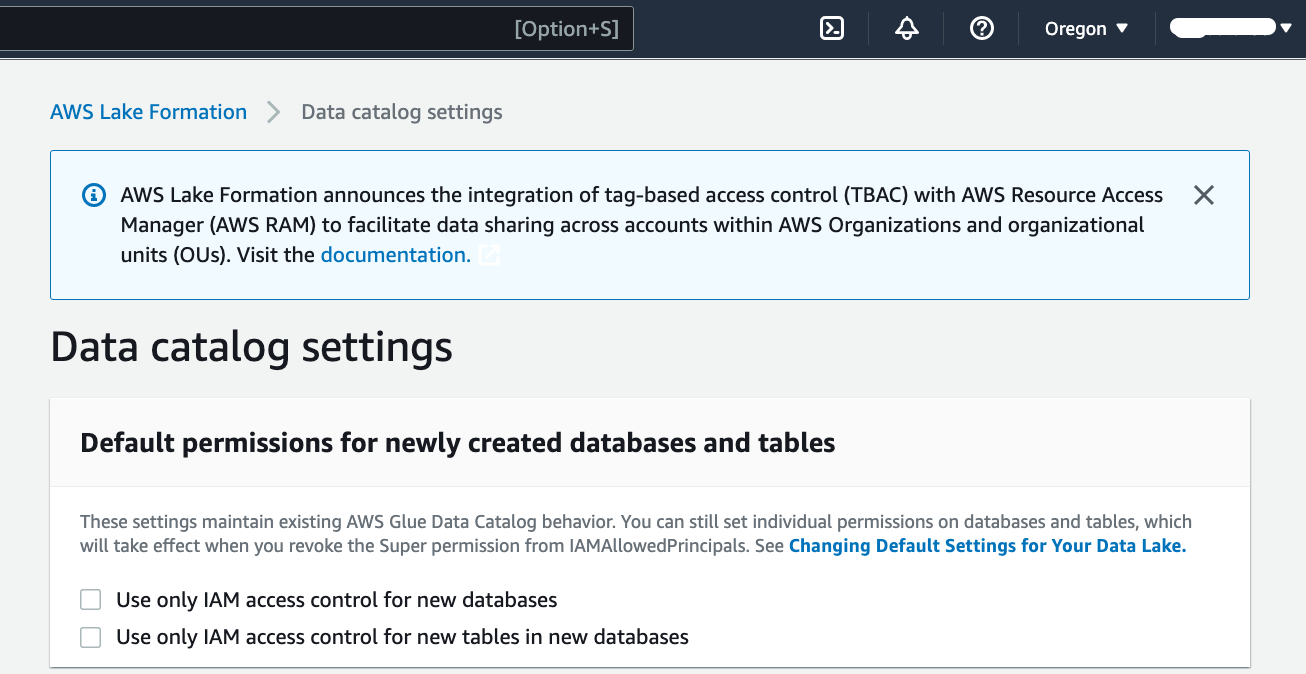
Update the Data Catalog settings to use Lake Formation permissions to control catalog resources instead of IAM-based access control.
In the navigation pane, under Data catalog¸ choose Settings.
Uncheck "Use only IAM access control for new databases", and uncheck "Use only IAM access control for new tables in new databases".
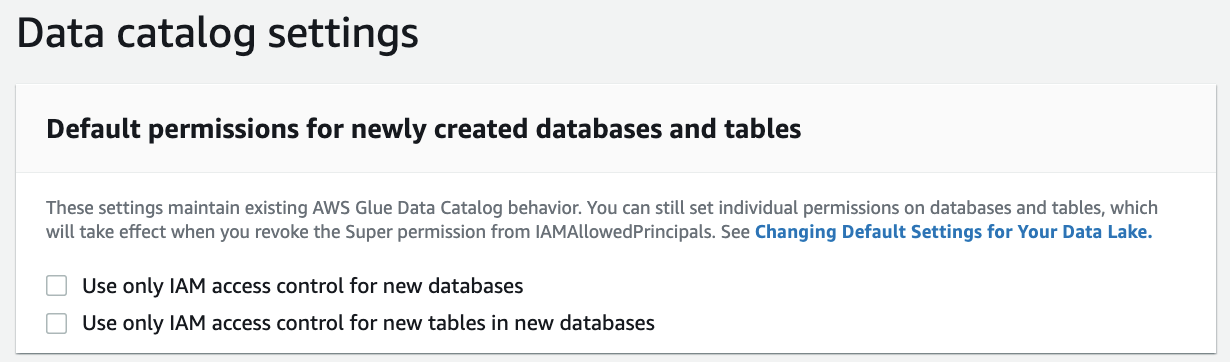
Save.
Set up the AWS Glue Data Catalog resource policy to grant cross-account access to Data Catalog resources.
Use the following policy, and replace the account number and Region with your own values:
As described in Lake Formation Tag-Based Access Control Cross-Account Prerequisites, before you can use the tag-based access control method to grant cross-account access to resources, you must add the following JSON permissions object to the AWS Glue Data Catalog resource policy in the central account. This gives the consumer account permission to access the Data Catalog when glue:EvaluatedByLakeFormationTagsis true. Also, this condition becomes true for resources on which you granted permission using Lake Formation permission Tags to the consumer’s account. This policy is required for every AWS account that you’re granting permissions to. We discuss the full IAM policy later in this post.
PS:
其中下面这段是为TS临时加的。实际是否需要还需要double check。
Run the following AWS CLI command on AWS CloudShell.
aws glue put-resource-policy --policy-in-json file://data_mesh_policy.json --region <aws-region> --enable-hybrid TRUE
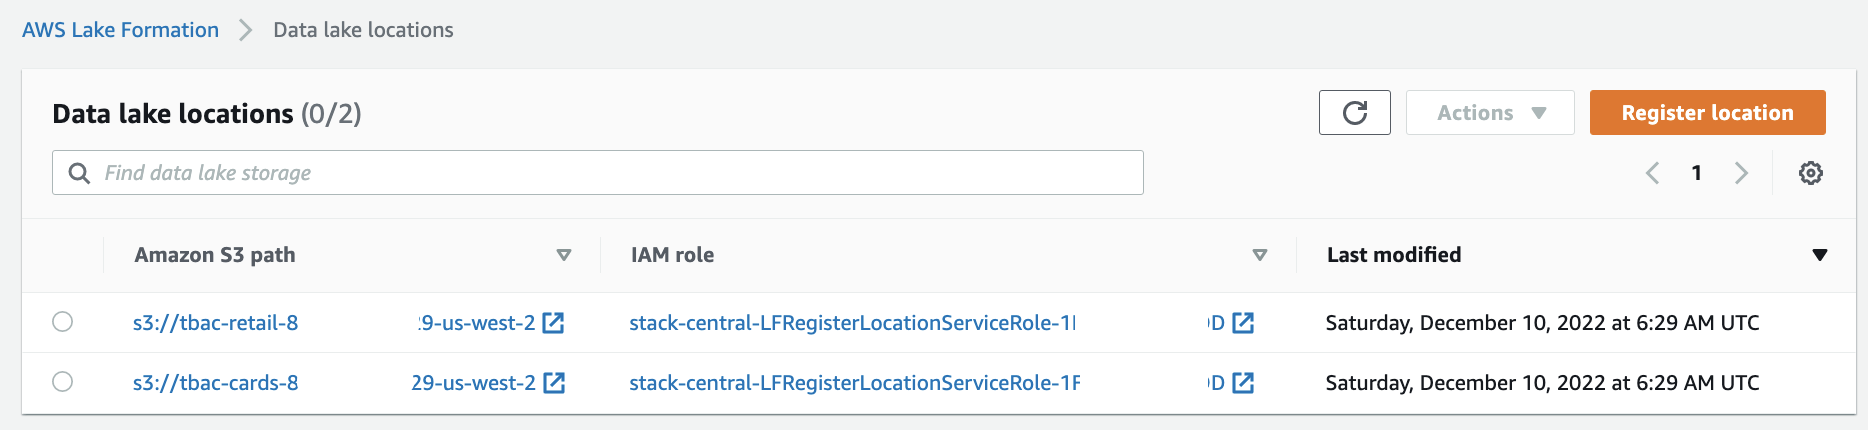
Verify the two source data S3 buckets are registered as data lake locations in the central account. This is completed by the CloudFormation template.
Under Register and ingest in the navigation pane, choose Data lake locations.
You should see the two S3 buckets registered under the data lake locations.
Configure Lake Formation Data Catalog settings in the central account
After completing all the prerequisites, start the data mesh configuration.
Log in as DataMeshOwner in the central account. (https://<CentralAccountID>.signin.aws.amazon.com/console)
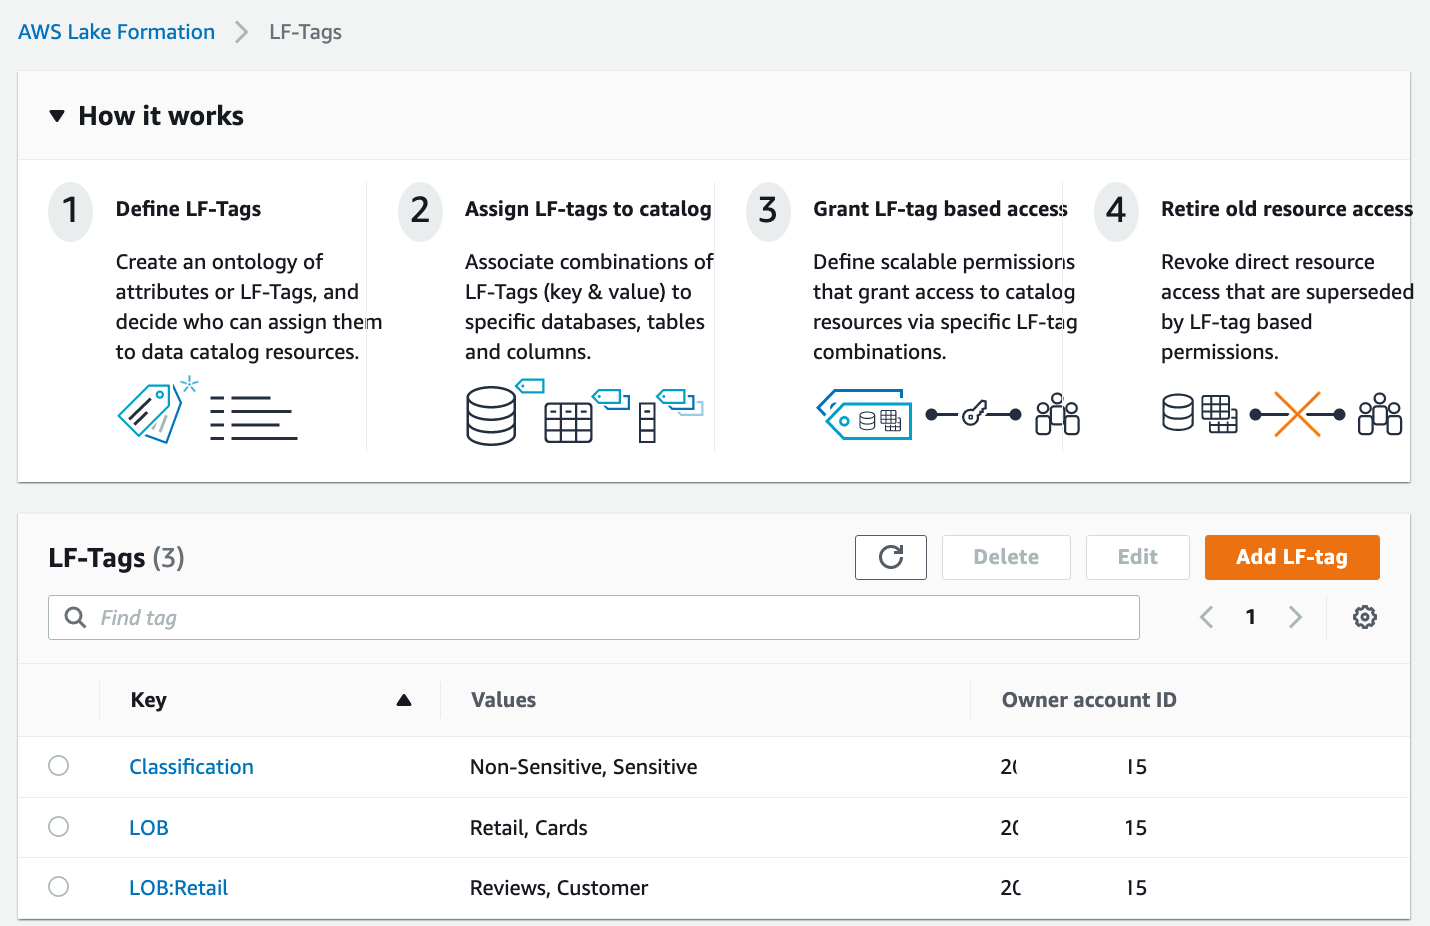
Define LF-tags
DataMeshOwner creates the tag ontology by defining LF-tags.
On the Lake Formation console, under Permissions in the navigation pane, under Administrative roles and tasks, choose LF-Tags.
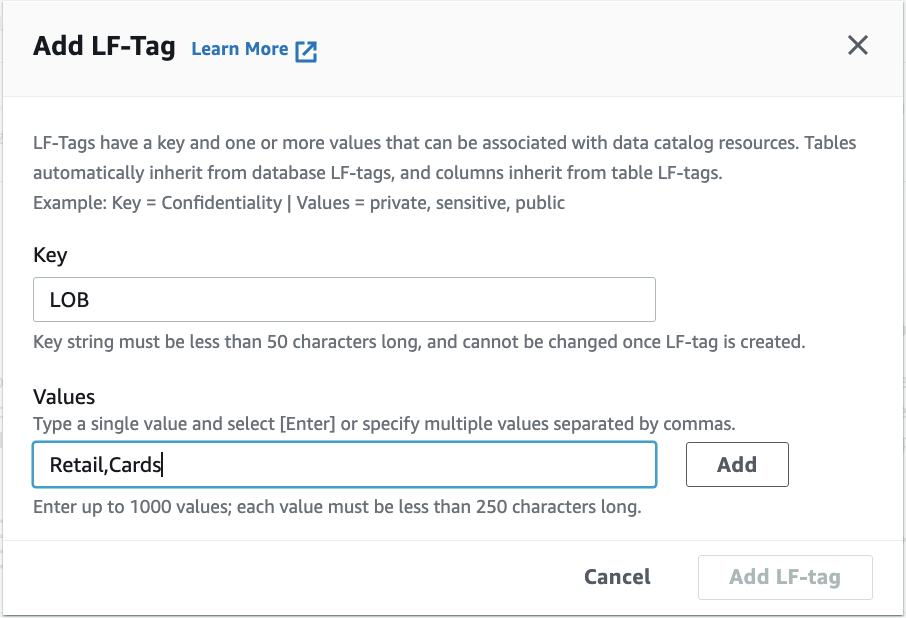
Choose Add LF-tags.
For Key, enter "LOB"(不含双引号). And for Values, input "Retail,Cards"(不含双引号).
Click Add.
Click "Add LF-tag" button.
Repeat these steps. Add the key LOB:Retail and values Customer and Reviews. Add the key Classification with values Sensitive and Non-Sensitive.
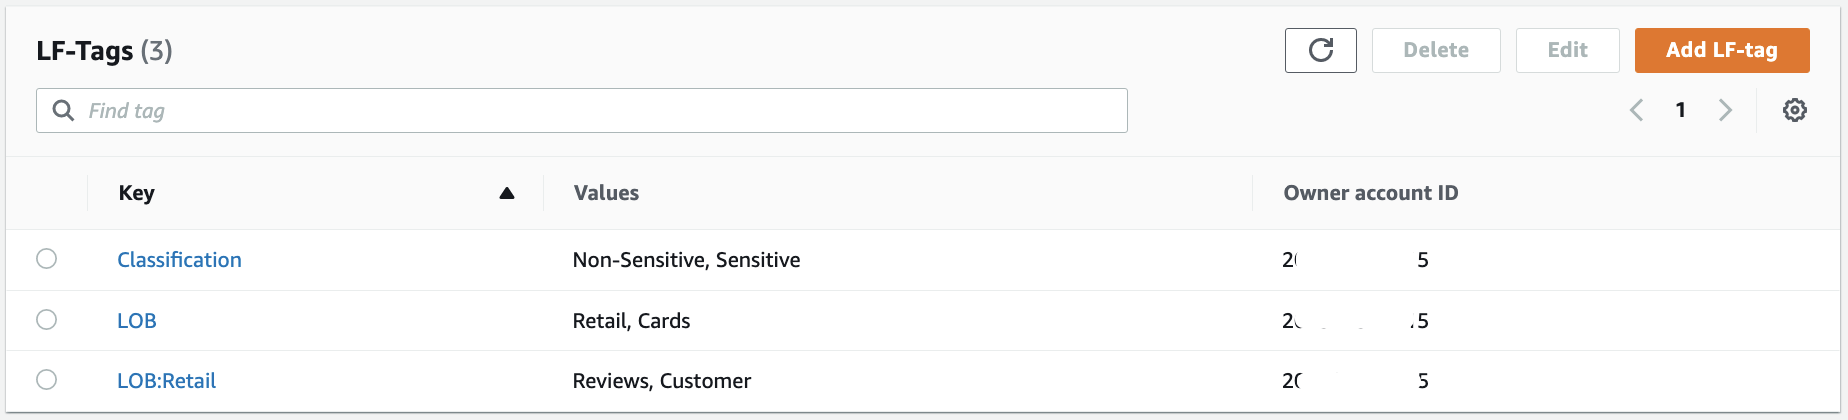
Now we complete the configuration of the tag ontology.
Grant permissions
We grant ProducerSteward in the central account describe and associate permissions on the preceding tag ontology. This enables ProducerSteward to view the LF-tags and assign them to Data Catalog resources (databases, tables, and columns). ProducerSteward in the central account can further grant the permission to ProducerSteward in the producer account.
When you have multiple producers, grant the relevant tags to each steward.
In the central account, expand Permissions in the navigation pane of AWS Lake Formation console, under Administrative roles and tasks, choose LF-tag permissions.
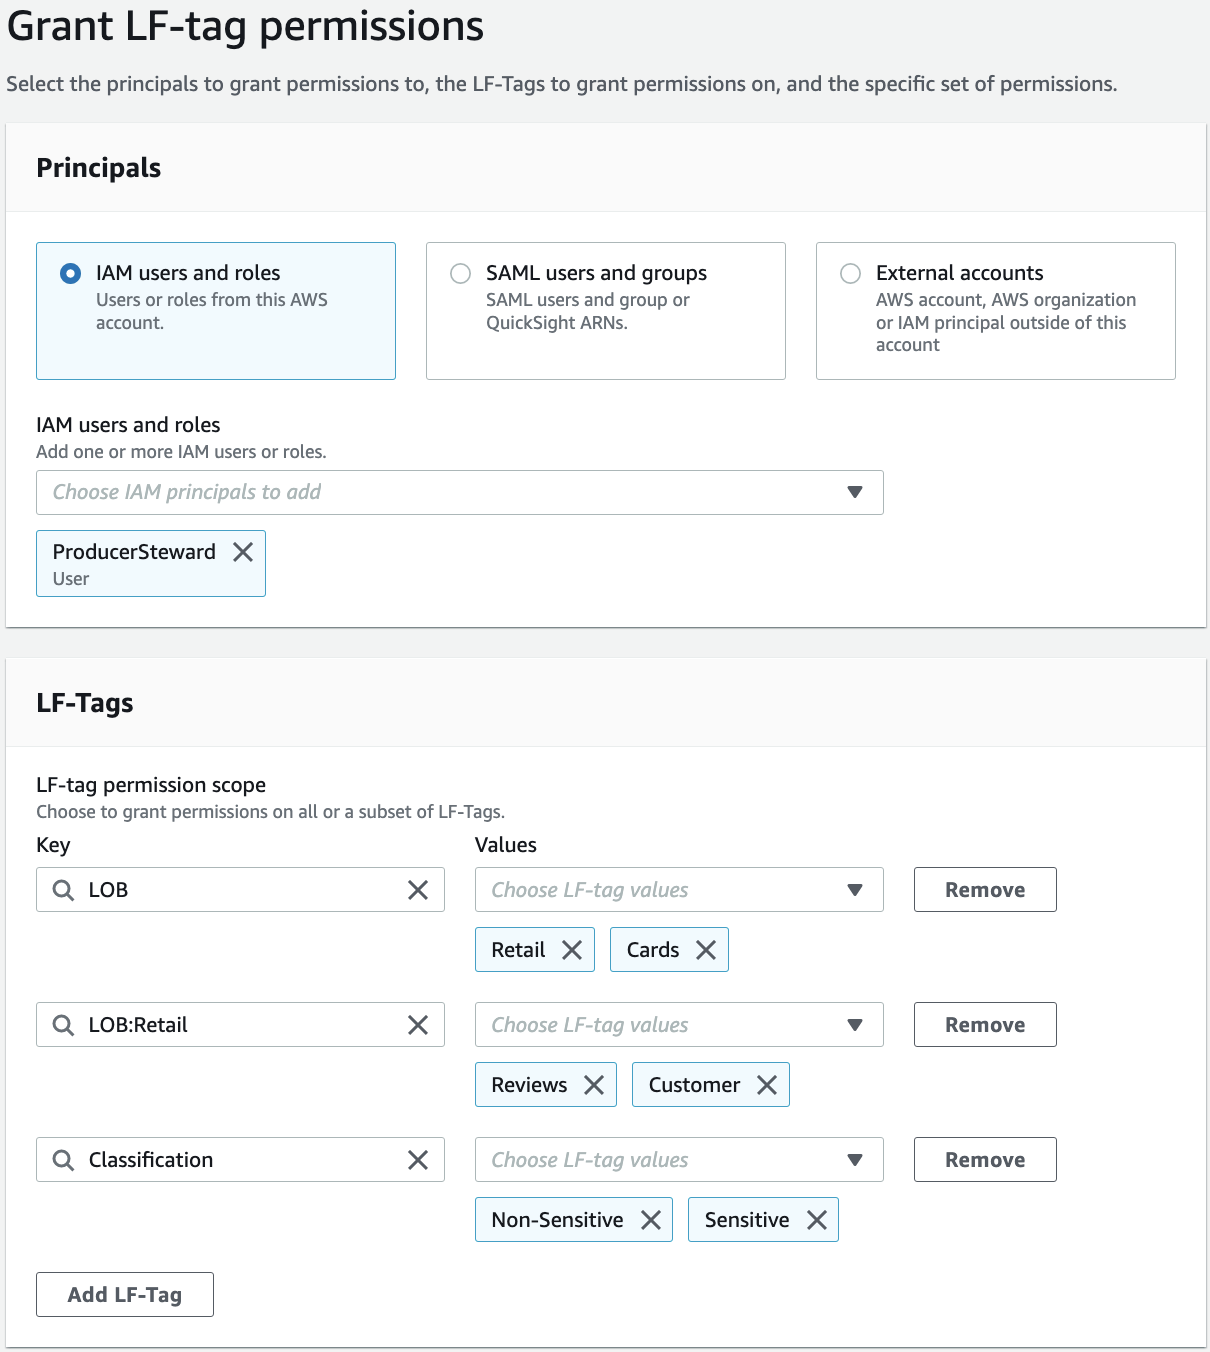
Click Grant.
For IAM users and roles, choose the ProducerSteward user.
In the LF-Tags section, add all three key-values:
Key LOB with values Retail and Cards.
Key LOB:Retail with values Customer and Reviews.
Key Classification with values Sensitive and Non-Sensitive.
For Permissions, select Describe and Associate for both LF-tag permissions and Grantable permissions.
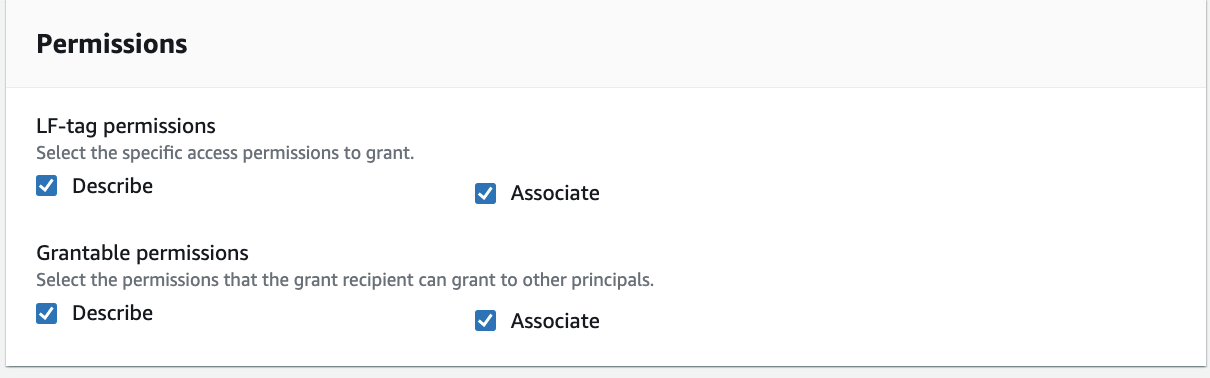
Click Grant.
Grant ProducerSteward tag-based data lake permissions. This enables ProducerSteward to create, alter, and drop tables in the databases with corresponding tags. ProducerSteward in the producer account can further grant the permission across accounts.
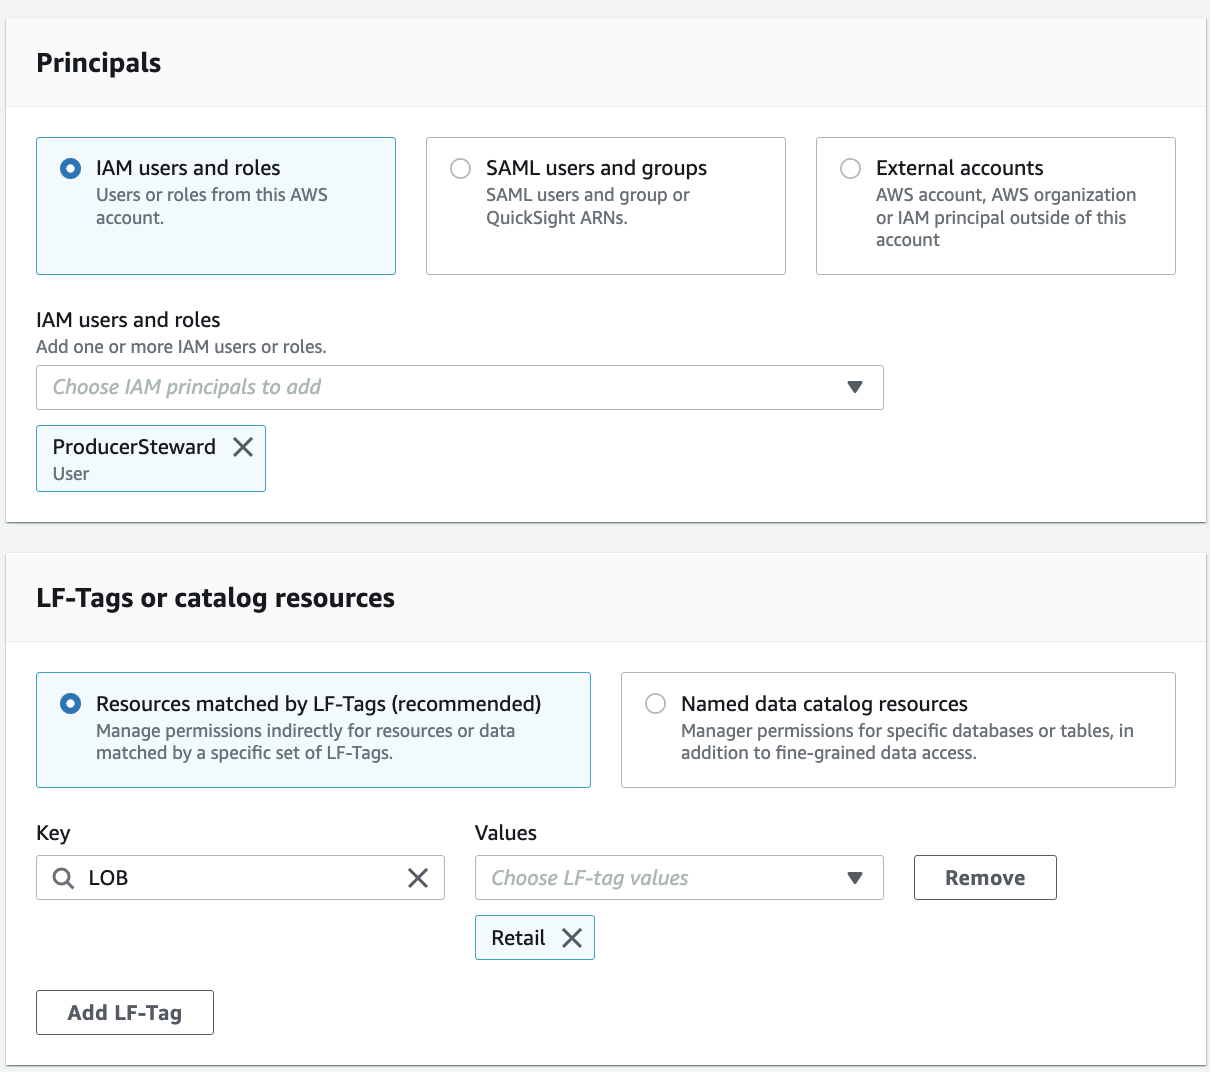
In the navigation pane, under Permissions, Data lake permissions, click Grant.
For Principals, choose IAM users and roles, and choose ProducerSteward.
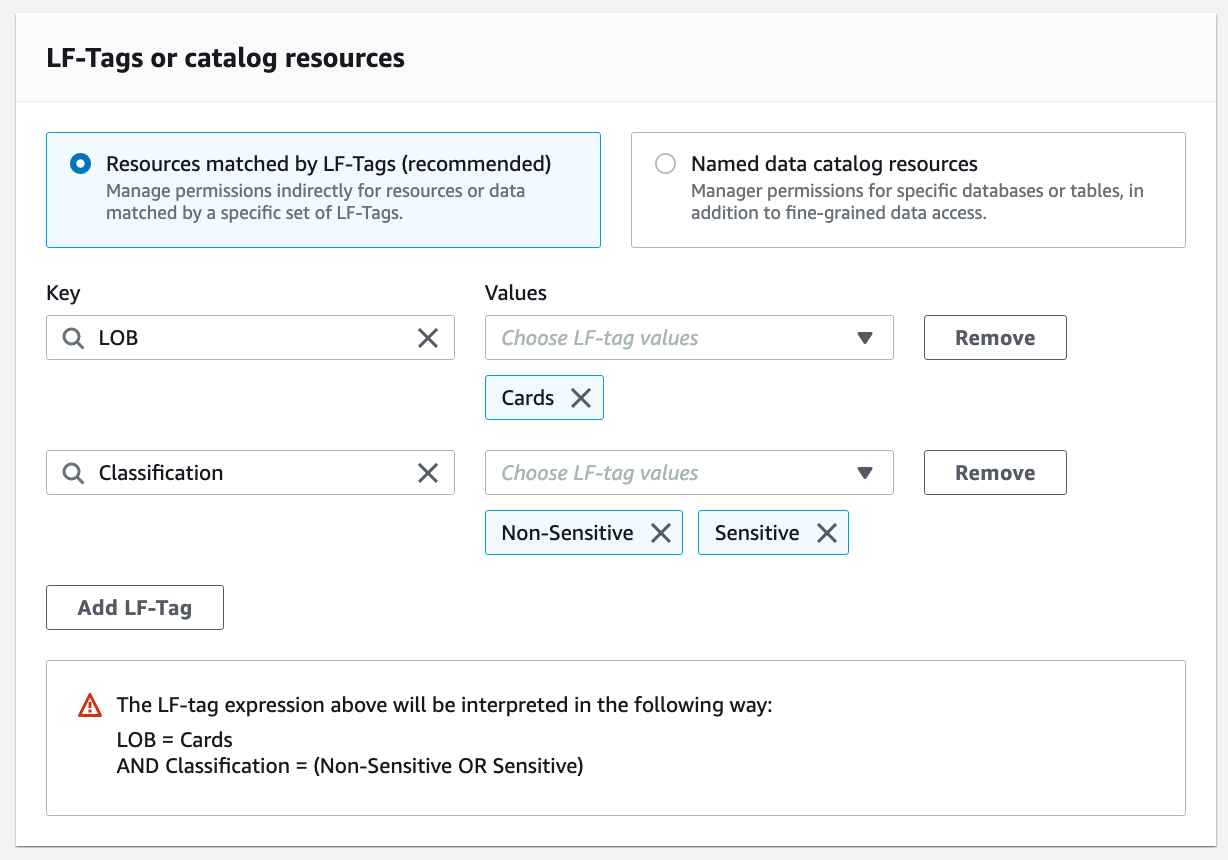
For LF-tags or catalog resources, select Resources matched by LF-Tags (recommended).
Choose Add LF-Tag.
For Key, choose "LOB" and for Values, choose "Cards".
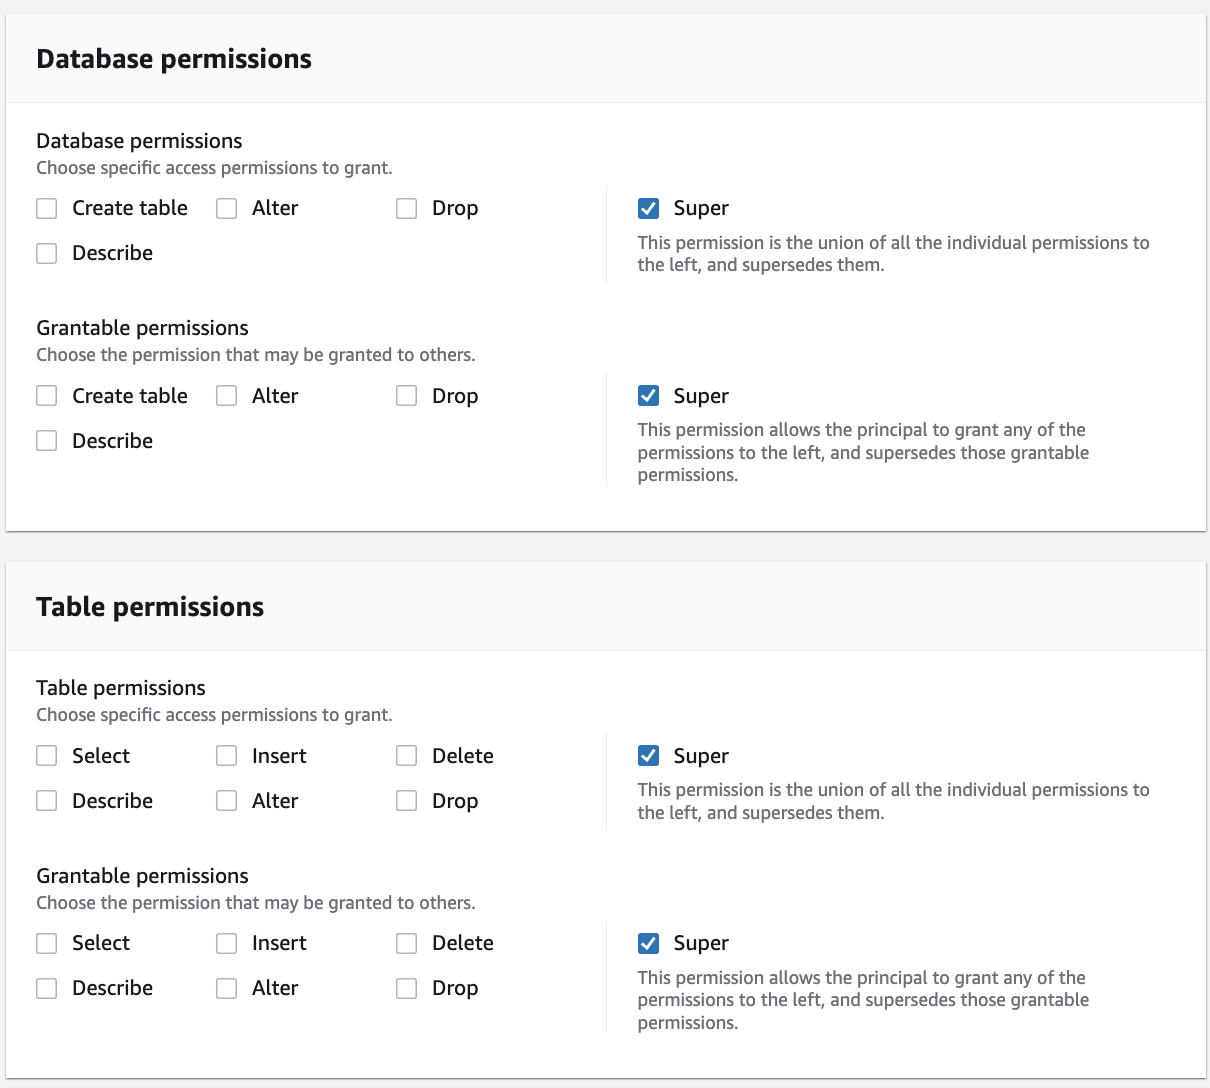
For Database permissions, select the "Super" permission because ProducerSteward owns the producer databases.
This permission allows a principal to perform every supported Lake Formation operation on the database. Use this admin permission when a principal is trusted with all operations.
Select "Super" under Grantable permissions so the ProducerSteward user can grant database-level permissions to the producer and consumer accounts.
For Table permissions, select "Super".
Select "Super" permission under Grantable permissions.

Click Grant.
Repeat these steps for key LOB and value Retail.
In the navigation pane, under Permissions, Data lake permissions, choose Grant.
For Principals, choose IAM users and roles, and choose ProducerSteward.
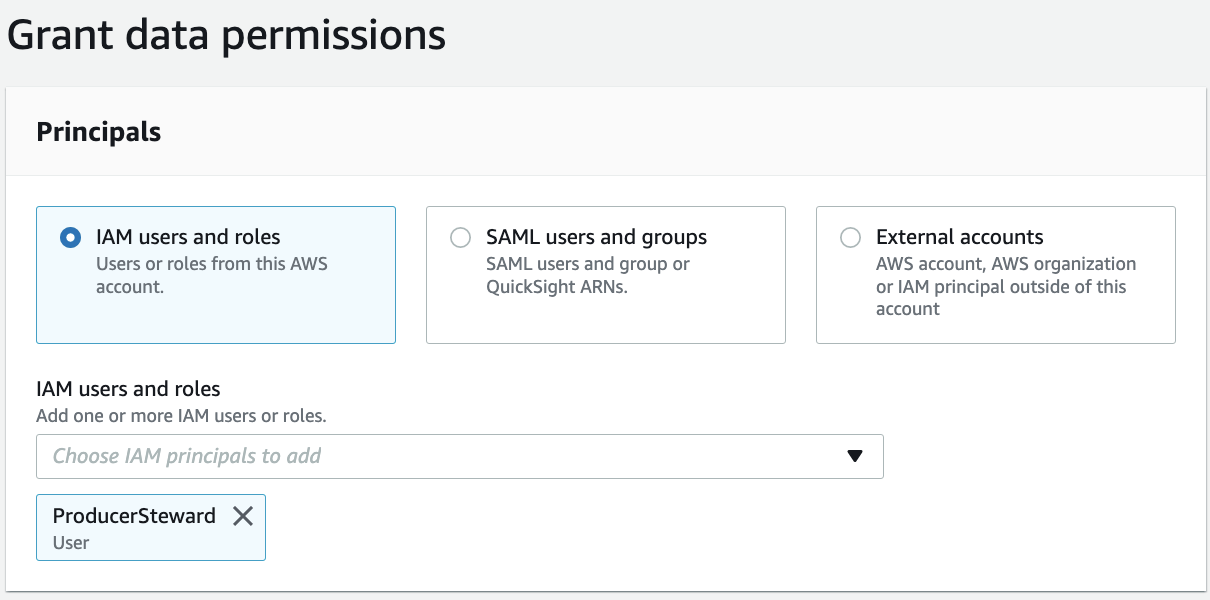
For LF-tags or catalog resources, select Resources matched by LF-Tags (recommended).
Add the key LOB with value Cards, and the key Classification with values Sensitive and Non-Sensitive.
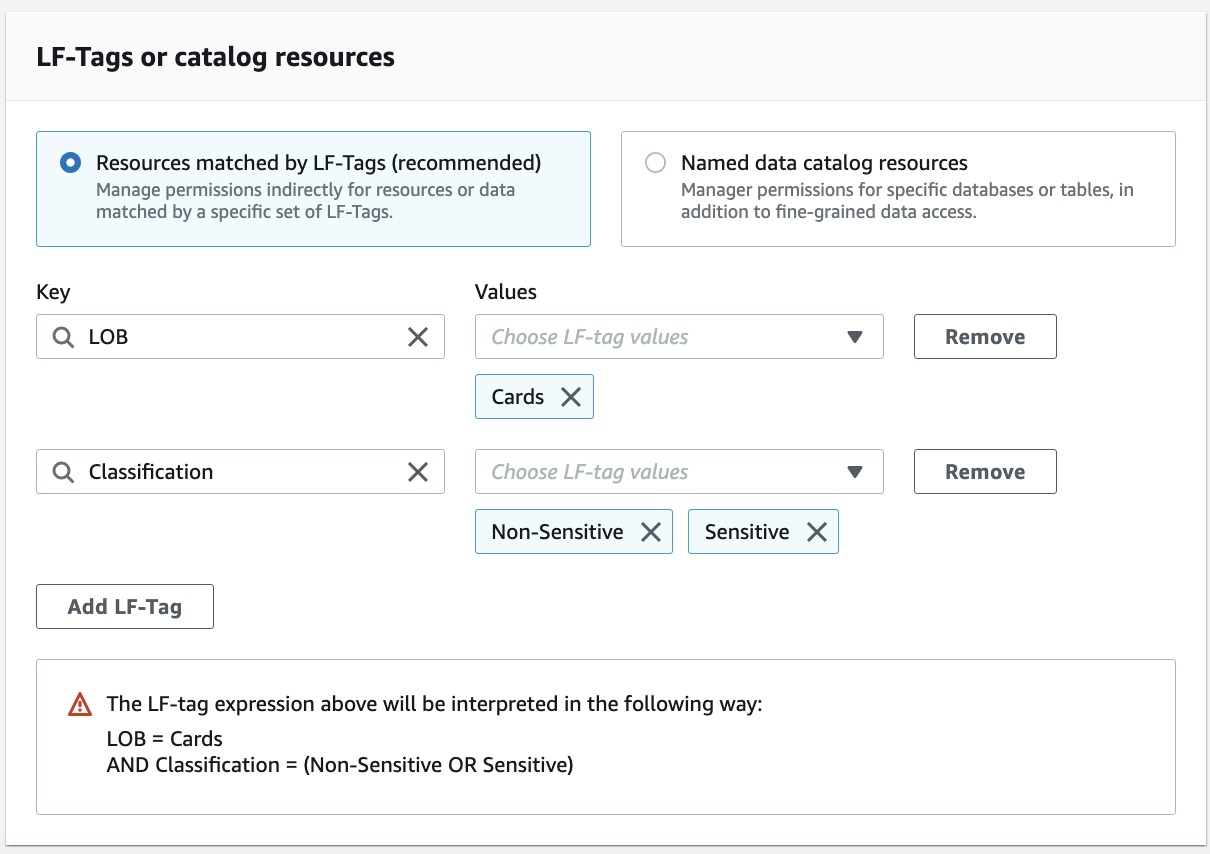
For Database permissions, select Super. Select Super permission under Grantable permissions. For Table permissions, select Super. Select Super under Grantable permissions.
Click Grant.
This gives ProducerSteward fine-grained permission expression on columns with either Sensitive or Non-sensitive tags.
Repeat these steps for key "LOB" and value "Retail", and key "LOB:Retail" and value "Reviews" or "Customer".
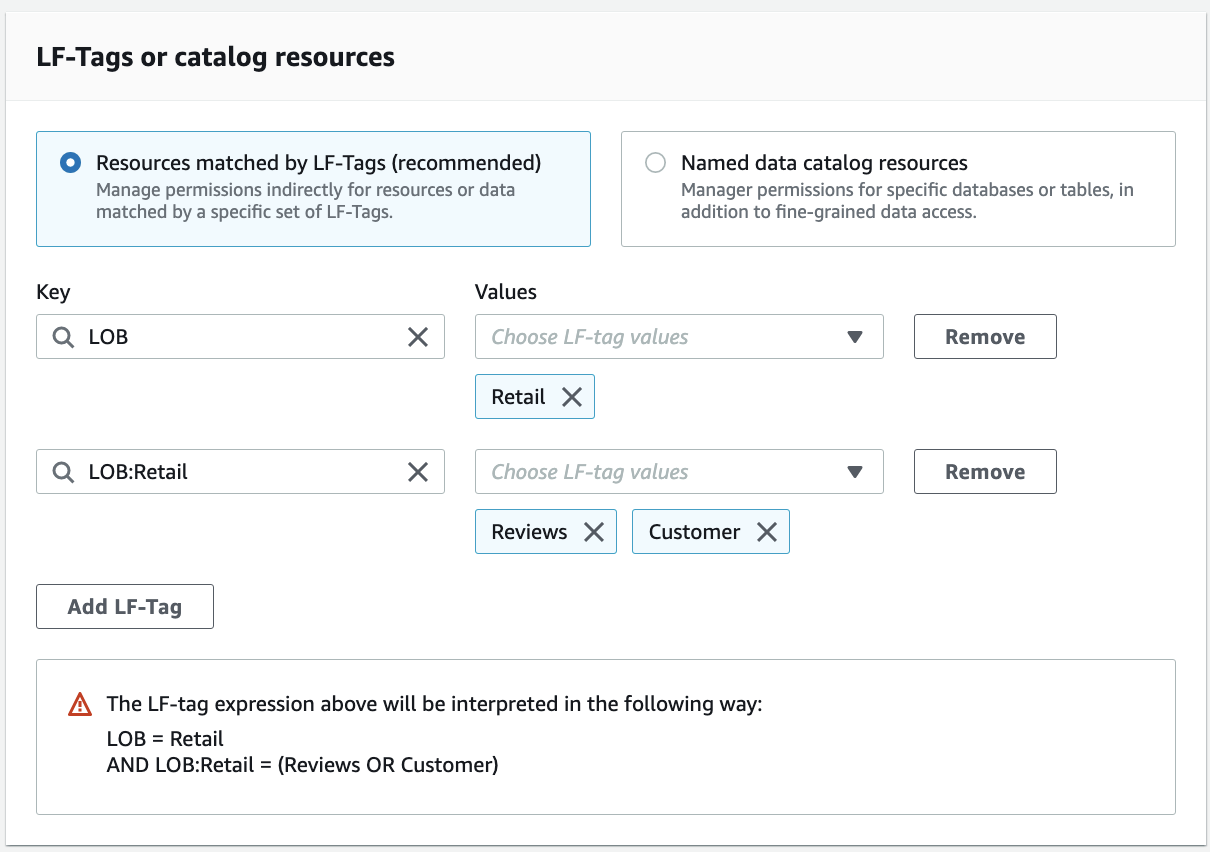
This gives ProducerSteward fine-grained permission expression on tables with either Reviews or Customer tags.
Producer data steward actions in the central account
Log in as the ProducerSteward user in the central account and create skeleton databases.
Sign in to the Lake Formation console as ProducerSteward.
In the navigation pane, under Data catalog, select Databases.
Choose the cards database.
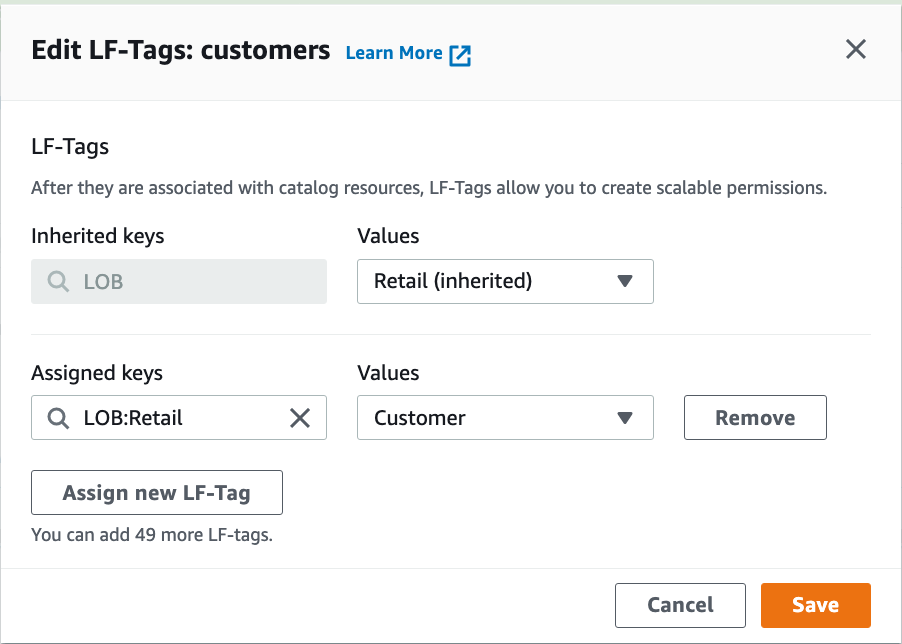
On the Actions menu, choose Edit LF-tags.
Choose Assign new LF-tag.
For Assigned Keys, enter "LOB" and for Values, choose "Cards".
Click Save.
This assigns the LOB=Cards tag to the Cards database.
Repeat these steps for Retail database, i.e., "retail", and assign the LOB=Retail tag to the retail database.
Next, share the LF-tags and data lake permissions with the producer account so that ProducerSteward in the producer account can run AWS Glue crawlers and generate tables in the preceding skeleton databases.
Under Permissions in the navigation pane, under Administrative roles and tasks, choose LF-tag permissions. Choose Grant.
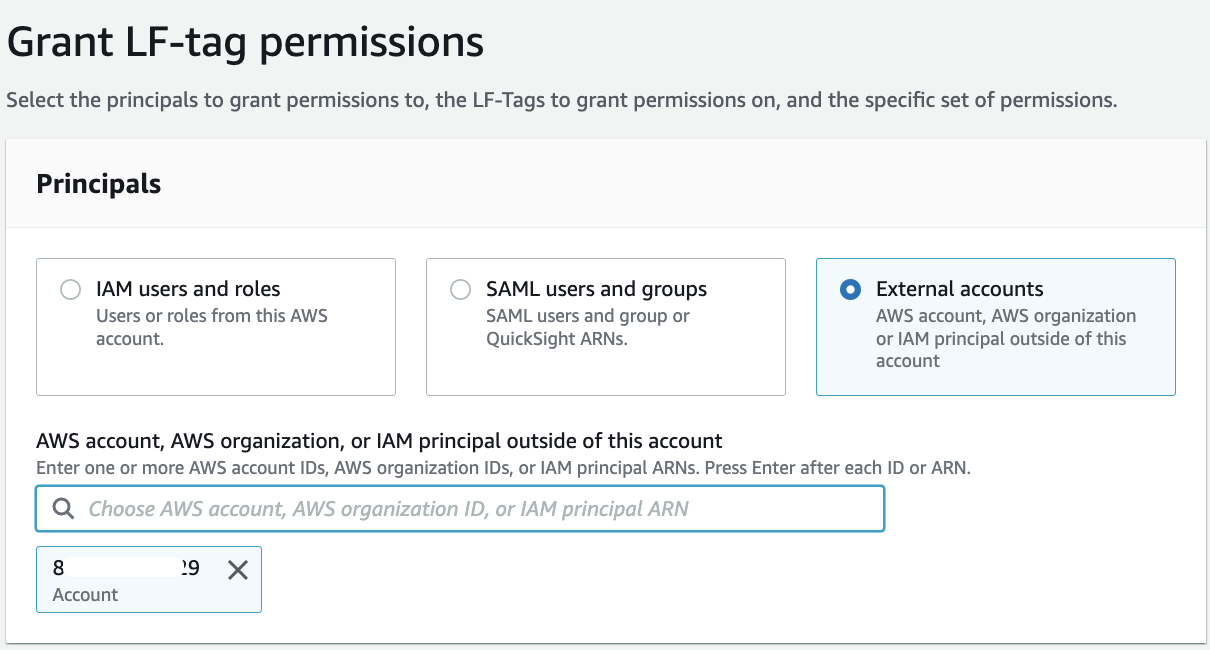
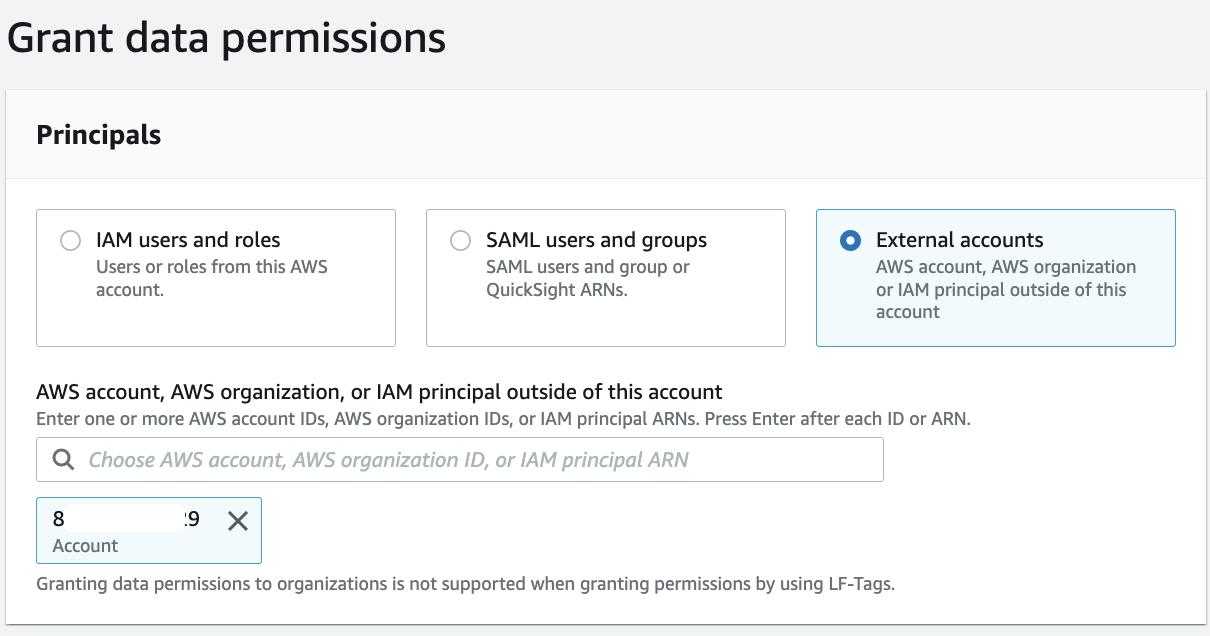
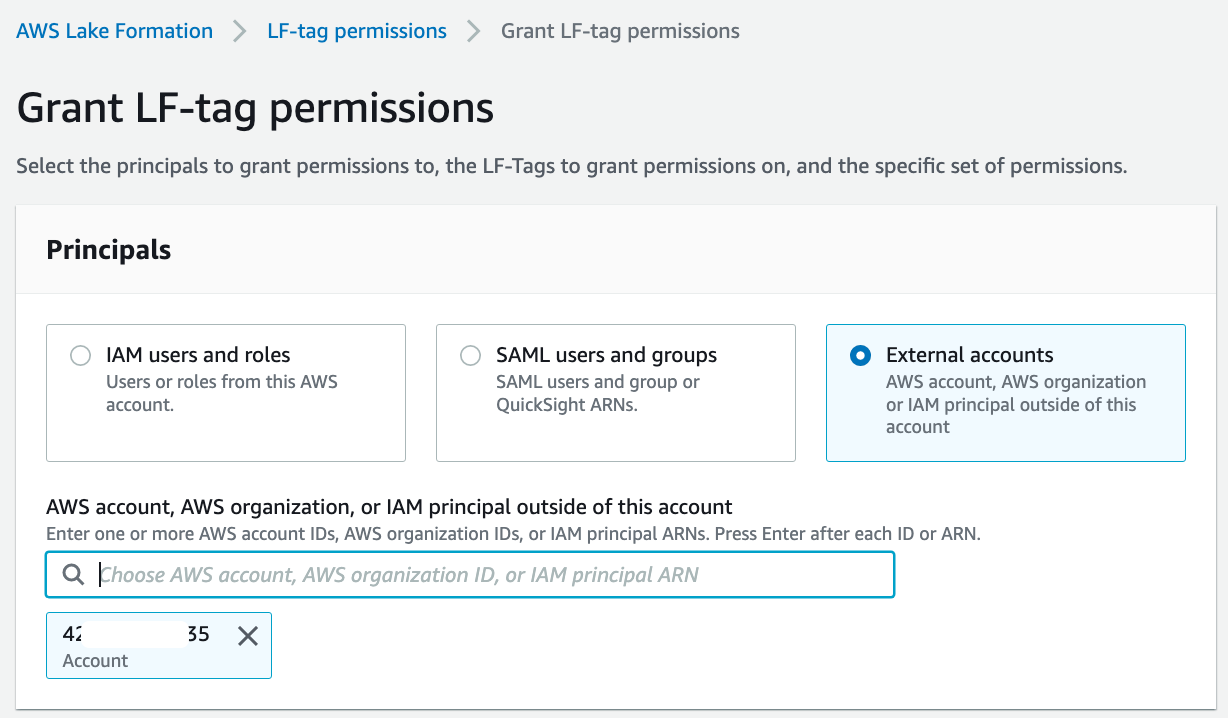
For Principals, select External accounts.
For AWS account or AWS organization, enter the account ID for the producer account.
In the LF-Tags section, we only need to add database-level tags. For Key, enter "LOB", and for Values, choose "Retail" and "Cards".
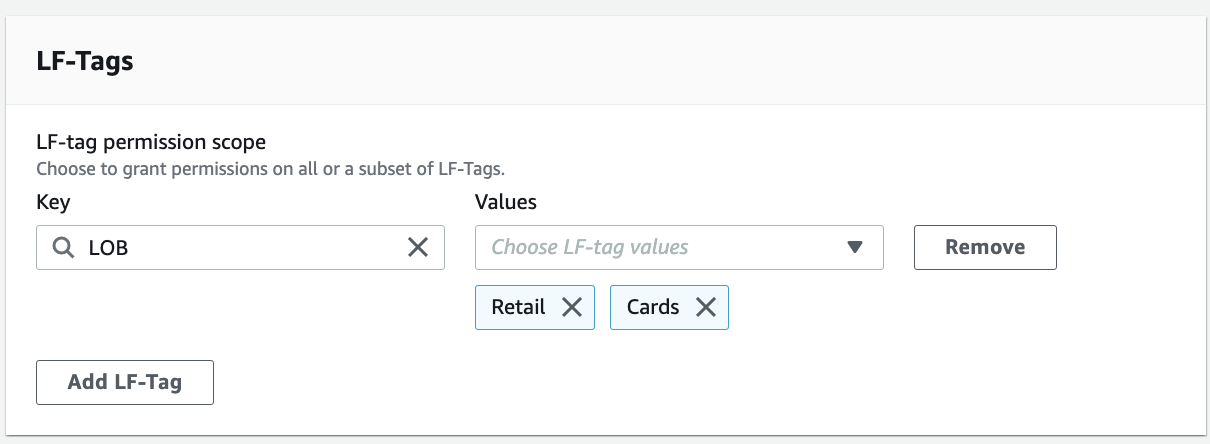
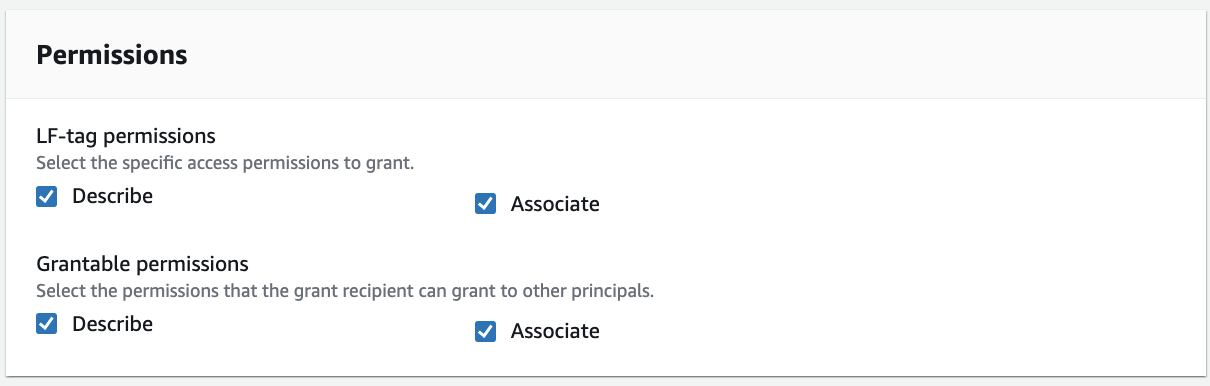
For Permissions, choose Describe and Associate for both LF-tag permissions and Grantable permissions.
Choose Grant.
In the navigation pane, under Permissions, Data lake permissions, choose Grant.
For Principals, select External accounts. For AWS account or AWS organization, enter the account ID for the producer account.
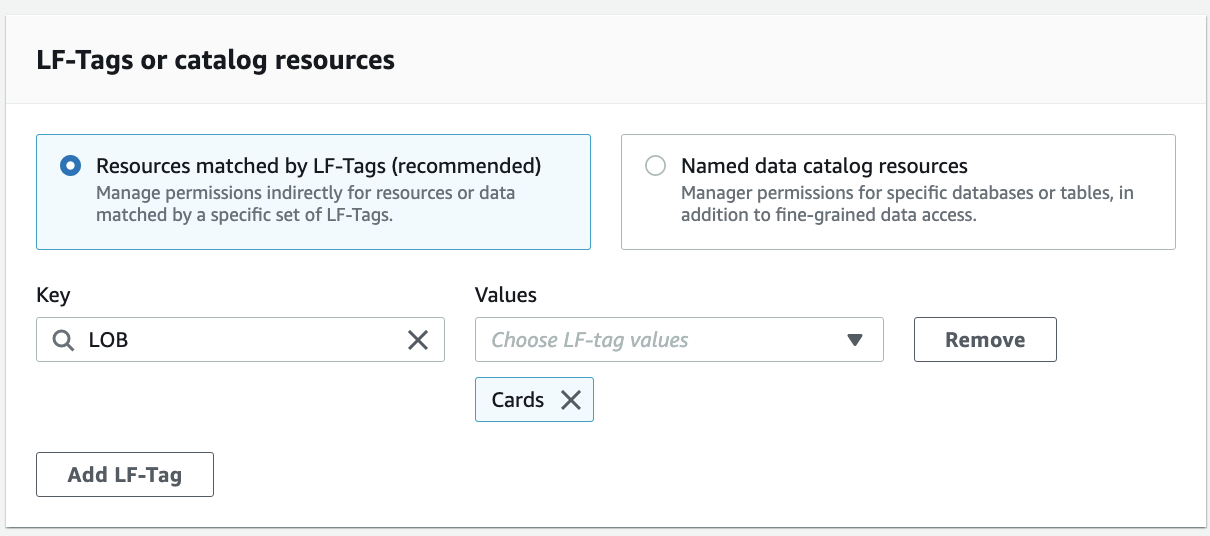
For LF-tags or catalog resources, select Resources matched by LF-Tags (recommended). Choose Add LF-Tag. Choose the key LOB and value Cards.
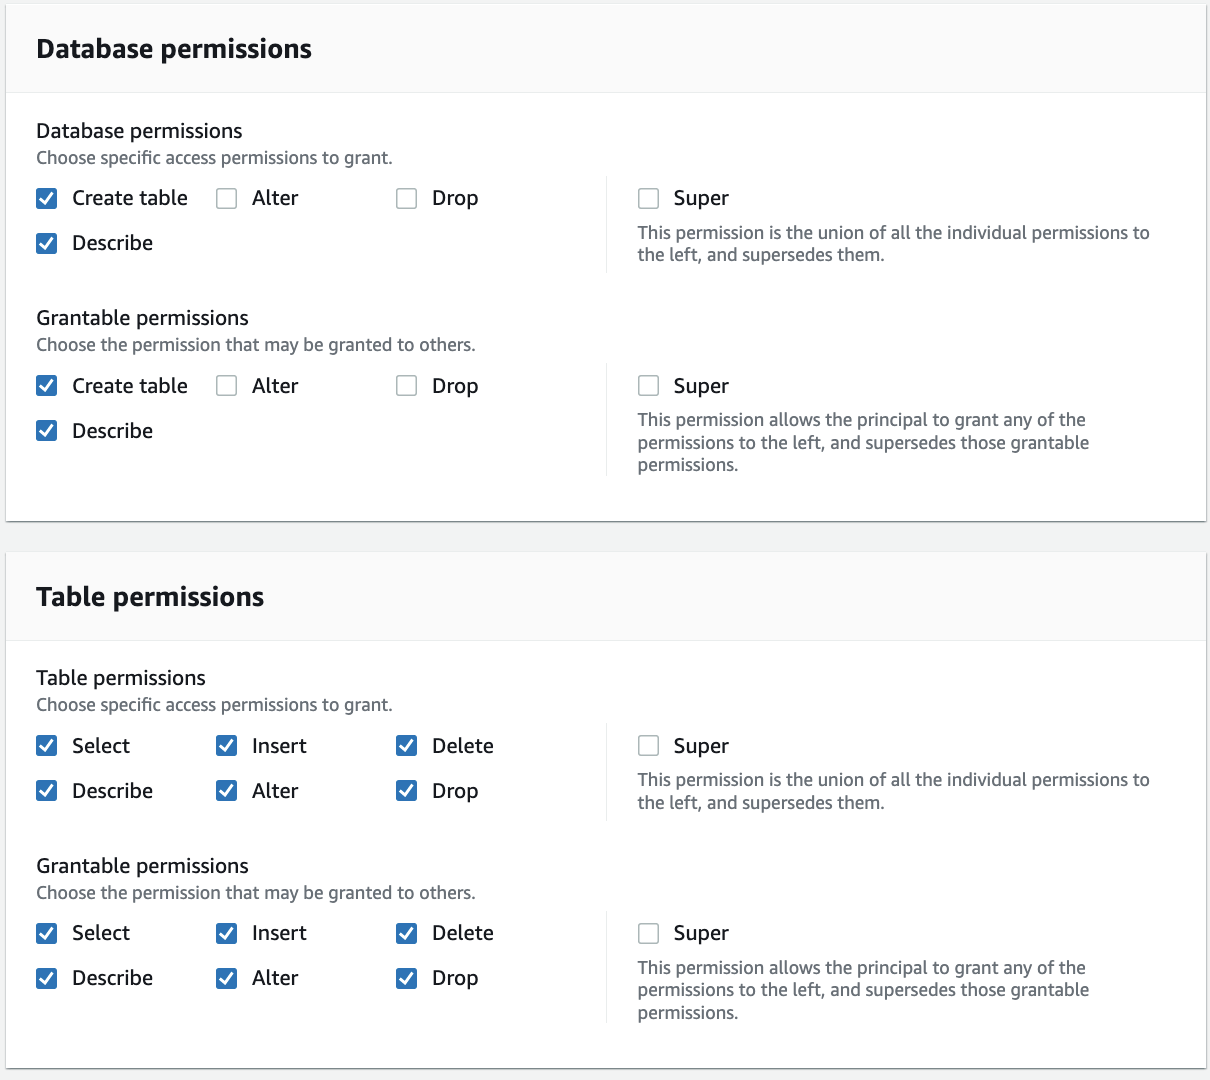
For Database permissions, select Create table and Describe because the ProducerSteward user in the producer account will add tables in the database. Select Create table and Describe under Grantable permissions so the ProducerSteward user can further grant the permission to the AWS Glue crawler. For Table permissions, select all the permissions. Select all the permissions under Grantable permissions.
Click Grant.
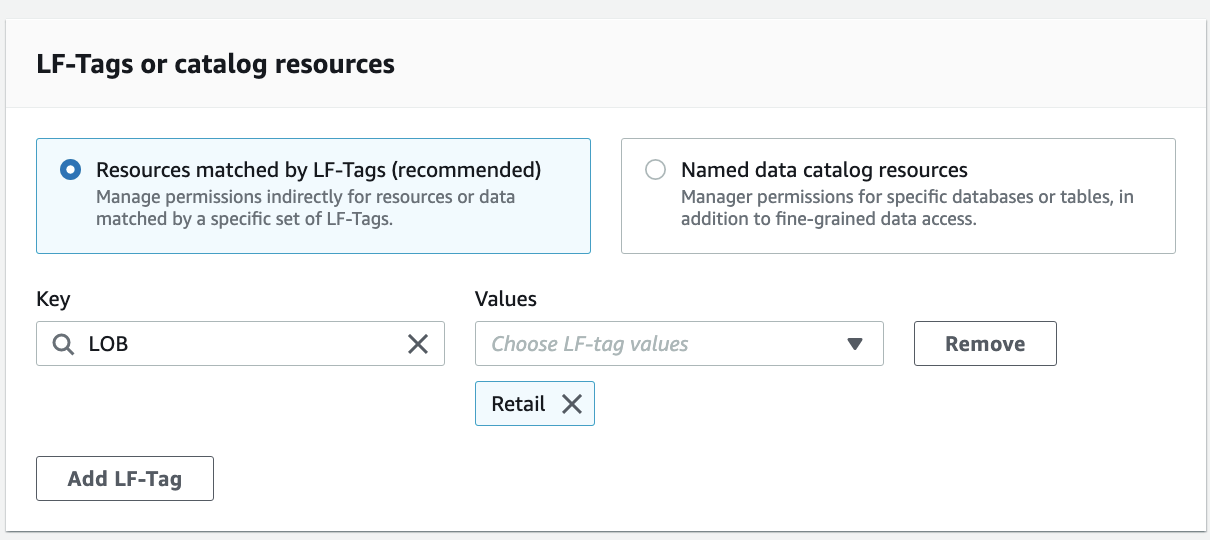
Repeat these steps for LOB=Retail.
Now the Lake Formation administrators on the producer account side has the right permissions to add tables.
使用有权限的用户登陆producer account
进入RAM Console,接受从central account过来的sharing request。
Crawl source tables in the producer account
Log in as the ProducerSteward user in the producer account to crawl the source tables for the Cards and Retail databases.
Sign in to the Lake Formation console as ProducerSteward.
In the navigation pane, under Administrative roles and tasks, verify that ProducerSteward is configured as the data lake administrator.
In the navigation pane, under Permissions, then choose Administrative roles and tasks, choose LF-Tags.
You can verify the root-level LOB tags that were shared with the producer account.
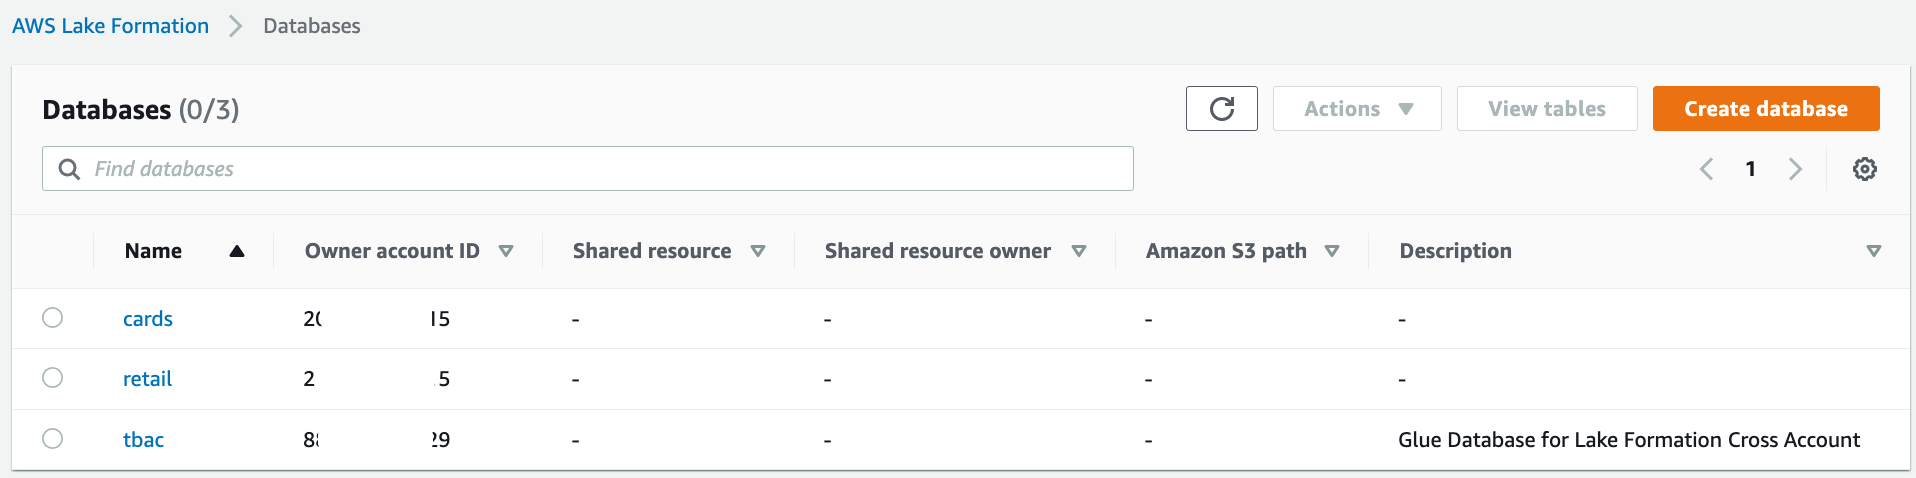
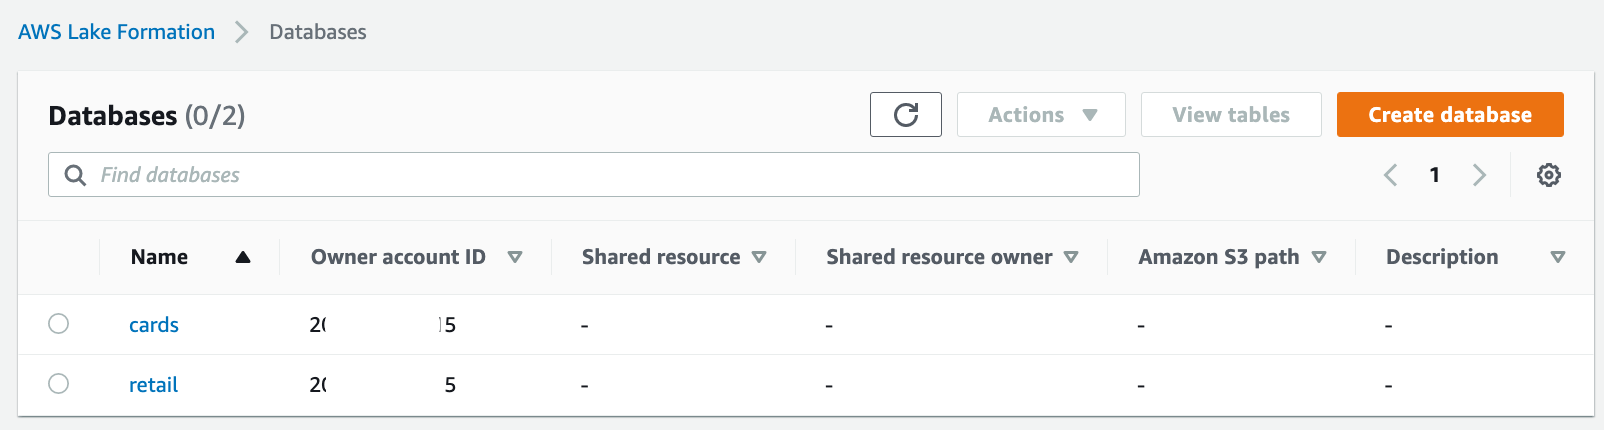
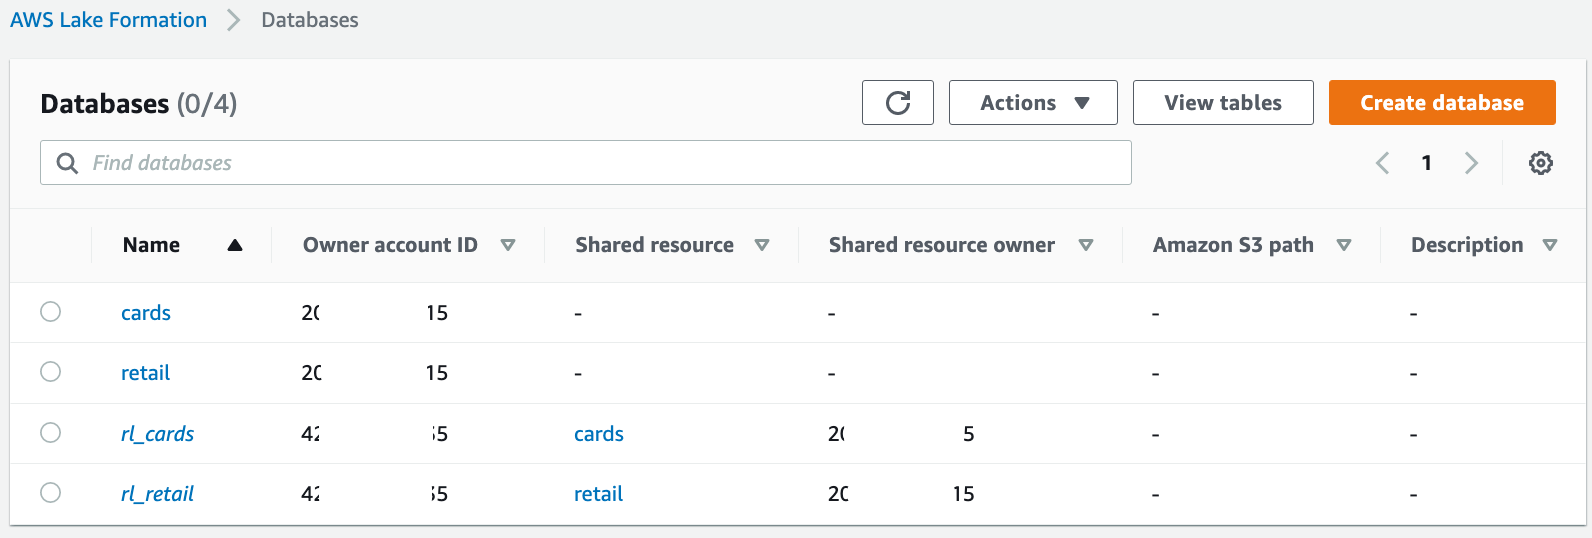
In the navigation pane, under Data catalog, select Databases. Verify the two databases, i.e., "cards" and "retail" that were shared with the producer account from the previous step.
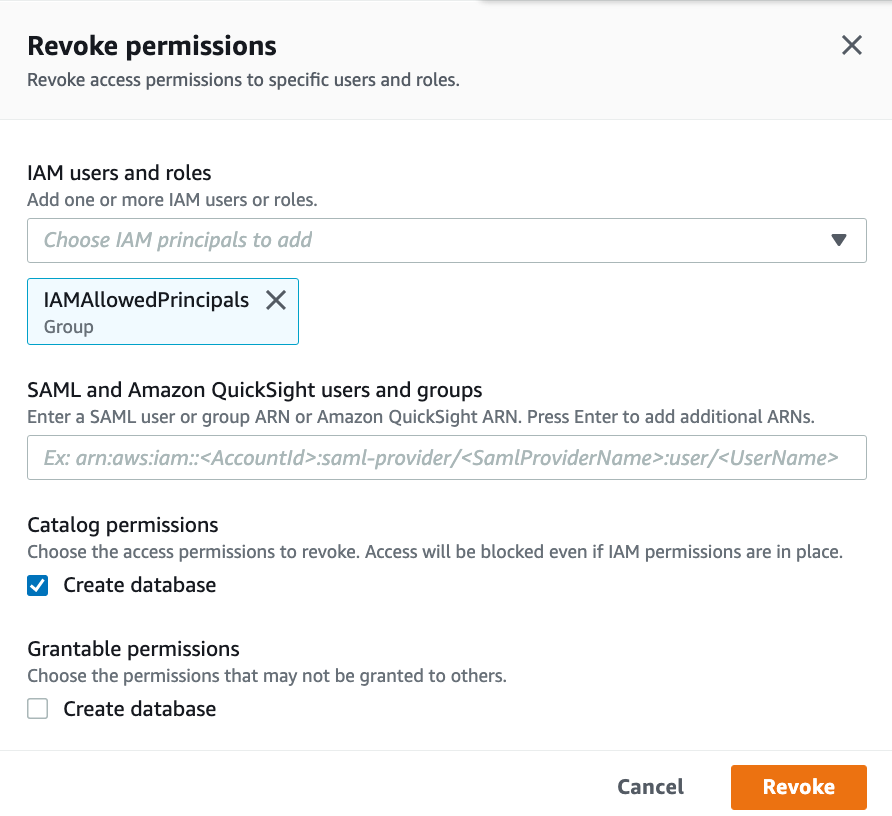
如果遇到下面报错,通过Revoke "IAMAllowedPrincipals" permission可以解决。
Create resource links in the producer account for these two databases. These links point at the shared databases and are used by AWS Glue crawler to create the tables.
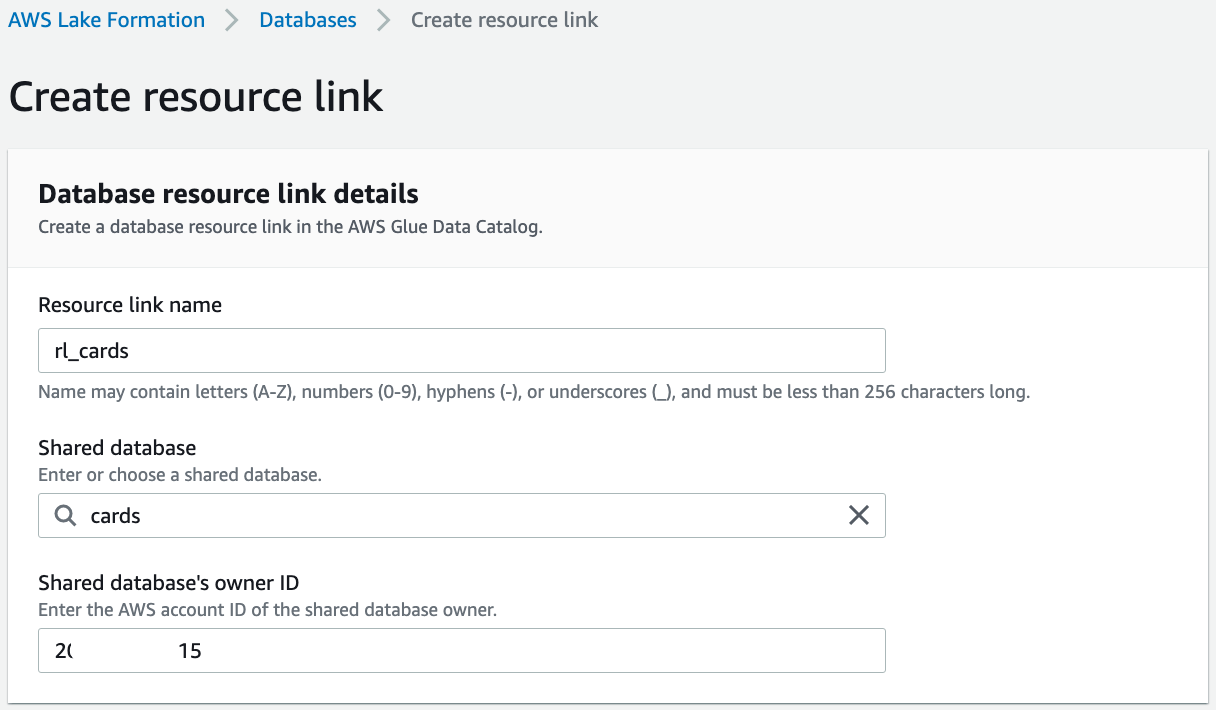
First, create a resource link for the cards database.
Select the cards database and on the Actions menu, choose Create resource link.
For Resource link name, enter "rl_cards".
Click Create.
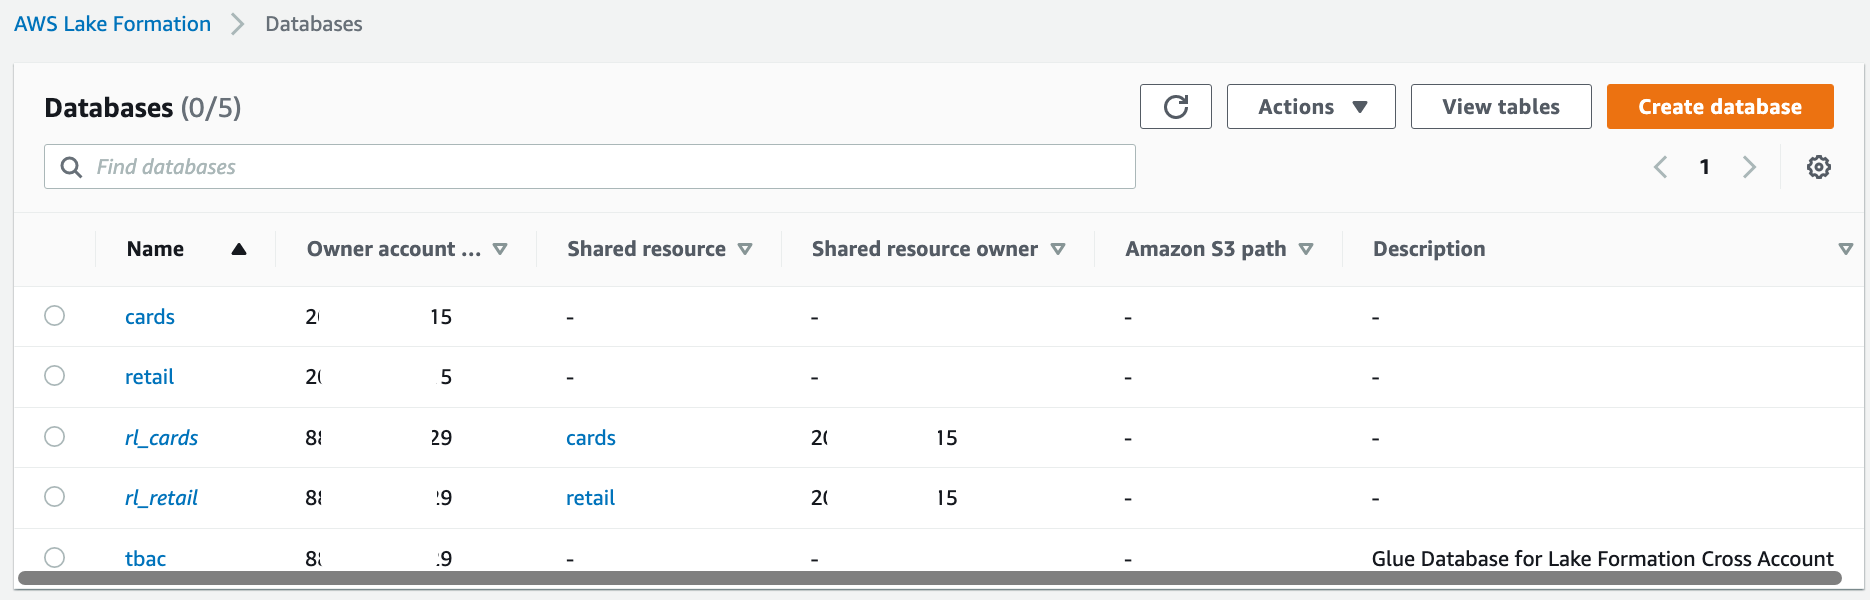
Repeat these steps to create a resource link for the retail database. For Resource link name, enter "rl_retail".
After the resource link creation, you should see both the resource link databases as shown in the following screenshot.
Next, grant permissions to the AWS Glue crawler role so that the crawler can crawl the source bucket and create the tables.
Select the rl_cards database and on the Actions menu, choose Grant.
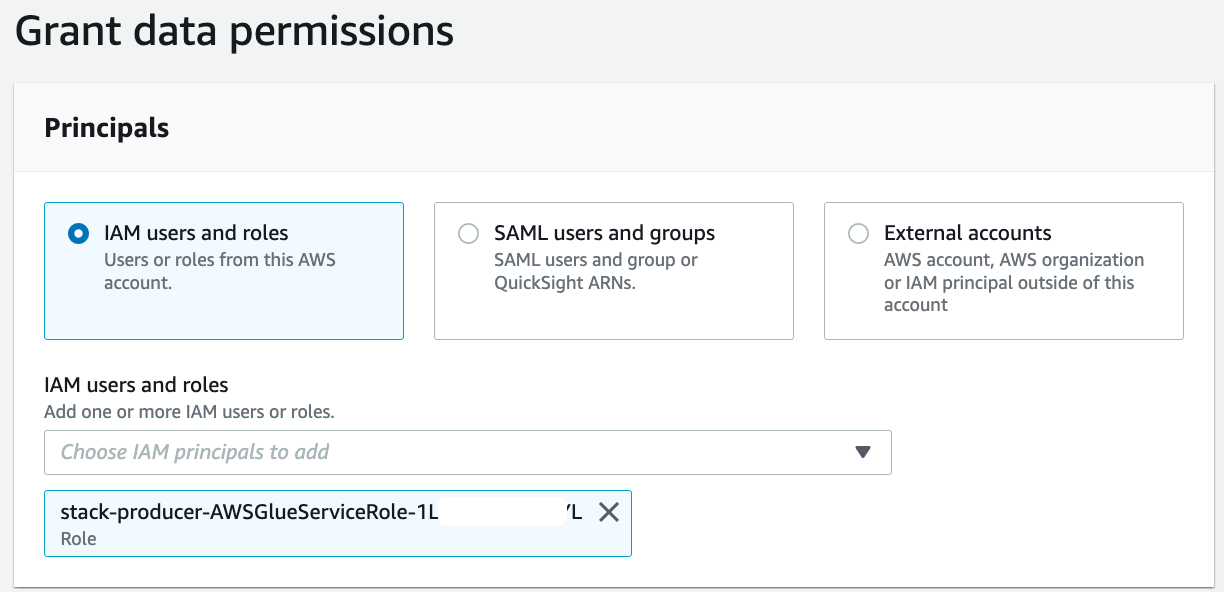
In the Grant data permissions section, select IAM users and roles, and choose the AWS Glue crawler role that was created by the CloudFormation template (for example, stack-producer-AWSGlueServiceRoleDefault-xxxxxx).
后来把role name改成“AWSGlueServiceRole-stack-producer”,只是为了TS,因为怀疑role name前缀对Glue Crawler有影响。下文遇到“AWSGlueServiceRole-stack-producer”,或者“stack-producer-AWSGlueServiceRoleDefault-xxxxxx”的文字或截图,其实都是指同一个role。
For Databases, choose rl_cards.
For Resource link permissions, select Describe.
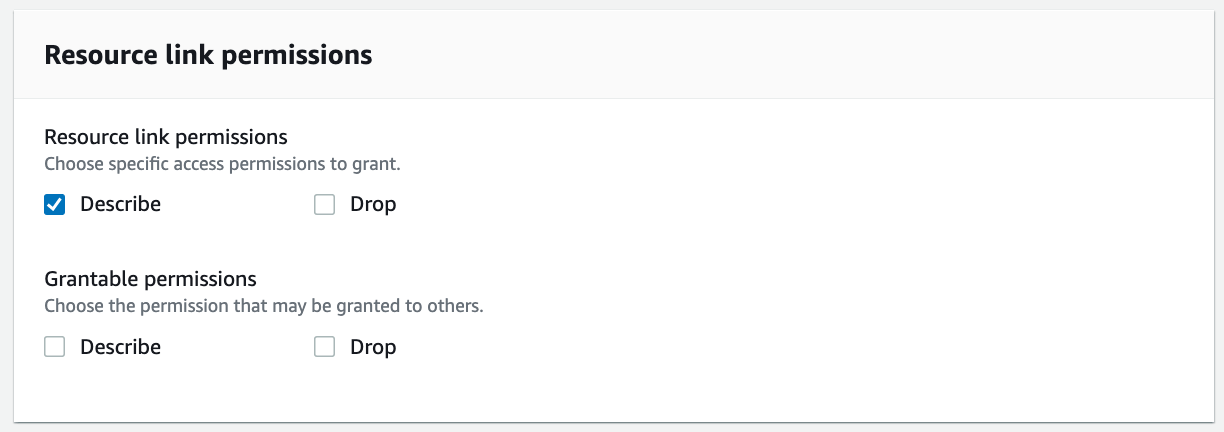
Choose Grant.
Repeat these steps for rl_retail.
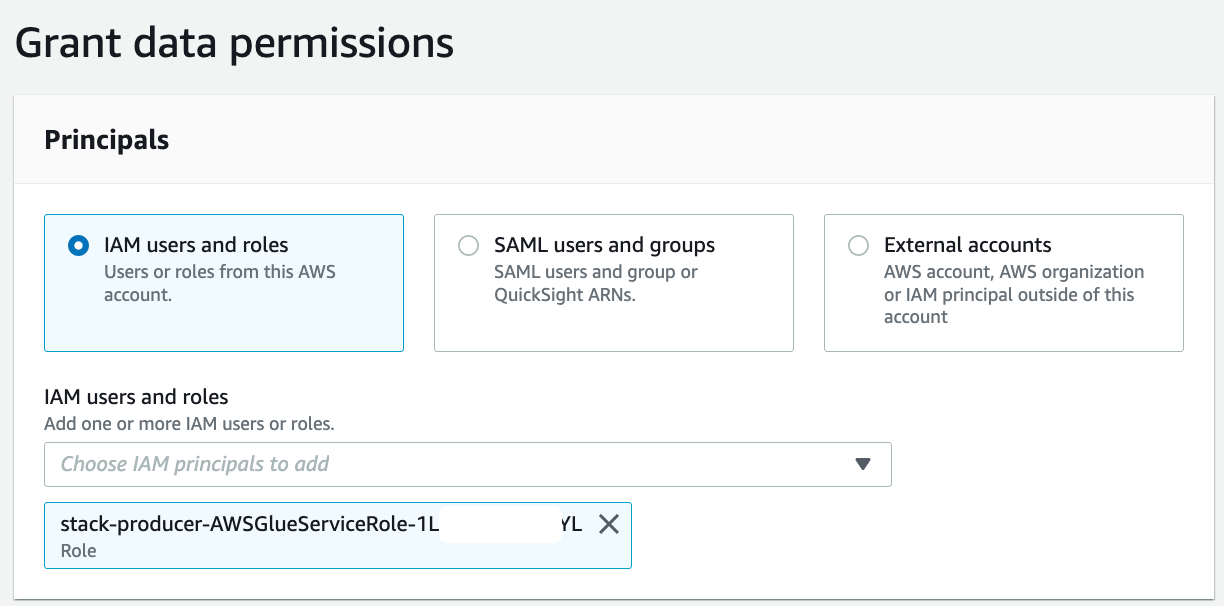
In the navigation pane, choose Data lake permissions and choose Grant. For IAM users and roles, choose the role stack-producer-AWSGlueServiceRoleDefault-XXXX.
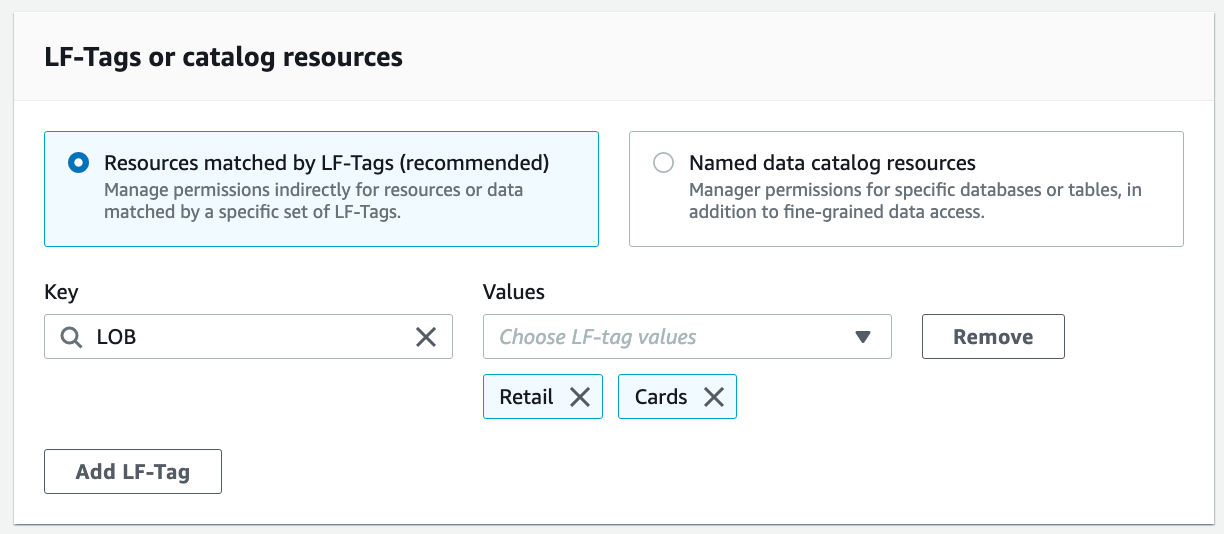
For LF-Tags or catalog resources, select Resources matched by LF-Tags. Enter the key LOB and values Retail and Cards.
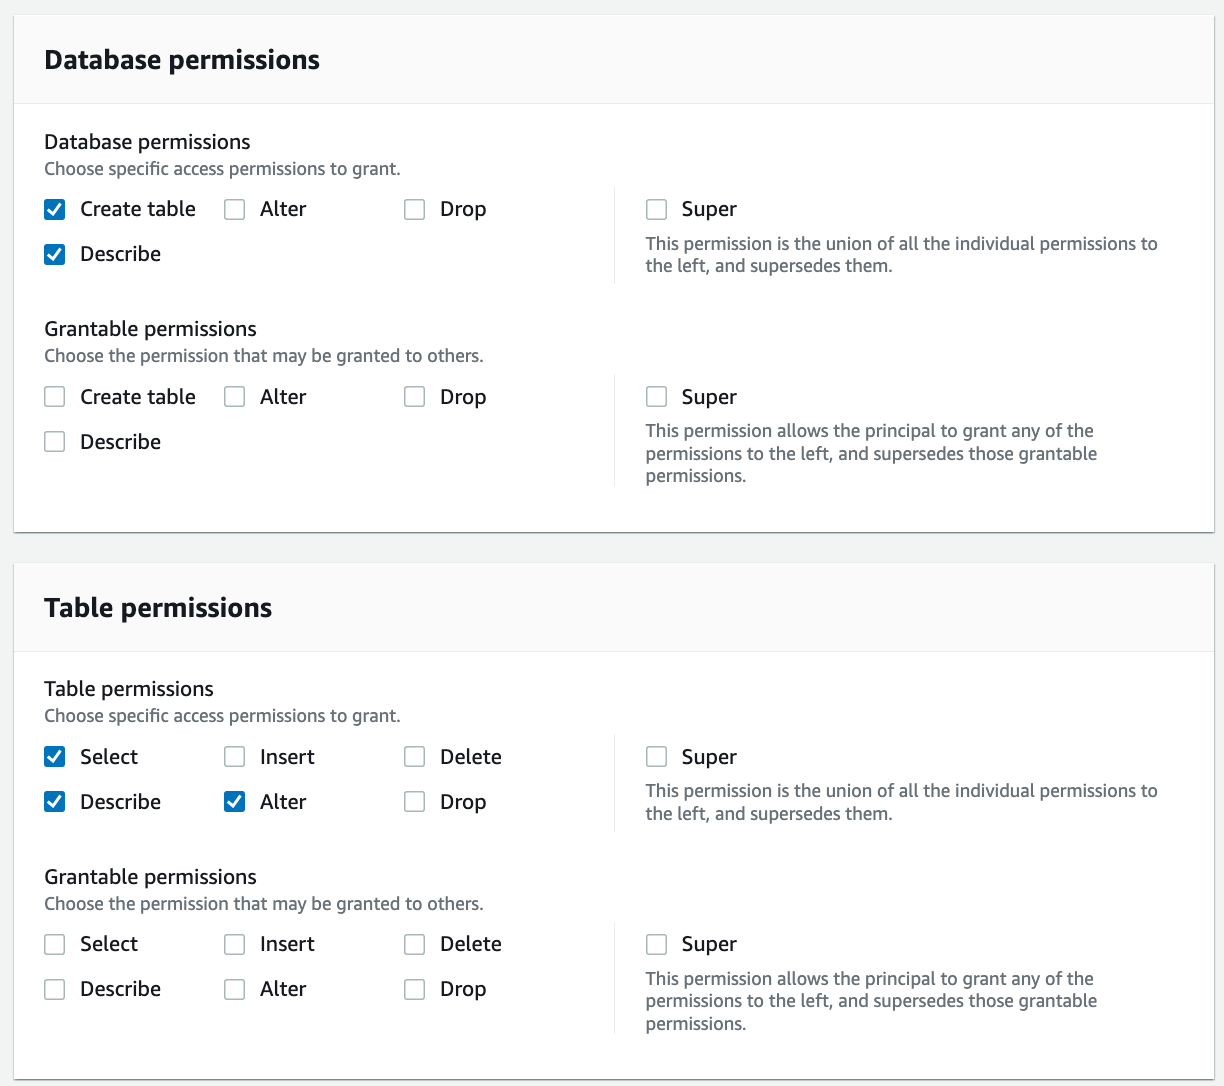
For Database permissions, select Create table and Describe. For Table permissions, choose Select, Describe, and Alter.
Click Grant.
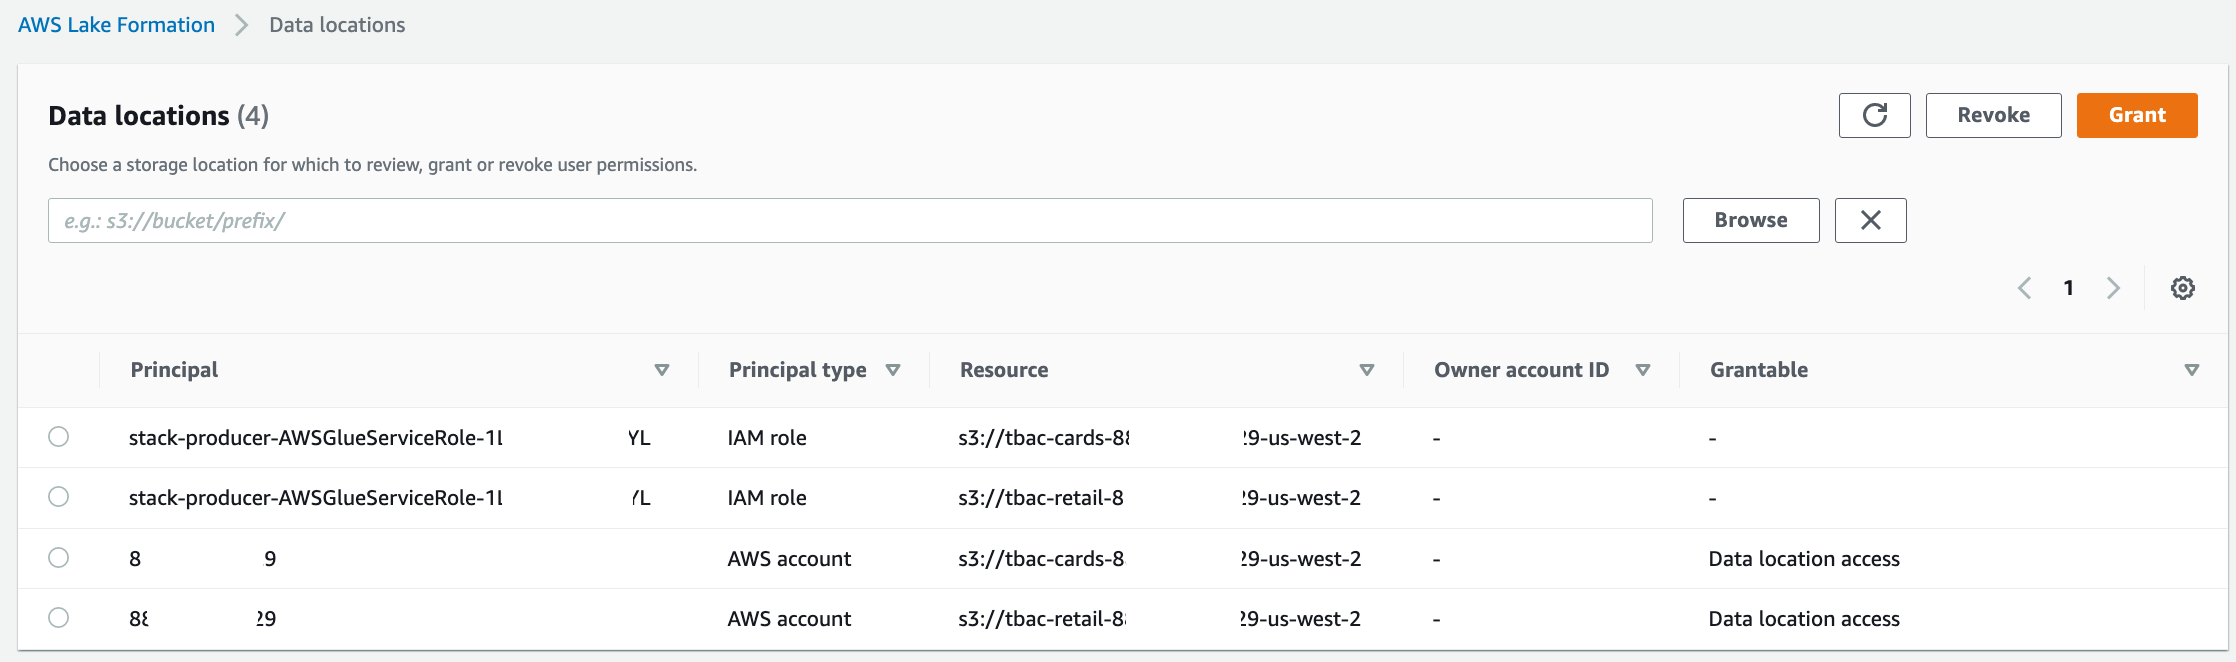
Verify grant permissions on the S3 bucket locations corresponding to cards and retail producers to the AWS Glue crawler role. This is completed by the CloudFormation template.
In the navigation pane, under Permissions, on the Data Locations, you should see the locations.
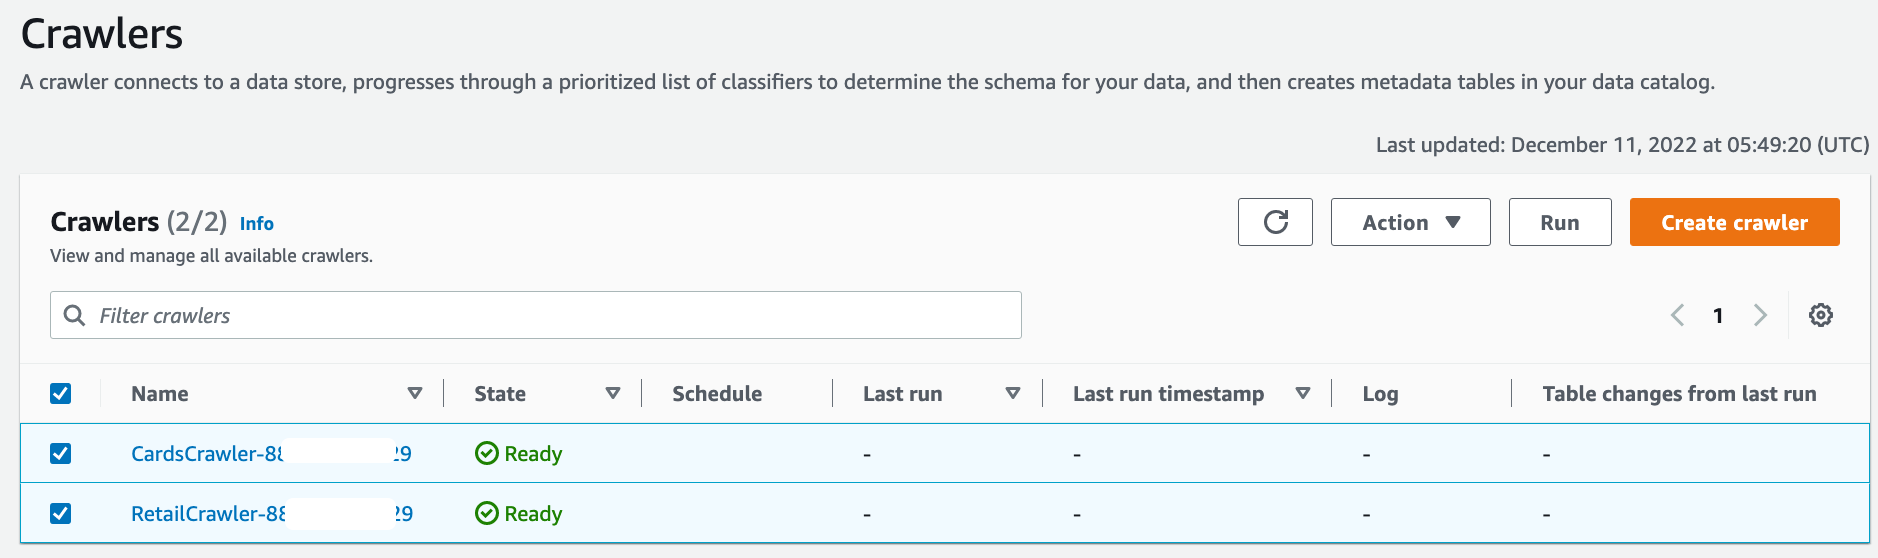
Now we’re ready to run the crawlers. We configure the crawlers that the CloudFormation template created, to point to these resource link databases.
On the AWS Glue console, under Data catalog in the navigation pane, choose Crawlers.
The two crawlers you created should be listed.
Select the crawler for the cards database, i.e., CardsCrawler-xxxxxxxxxxxx, and on the Action menu, choose Edit crawler.
For the input data store, choose the S3 bucket for the cards producer.
For IAM role, choose the AWS Glue service role created by the CloudFormation template.
For Schedule, choose Run on demand.
For the output database, choose the resource link database rl_cards corresponding to the cards database.

Verify all the information and choose Save.
Repeat these steps for the crawler corresponding to the retail producer.
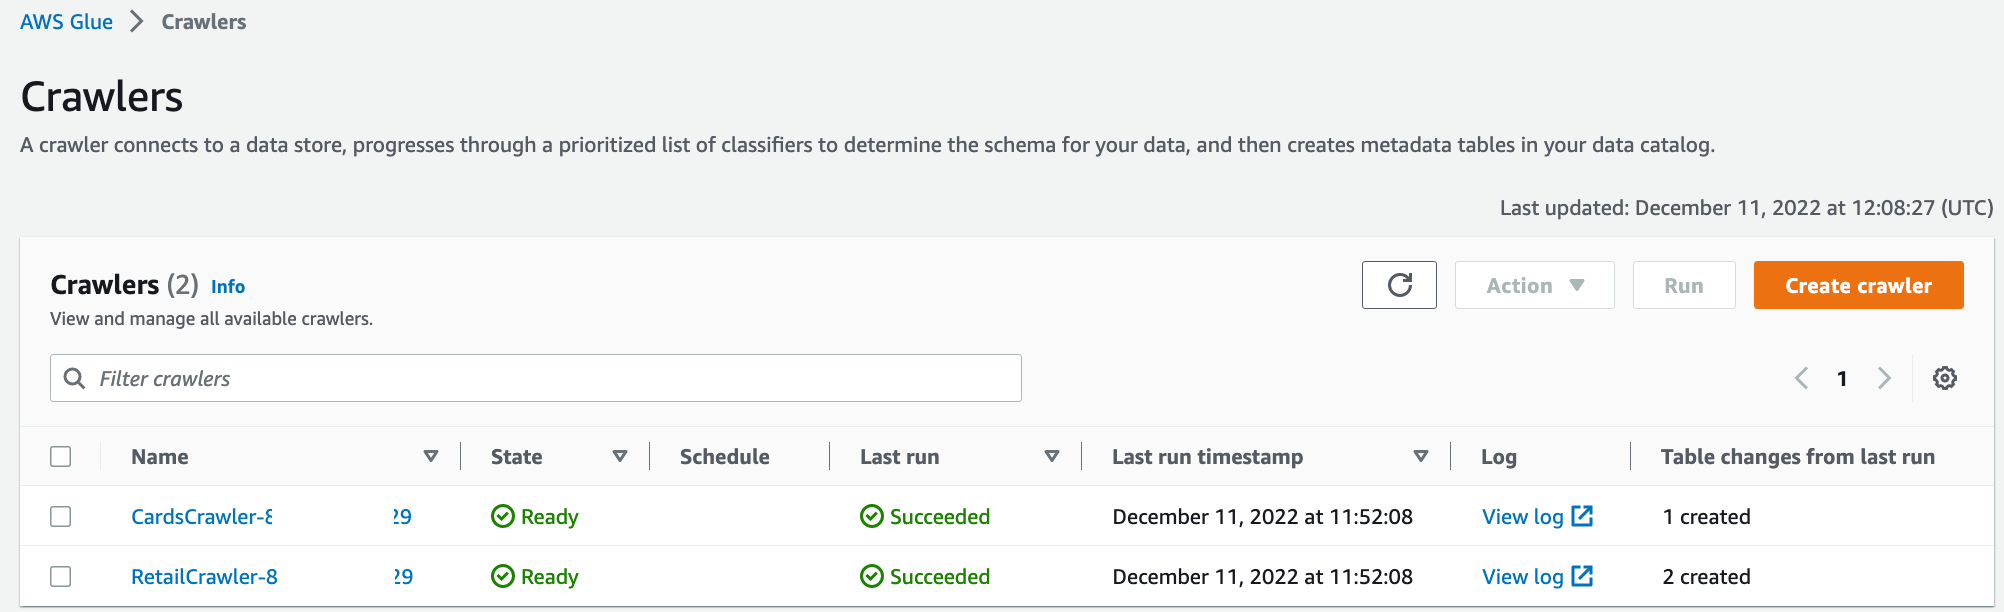
Select both crawlers and choose Run crawler.
When the crawlers finish, they create tables corresponding to each producer in their respective resource link databases. The table schemas are present in the shared database in the central account.
对cards和retail databases,uncheck "Use only IAM access control for new tables in this database".
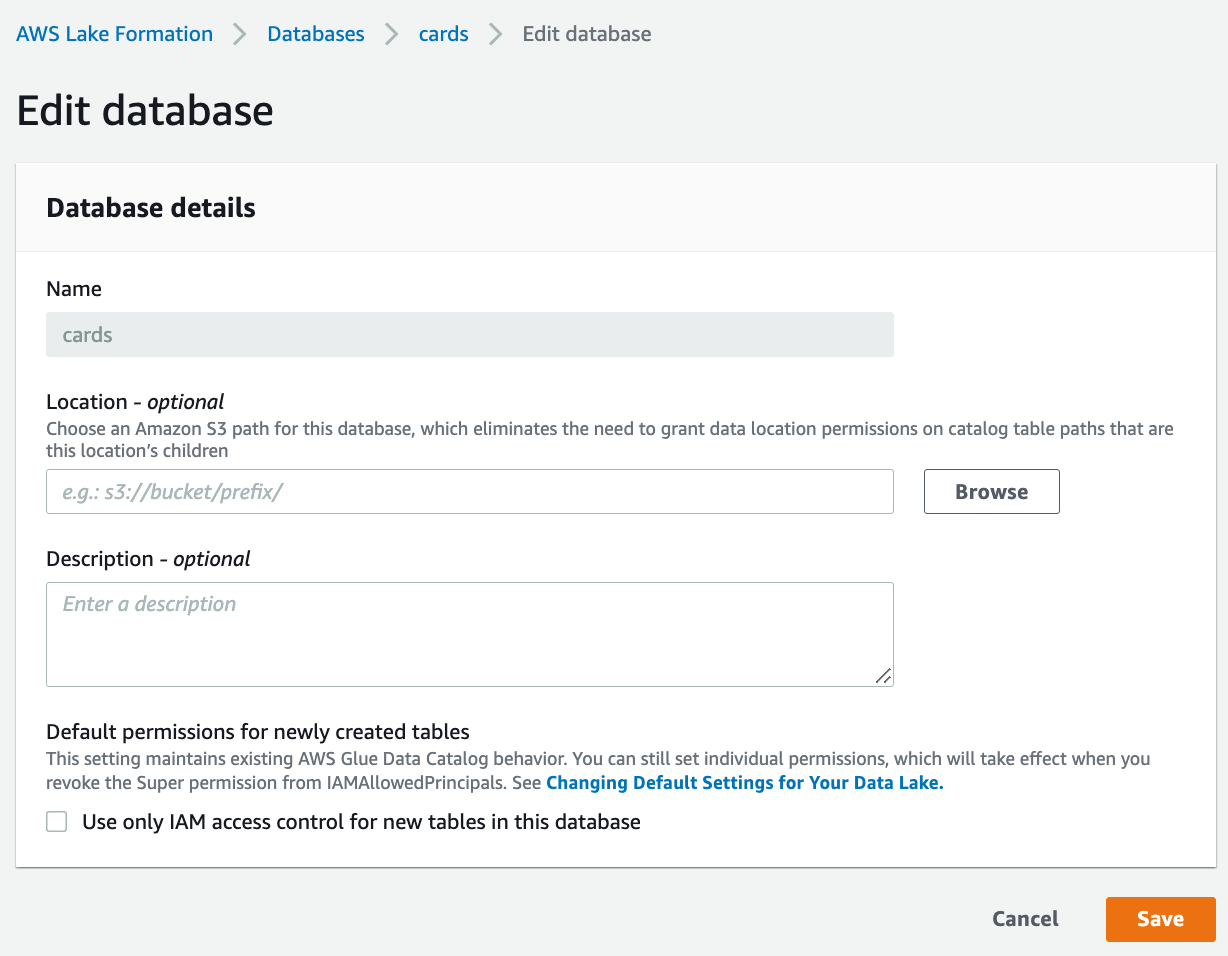

否则会有如下报错
Configure Lake Formation tags in the central account
Perform fine-grained access control for the tables that the crawlers created to support different consumption use cases using Lake Formation tags.
Tag columns
First, we tag sensitive columns in the cards table corresponding to the cards database, first using the Classification tag that we created earlier.
Log in to central account as IAM user ProducerSteward.
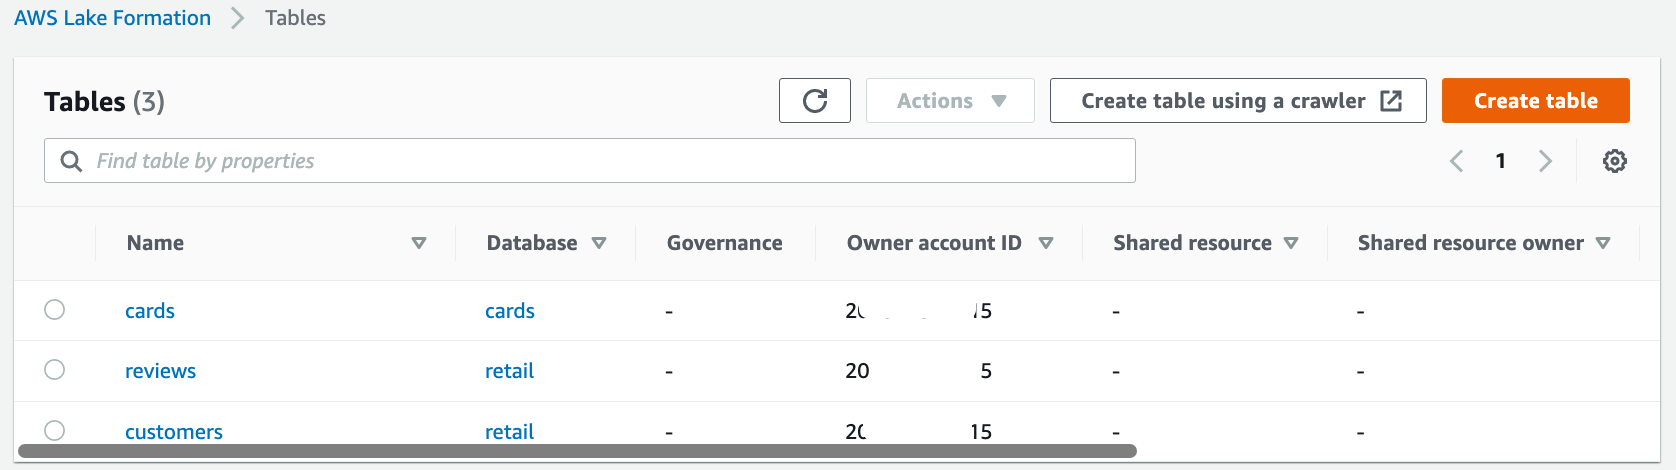
On the Lake Formation console, in the navigation pane, choose Data catalog and then choose Tables.
You should see three tables: the cards table corresponding to cards database, and the reviews and customers tables corresponding to the retail database.
Choose the cards table.
Navigate to the Schema section and choose Edit schema.
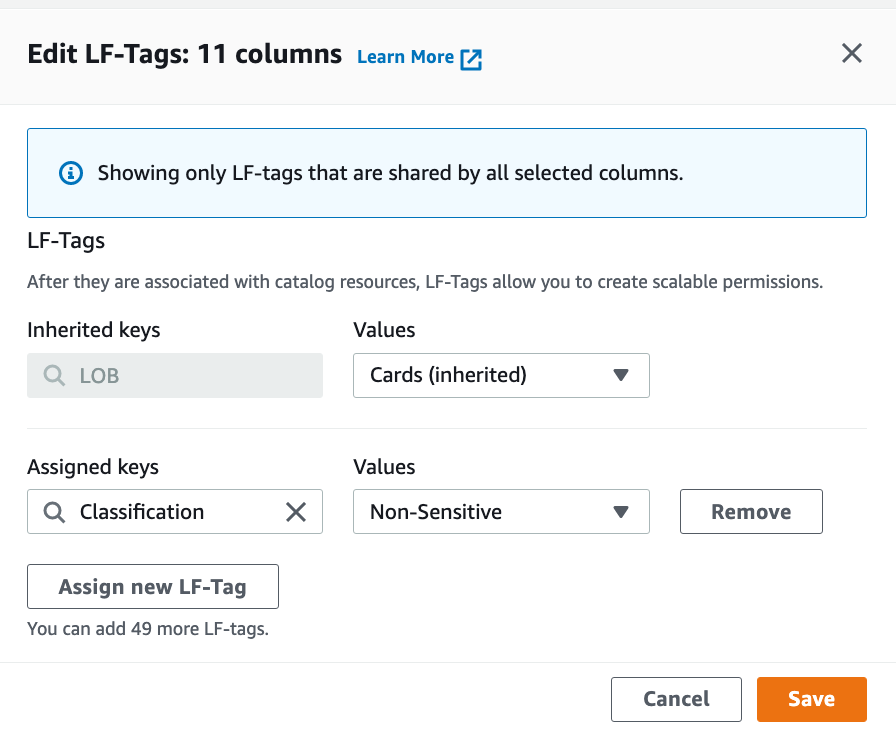
Select all the columns and choose Edit tags.
Choose Assign new LF-Tag.
For Assigned keys, enter Classification and for Values, choose Non-Sensitive.
Choose Save.
Next, we selectively tag the sensitive columns.
In the Edit schema section, select columns card number, card holder’s name, cvv/cvv2, and card pin.
Choose Edit tags.
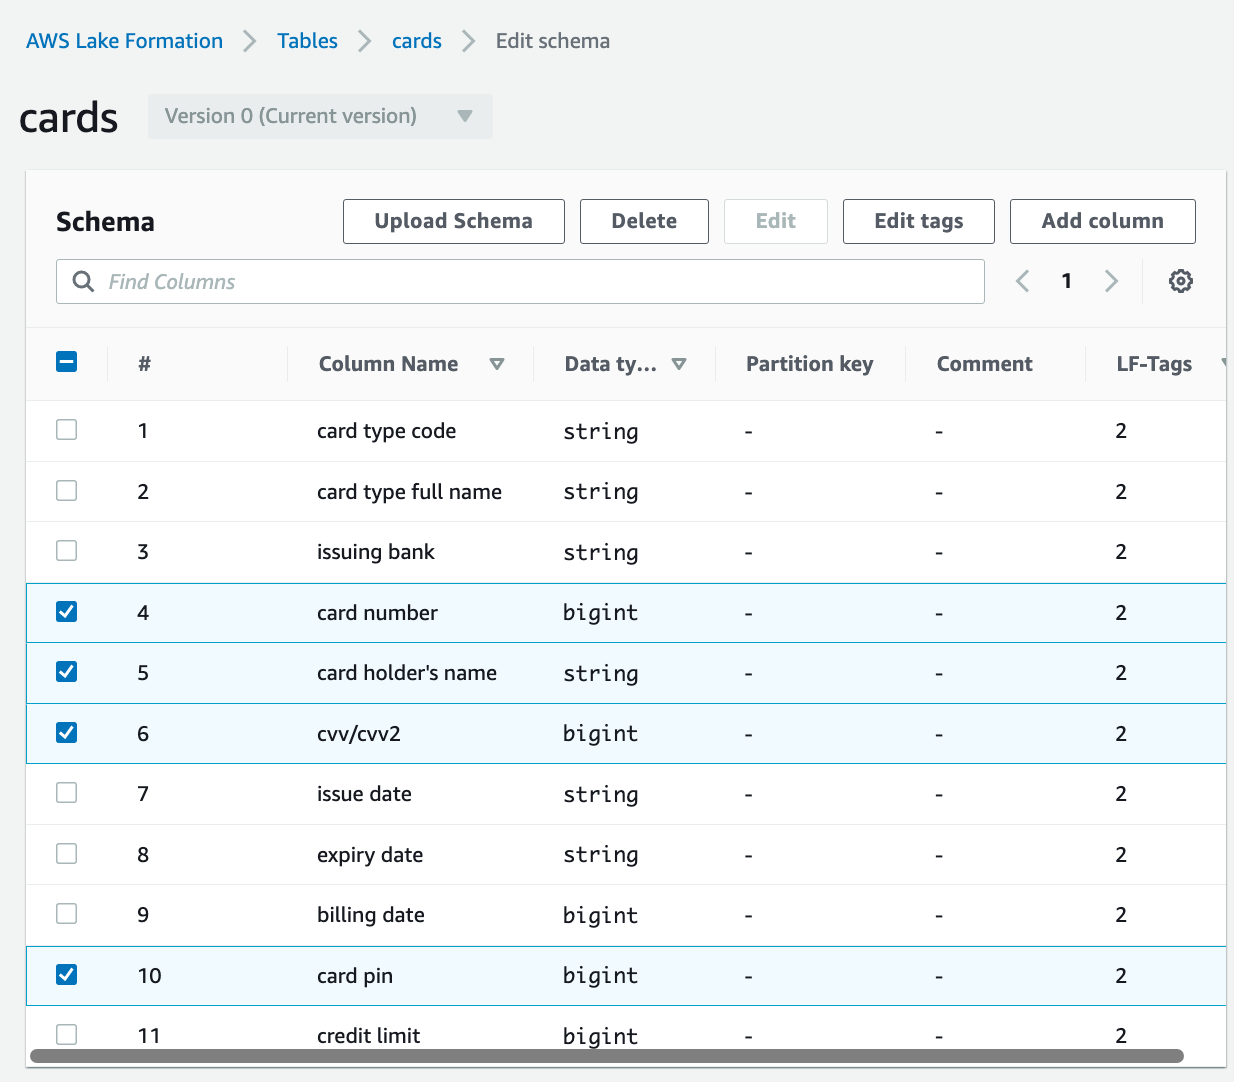
For Assigned keys, enter Classification and for Values, choose Sensitive.
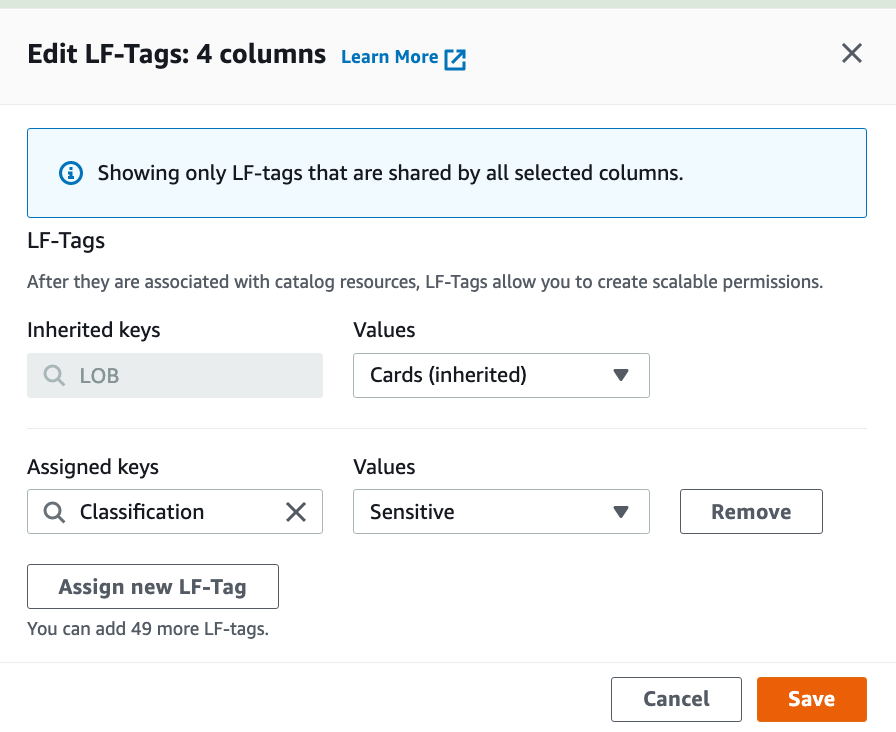
Choose Save.
Choose Save as new version to save the schema.
Tag tables
Next, we tag the reviews and customer tables under the retail database using the LOB:retail tag that we created earlier.
On the Tables page, select the reviews table and on the Actions menu, choose Edit LF-tags.
Choose Assign new LF-Tag.
For Assigned keys, choose LOB:Retail and for Values, choose Reviews.
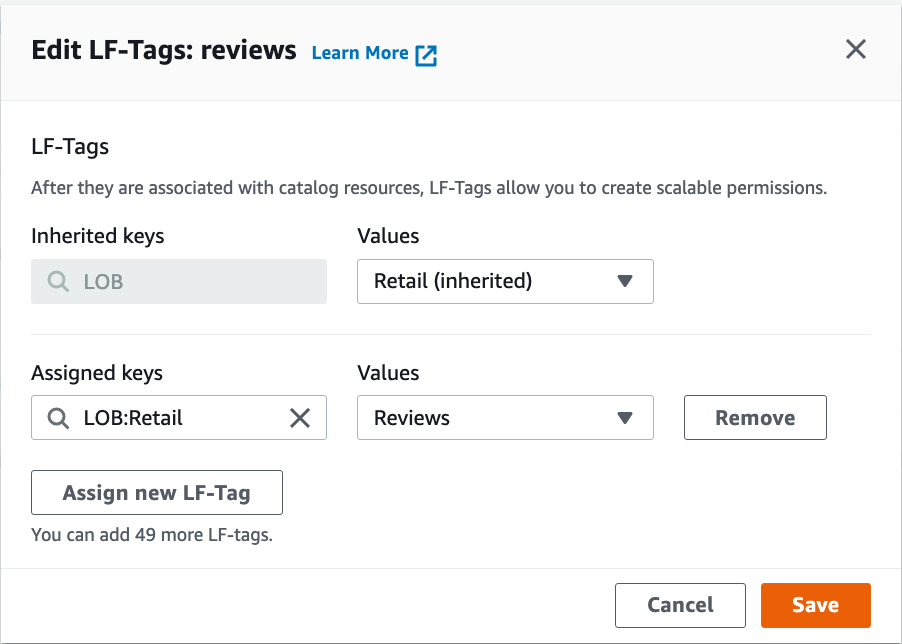
Choose Save.
Repeat the steps for the "customer" table. Choose "LOB:Retail" for the key and "Customer" for the value.
Grant tag permissions
Grant LF-tag permissions to the external consumer account.
On the Lake Formation console, in the navigation pane, choose Permissions, then choose Administrative roles and tasks and choose LF-tag permissions.
Choose Grant.
For Principals, select External accounts.
For AWS account or AWS organization, enter the AWS account number corresponding to the consumer account.
For LF-Tags, choose Add LF-Tag. For Key, choose "LOB" and for Values, choose "Retail" and "Cards". Repeat these steps for key "Classification" with values "Non-Sensitive" and "Sensitive", and key "LOB:Retail" with values "Reviews" and "Customer".
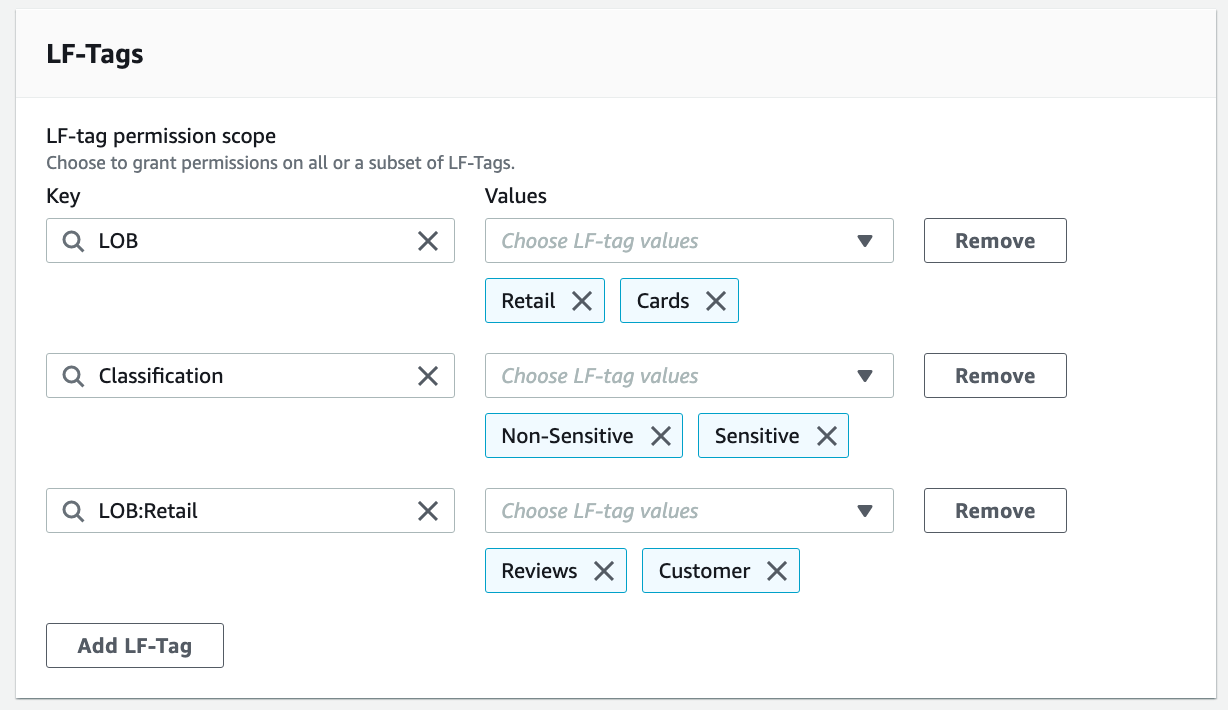
For Permissions, choose "Describe". For Grantable permissions, choose "Describe".
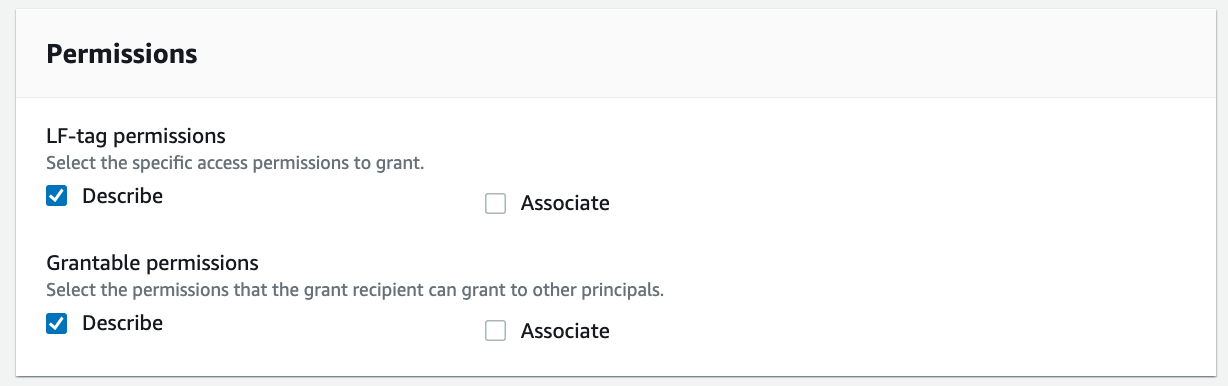
Choose Grant.
Grant Lake Formation policy tag expression permissions to the external consumer account.
In the consumer account, accept the resource shares.
Uncheck "Use only IAM access control for new databases" and "Use only IAM access control for new tables in new databases".
In the navigation pane, choose Data lake permissions and choose Grant.
In the Principals section, select External accounts. For AWS account or AWS organization, enter the AWS account number corresponding to the consumer account.
For LF-Tags or catalog resources, select Resources matched by LF-Tags. Choose Add LF-Tag. For Key, choose "LOB" and for Values, choose "Retail".

For Database permissions, select "Describe". For Grantable permissions, select "Describe".
Choose Grant.
Repeat these steps to grant permissions on the policy tag expression LOB=Cards.
Grant table permissions
In the navigation pane, choose Data lake permissions and choose Grant.
For Principals, select External accounts. For AWS account or AWS organization, enter the AWS account number corresponding to the consumer account.
For LF-Tags or catalog resources, select Resources matched by LF-Tags. Add key LOB with value Retail, and key LOB:Retail with values Reviews and Customer.

For Table Permissions, select Select and Describe. For Grantable permissions, select Select and Describe.
Choose Grant.
Repeat these steps to grant permissions on the policy tag expressions LOB=Cards and Classification = (Non-Sensitive or Sensitive).
Share and consume tables in the consumer account
When you sign in to the Lake Formation console in the consumer account as ConsumerAdmin, you can see all the tags and the corresponding values that were shared by the producer.
Share and consume tables in the consumer account
Create a resource link to the shared database
On the Databases page on the Lake Formation console, you can see all the databases that were shared to the consumer account. To create a resource link, complete the following steps:
On the Databases page, select the "cards" database and on the Actions menu, choose Create resource link.
Enter the resource link name as "rl_cards".
Leave the shared database and shared database's owner ID as default.
Choose Create.
Follow the same process to create the "rl_retail" resource link.
Grant Describe permission to ConsumerAnalyst1
To grant Describe permissions on resource link databases to ConsumerAnalyst1, complete the following steps:
On the Databases page, select the resource database rl_retail and on the Actions menu, choose Grant.
In the Grant data permissions section, select IAM users and roles.
Choose the role ConsumerAnalyst1.
In the Resource link permissions section, select Describe.
Choose Grant.
Follow the same steps to grant rl_cards access to ConsumerAnalyst2.

Grant Tag permissions to ConsumerAnalyst1
To grant Tag permissions on the LOB:Retail Customer tag to ConsumerAnalyst1 to access the sales table, complete the following steps:
On the Lake Formation console, on the Data lake permission page, choose Grant.
In the Grant data permissions section, select IAM users and roles. Choose user "ConsumerAnalyst1".

For LF-Tags or catalog resources, select Resources matched by LF-Tags. Add the key "LOB" with value "Retail", and the key "LOB:Retail" with value "Customer".
For Table permissions, select Select and Describe.

Choose Grant.
Access to the customers table inside the rl_retail database is granted to ConsumerAnalyst1.
Grant Tag permissions to ConsumerAnalyst2
To grant Tag permissions on the Classification:Sensitive tag to l to access attributes tagged as Sensitive in the cards table, complete the following steps:
On the Lake Formation console, on the Data lake permission page, choose Grant.
In the Grant data permissions section, select IAM users and roles.
Choose the role ConsumerAnalyst2.
For LF-Tags or catalog resources, select Resources matched by LF-Tags.
Add the key LOB with value Cards, and the key Classification with value Sensitive.
For Table permissions, select Select and Describe.
Choose Grant.
Access to attributes tagged as sensitive in the cards table inside the rl_cards database is granted to ConsumerAnalyst2.
Validate the access to ConsumerAnalyst1
To confirm ConsumerAnalyst1 access, complete the following steps:
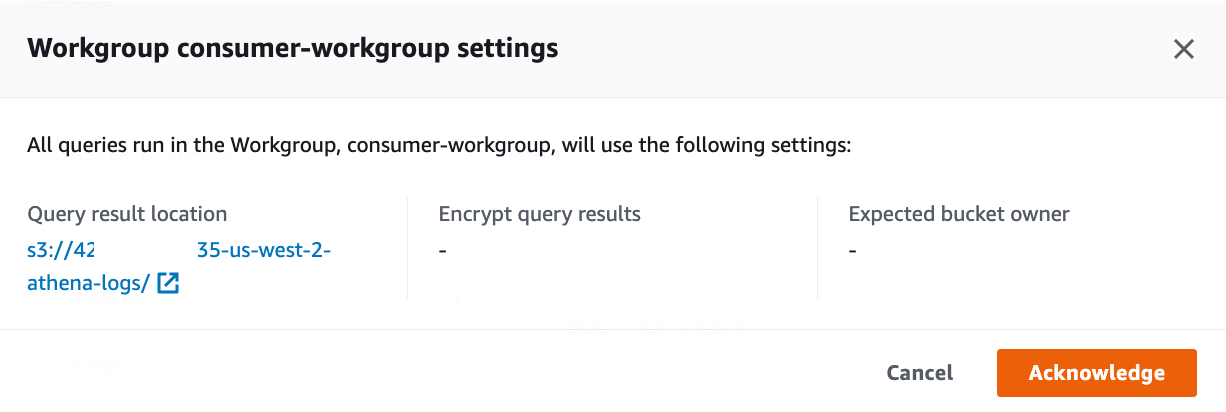
Logon the Athena console using IAM user "ConsumerAnalyst1". For Workgroup, choose consumer-workgroup.
Choose Acknowledge.
Choose the database rl_retail.
You should be able to see the customers table and be able to query.
Validate the access to ConsumerAnalyst2
To confirm ConsumerAnalyst2 access, complete the following steps:
Logon the Athena console using IAM user "ConsumerAnalyst2". for Workgroup, choose consumer-workgroup.
Choose Acknowledge.
Choose the database rl_cards.
You should be able to see only the sensitive attributes from the cards table.
As a thought experiment, you can also check to see the Lake Formation Tag-based access policy behavior on columns to which the user doesn't have policy grants.
When an untagged column is selected from the table rl_cards.cards, Athena returns an error. For example, you can run the following query to choose the untagged column "issuing bank" which is non-sensitive.
用ConsumerAdmin用户执行同样的SQL命令:

-
References
https://aws.amazon.com/blogs/big-data/build-a-modern-data-architecture-and-data-mesh-pattern-at-scale-using-aws-lake-formation-tag-based-access-control/
Cross-account best practices and limitations
Step 2: Lake Formation cross-account sharing prerequisites
Cross-account data sharing prerequisites
-
设定四个数据原则。
- Start small
- Scale fast
- Iterate fast
- Think big
开启数据架构的演进之旅。
The overall data architect will utilize three AWS accounts. To avoid jumping among AWS console login, I created three temporary Chrome profiles and the corresponding browser windows.
First, prepare 3 AWS accounts under my AWS Organizations. I use Amazon WorkMail to automatically vend out new AWS accounts, so it is really simple and quick to get these AWS accounts.
Account Initialization
对于全新的AWS account,需要进行初始化。官方资料assume了一些配置已经存在或者已经初始化完成,故没有明确指出central account的Lake Formation需要init这个必要的步骤。
第一次登陆Lake Formation的console页面时,会弹出下面下面欢迎语和配置初始化设置界面。保持“Add myself”选中。点击Get started。
PS: producer account事实上也需要这步操作。
Deploy cloud resource in the order of central, producer, and consumer due to dependencies. 官方资料这里有点儿小问题。
Central account CloudFormation:
To create resources in the central account, complete the following steps:
From the Chrome browser designated for the central account, sign in to the central account’s AWS CloudFormation console in the target Region.
Create a new CloudFormation stack with this template:
https://aws-bigdata-blog.s3.amazonaws.com/artifacts/lakeformationtbac/cfn/tbac-cross-account-central.yaml
It will create DataMeshOwnerUserName, "DataMeshOwner" and ProducerStewardUserName, "ProducerSteward".
For Stack name, enter stack-central.
For DataMeshOwnerUserPassword, enter the password you want for the data lake admin IAM user in the central account.
For ProducerStewardUserPassword, enter the password you want for the producer steward IAM user in the producer account.
For ProducerAWSAccount, enter the producer's AWS Account ID.
Select "I acknowledge that AWS CloudFormation might create IAM resources with custom names".
Create stack.
Collect the value for LFRegisterLocationServiceRole on the stack’s Outputs tab, e.g., "stack-central-LFRegisterLocationServiceRole-1FxxxxOD".
Producer account CloudFormation:
Launch the CloudFormation stack in the producer account
To set up resources in the producer account, complete the following steps:
From the Chrome browser designated for the producer account, sign in to the producer account’s AWS CloudFormation console in the target Region.
Create a new CloudFormation stack with this template:
https://aws-bigdata-blog.s3.amazonaws.com/artifacts/lakeformationtbac/cfn/tbac-cross-account-producer.yaml
For Stack name, enter stack-producer.
For CentralAccountID, copy and paste the value of the central AWS account ID.
For CentralAccountLFServiceRole, copy and paste the value of the LFRegisterLocationServiceRole collected from the stack-central.
For LFDatabaseName, keep the default value of the tbac database name.
For ProducerStewardUserPassword, enter the password you want for the data lake admin IAM user on the producer account.
Select "I acknowledge that AWS CloudFormation might create IAM resources with custom names".
Create stack.
Launch the CloudFormation stack in the consumer account
To create resources in the consumer account, complete the following steps:
From the Chrome browser designated for the consumer account, sign in to the consumer account’s AWS CloudFormation console in the target Region.
Create a new CloudFormation stack with this template:
https://aws-bigdata-blog.s3.amazonaws.com/artifacts/lakeformationtbac/cfn/tbac-cross-account-consumer.yaml
For Stack name, enter stack-consumer.
For ConsumerAdminUserName and ConsumerAdminUserPassword, enter the user name and password you want for the data lake admin IAM user.
For ConsumerAnalyst1UserName and ConsumerAnalyst1UserPassword, enter the user name and password you want for the consumeranalyst1 IAM user.
For ConsumerAnalyst2UserName and ConsumerAnalyst2UserPassword, enter the user name and password you want for the consumeranalyst2 IAM user.
Select "I acknowledge that AWS CloudFormation might create IAM resources with custom names".
Create stack.
Configure Lake Formation cross-account sharing
After create the resources with AWS CloudFormation, perform the following steps in the producer and central account to set up Lake Formation cross-account sharing.
Central governance account
In the central account, complete the following steps:
Sign in to the Lake Formation console as admin.
In the navigation pane, expand Permissions, then choose Administrative roles and tasks.
The CloudFormation template added the data mesh owner as the data lake administrator.
Update the Data Catalog settings to use Lake Formation permissions to control catalog resources instead of IAM-based access control.
In the navigation pane, under Data catalog¸ choose Settings.
Uncheck "Use only IAM access control for new databases", and uncheck "Use only IAM access control for new tables in new databases".
Save.
Set up the AWS Glue Data Catalog resource policy to grant cross-account access to Data Catalog resources.
Use the following policy, and replace the account number and Region with your own values:
As described in Lake Formation Tag-Based Access Control Cross-Account Prerequisites, before you can use the tag-based access control method to grant cross-account access to resources, you must add the following JSON permissions object to the AWS Glue Data Catalog resource policy in the central account. This gives the consumer account permission to access the Data Catalog when glue:EvaluatedByLakeFormationTagsis true. Also, this condition becomes true for resources on which you granted permission using Lake Formation permission Tags to the consumer’s account. This policy is required for every AWS account that you’re granting permissions to. We discuss the full IAM policy later in this post.
{
  "Version" : "2012-10-17",
  "Statement" : [ {
    "Effect" : "Allow",
    "Principal" : {
      "AWS" : [ "arn:aws:iam::<ConsumerAccountID>:root", "arn:aws:iam::<ProducerAccountID>:root" ]
    },
    "Action" : "glue:*",
    "Resource" : [ "arn:aws:glue:<aws-region>:<CentralAccountID>:table/*", "arn:aws:glue:<aws-region>:<CentralAccountID>:database/*", "arn:aws:glue:<aws-region>:<CentralAccountID>:catalog" ],
    "Condition" : {
      "Bool" : {
        "glue:EvaluatedByLakeFormationTags" : "true"
      }
    }
  }, {
    "Effect" : "Allow",
    "Principal" : {
      "Service" : "ram.amazonaws.com"
    },
    "Action" : "glue:ShareResource",
    "Resource" : [ "arn:aws:glue:<aws-region>:<CentralAccountID>:table/*", "arn:aws:glue:<aws-region>:<CentralAccountID>:database/*", "arn:aws:glue:<aws-region>:<CentralAccountID>:catalog" ]
  }, {
    "Effect" : "Allow",
    "Principal" : {
      "Service" : "glue.amazonaws.com"
    },
    "Action" : "glue:*",
    "Resource" : [ "arn:aws:glue:<aws-region>:<CentralAccountID>:table/*", "arn:aws:glue:<aws-region>:<CentralAccountID>:database/*", "arn:aws:glue:<aws-region>:<CentralAccountID>:catalog" ]
  } ]
}
Replace the <aws-region>, <ProducerAccountID>, <ConsumerAccountID> and <CentralAccountID> values in the above policy as appropriate and save it in a file called data_mesh_policy.json.PS:
其中下面这段是为TS临时加的。实际是否需要还需要double check。
...
  {
    "Effect" : "Allow",
    "Principal" : {
      "Service" : "glue.amazonaws.com"
    },
    "Action" : "glue:*",
    "Resource" : [ "arn:aws:glue:<aws-region>:<CentralAccountID>:table/*", "arn:aws:glue:<aws-region>:<CentralAccountID>:database/*", "arn:aws:glue:<aws-region>:<CentralAccountID>:catalog" ]
  }
...
Run the following AWS CLI command on AWS CloudShell.
aws glue put-resource-policy --policy-in-json file://data_mesh_policy.json --region <aws-region> --enable-hybrid TRUE
{
    "PolicyHash": "Vcm***Cw=="
}
Verify the two source data S3 buckets are registered as data lake locations in the central account. This is completed by the CloudFormation template.
Under Register and ingest in the navigation pane, choose Data lake locations.
You should see the two S3 buckets registered under the data lake locations.
Configure Lake Formation Data Catalog settings in the central account
After completing all the prerequisites, start the data mesh configuration.
Log in as DataMeshOwner in the central account. (https://<CentralAccountID>.signin.aws.amazon.com/console)
Define LF-tags
DataMeshOwner creates the tag ontology by defining LF-tags.
On the Lake Formation console, under Permissions in the navigation pane, under Administrative roles and tasks, choose LF-Tags.
Choose Add LF-tags.
For Key, enter "LOB"(不含双引号). And for Values, input "Retail,Cards"(不含双引号).
Click Add.
Click "Add LF-tag" button.
Repeat these steps. Add the key LOB:Retail and values Customer and Reviews. Add the key Classification with values Sensitive and Non-Sensitive.
Now we complete the configuration of the tag ontology.
Grant permissions
We grant ProducerSteward in the central account describe and associate permissions on the preceding tag ontology. This enables ProducerSteward to view the LF-tags and assign them to Data Catalog resources (databases, tables, and columns). ProducerSteward in the central account can further grant the permission to ProducerSteward in the producer account.
When you have multiple producers, grant the relevant tags to each steward.
In the central account, expand Permissions in the navigation pane of AWS Lake Formation console, under Administrative roles and tasks, choose LF-tag permissions.
Click Grant.
For IAM users and roles, choose the ProducerSteward user.
In the LF-Tags section, add all three key-values:
Key LOB with values Retail and Cards.
Key LOB:Retail with values Customer and Reviews.
Key Classification with values Sensitive and Non-Sensitive.
For Permissions, select Describe and Associate for both LF-tag permissions and Grantable permissions.
Click Grant.
Grant ProducerSteward tag-based data lake permissions. This enables ProducerSteward to create, alter, and drop tables in the databases with corresponding tags. ProducerSteward in the producer account can further grant the permission across accounts.
In the navigation pane, under Permissions, Data lake permissions, click Grant.
For Principals, choose IAM users and roles, and choose ProducerSteward.
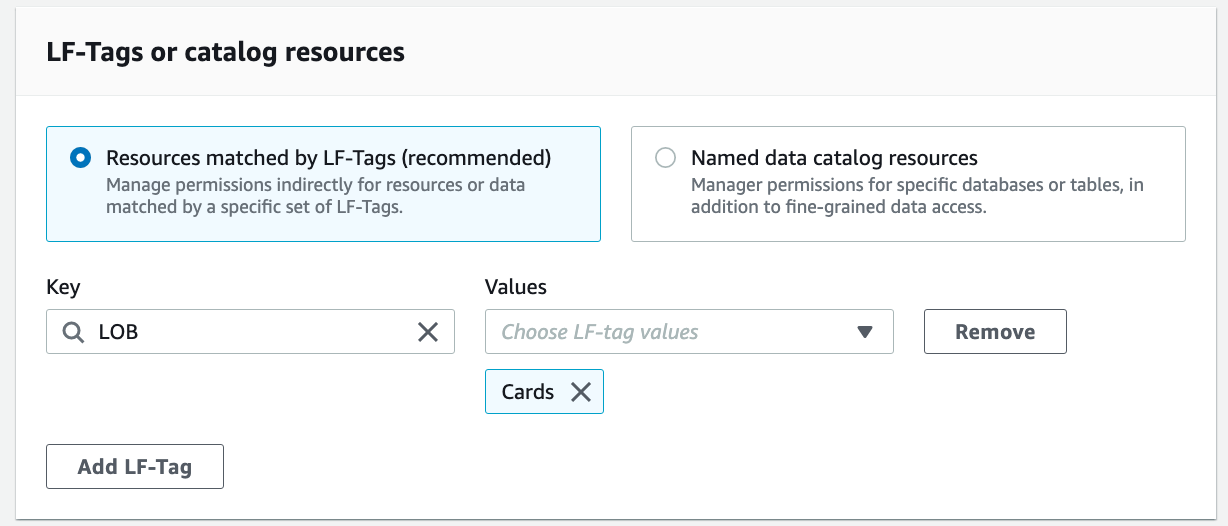
For LF-tags or catalog resources, select Resources matched by LF-Tags (recommended).
Choose Add LF-Tag.
For Key, choose "LOB" and for Values, choose "Cards".
For Database permissions, select the "Super" permission because ProducerSteward owns the producer databases.
This permission allows a principal to perform every supported Lake Formation operation on the database. Use this admin permission when a principal is trusted with all operations.
Select "Super" under Grantable permissions so the ProducerSteward user can grant database-level permissions to the producer and consumer accounts.
For Table permissions, select "Super".
Select "Super" permission under Grantable permissions.
Click Grant.
Repeat these steps for key LOB and value Retail.
In the navigation pane, under Permissions, Data lake permissions, choose Grant.
For Principals, choose IAM users and roles, and choose ProducerSteward.
For LF-tags or catalog resources, select Resources matched by LF-Tags (recommended).
Add the key LOB with value Cards, and the key Classification with values Sensitive and Non-Sensitive.
For Database permissions, select Super. Select Super permission under Grantable permissions. For Table permissions, select Super. Select Super under Grantable permissions.
Click Grant.
This gives ProducerSteward fine-grained permission expression on columns with either Sensitive or Non-sensitive tags.
Repeat these steps for key "LOB" and value "Retail", and key "LOB:Retail" and value "Reviews" or "Customer".
This gives ProducerSteward fine-grained permission expression on tables with either Reviews or Customer tags.
Producer data steward actions in the central account
Log in as the ProducerSteward user in the central account and create skeleton databases.
Sign in to the Lake Formation console as ProducerSteward.
In the navigation pane, under Data catalog, select Databases.
Choose the cards database.
On the Actions menu, choose Edit LF-tags.
Choose Assign new LF-tag.
For Assigned Keys, enter "LOB" and for Values, choose "Cards".
Click Save.
This assigns the LOB=Cards tag to the Cards database.
Repeat these steps for Retail database, i.e., "retail", and assign the LOB=Retail tag to the retail database.
Next, share the LF-tags and data lake permissions with the producer account so that ProducerSteward in the producer account can run AWS Glue crawlers and generate tables in the preceding skeleton databases.
Under Permissions in the navigation pane, under Administrative roles and tasks, choose LF-tag permissions. Choose Grant.
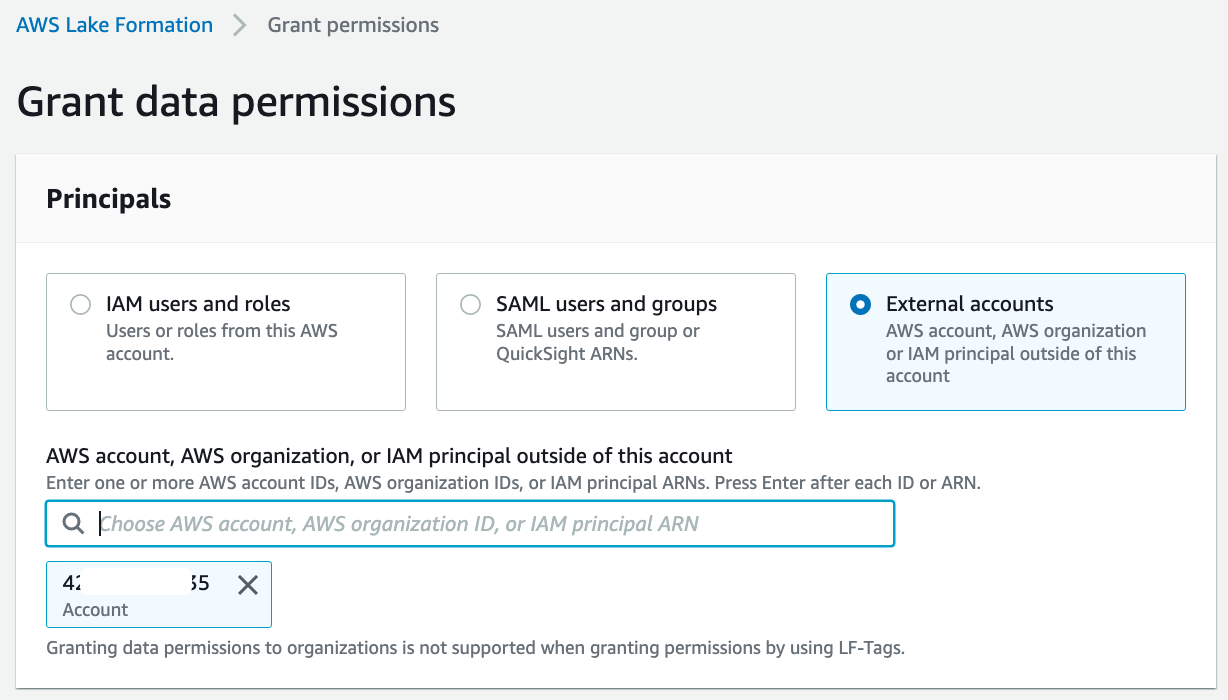
For Principals, select External accounts.
For AWS account or AWS organization, enter the account ID for the producer account.
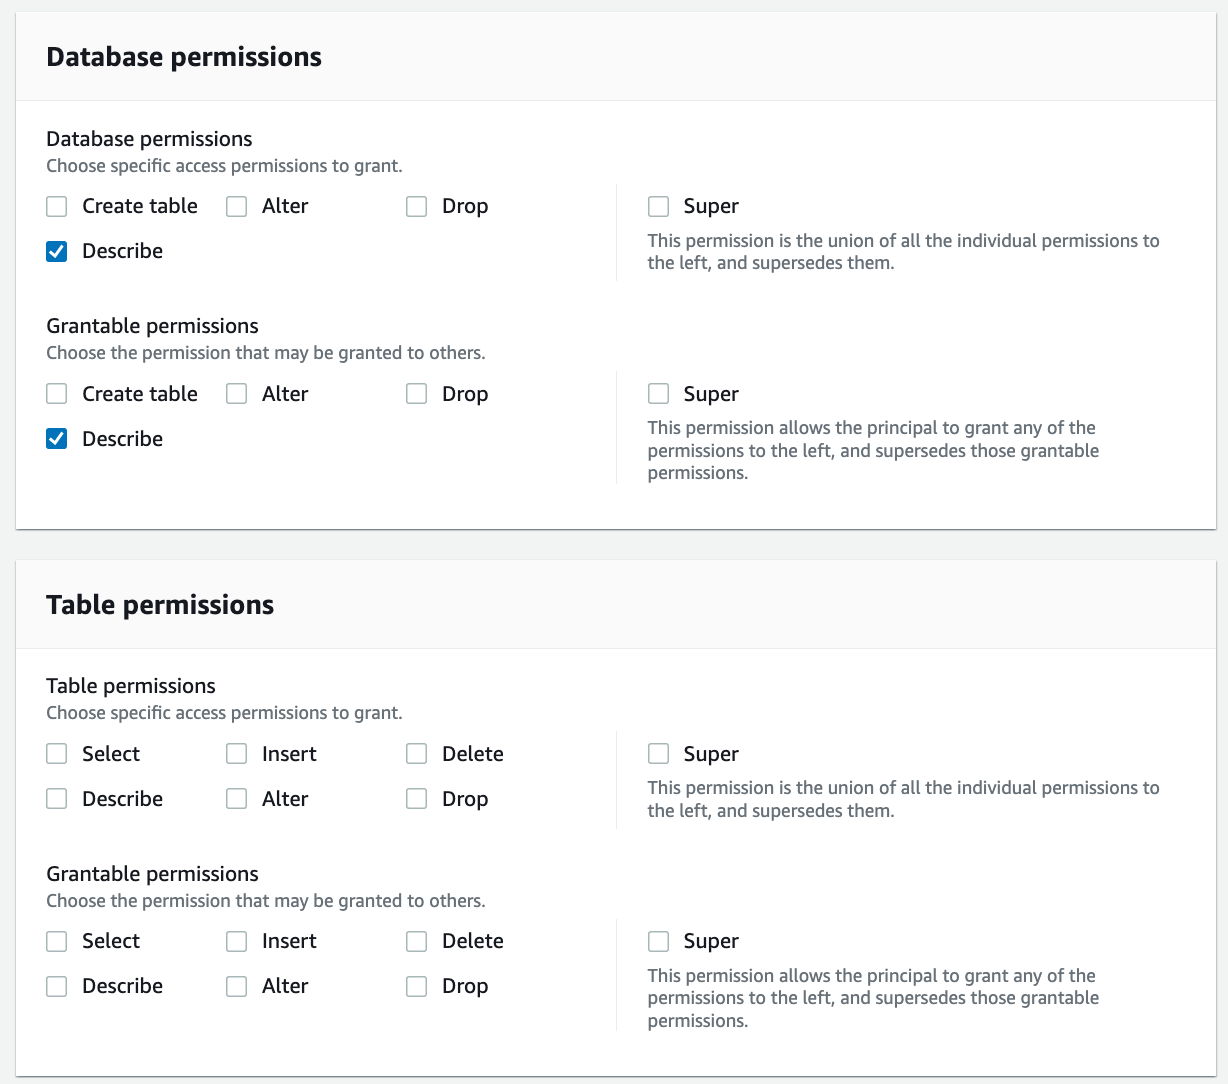
In the LF-Tags section, we only need to add database-level tags. For Key, enter "LOB", and for Values, choose "Retail" and "Cards".
For Permissions, choose Describe and Associate for both LF-tag permissions and Grantable permissions.
Choose Grant.
In the navigation pane, under Permissions, Data lake permissions, choose Grant.
For Principals, select External accounts. For AWS account or AWS organization, enter the account ID for the producer account.
For LF-tags or catalog resources, select Resources matched by LF-Tags (recommended). Choose Add LF-Tag. Choose the key LOB and value Cards.
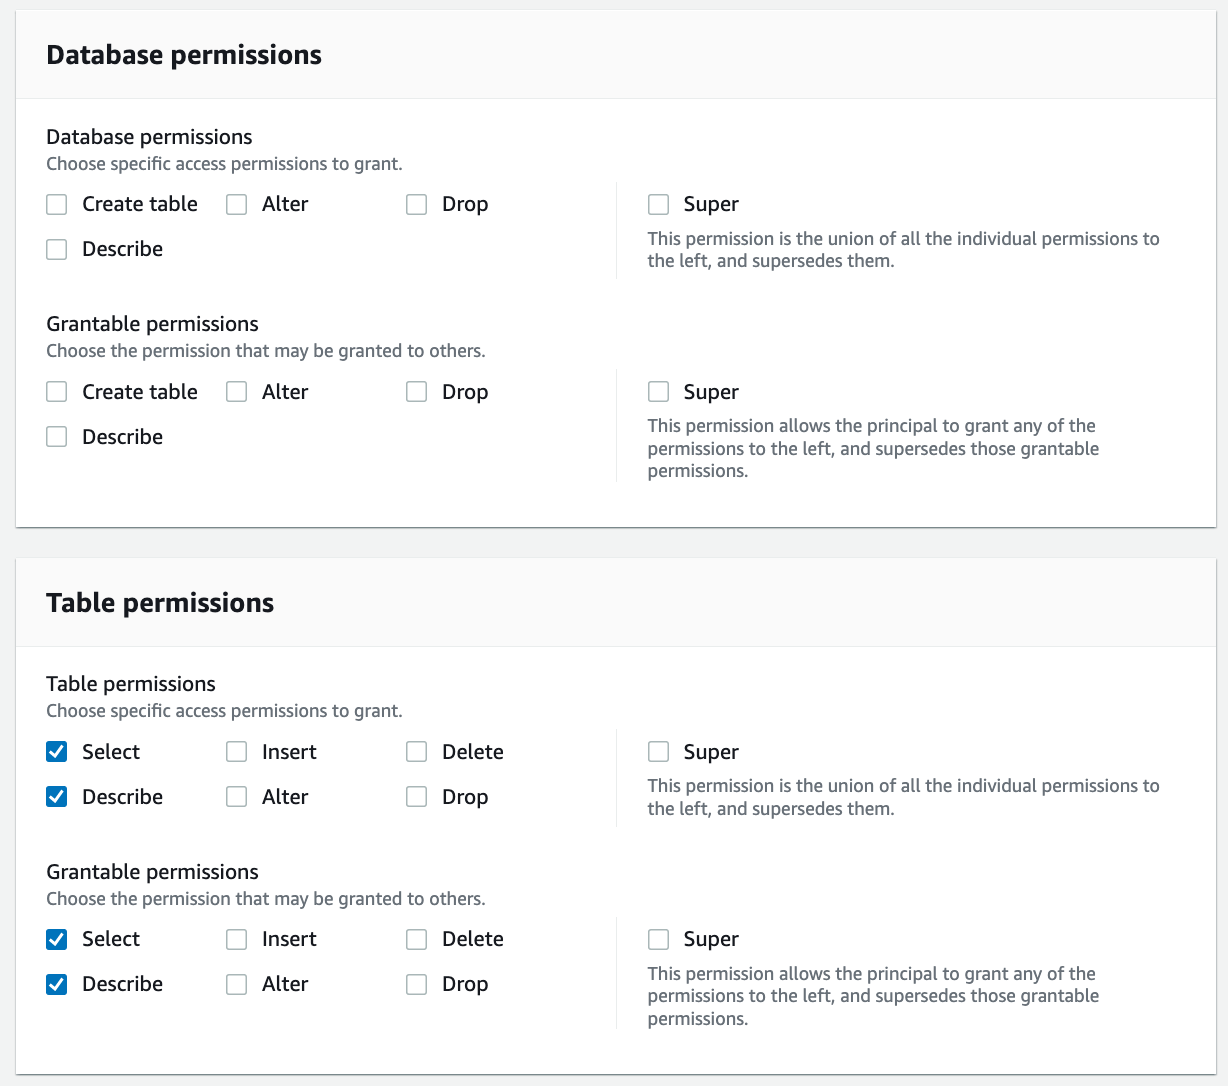
For Database permissions, select Create table and Describe because the ProducerSteward user in the producer account will add tables in the database. Select Create table and Describe under Grantable permissions so the ProducerSteward user can further grant the permission to the AWS Glue crawler. For Table permissions, select all the permissions. Select all the permissions under Grantable permissions.
Click Grant.
Repeat these steps for LOB=Retail.
Now the Lake Formation administrators on the producer account side has the right permissions to add tables.
使用有权限的用户登陆producer account
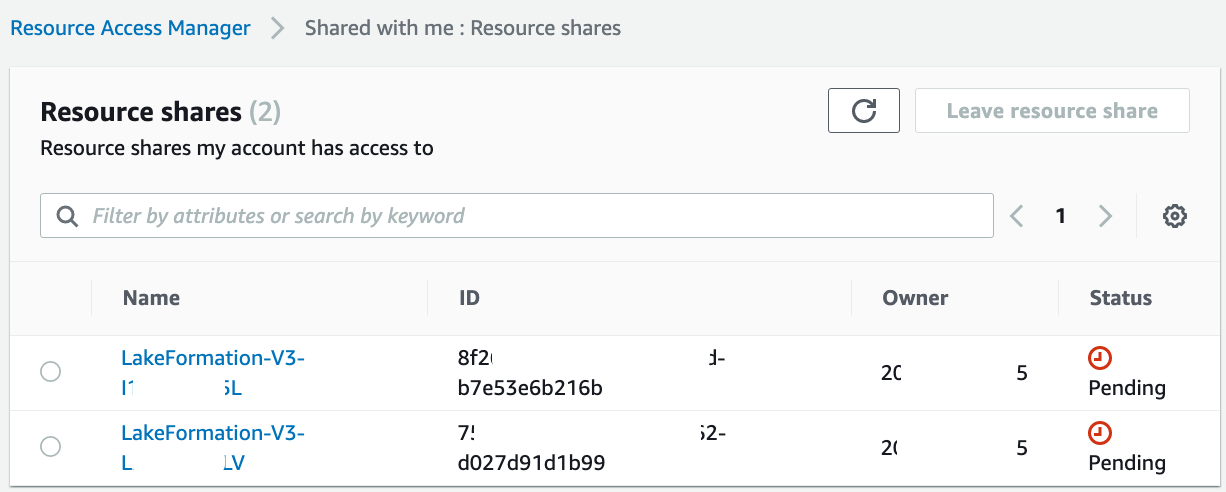
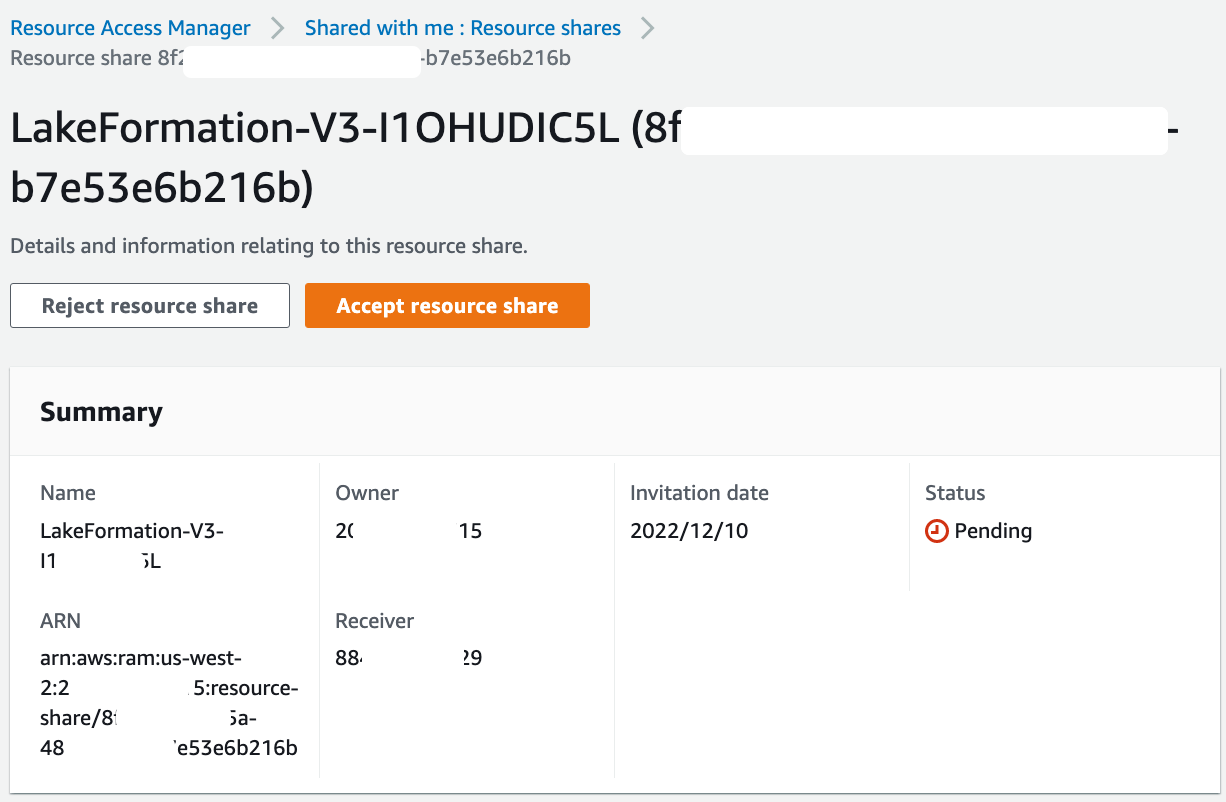
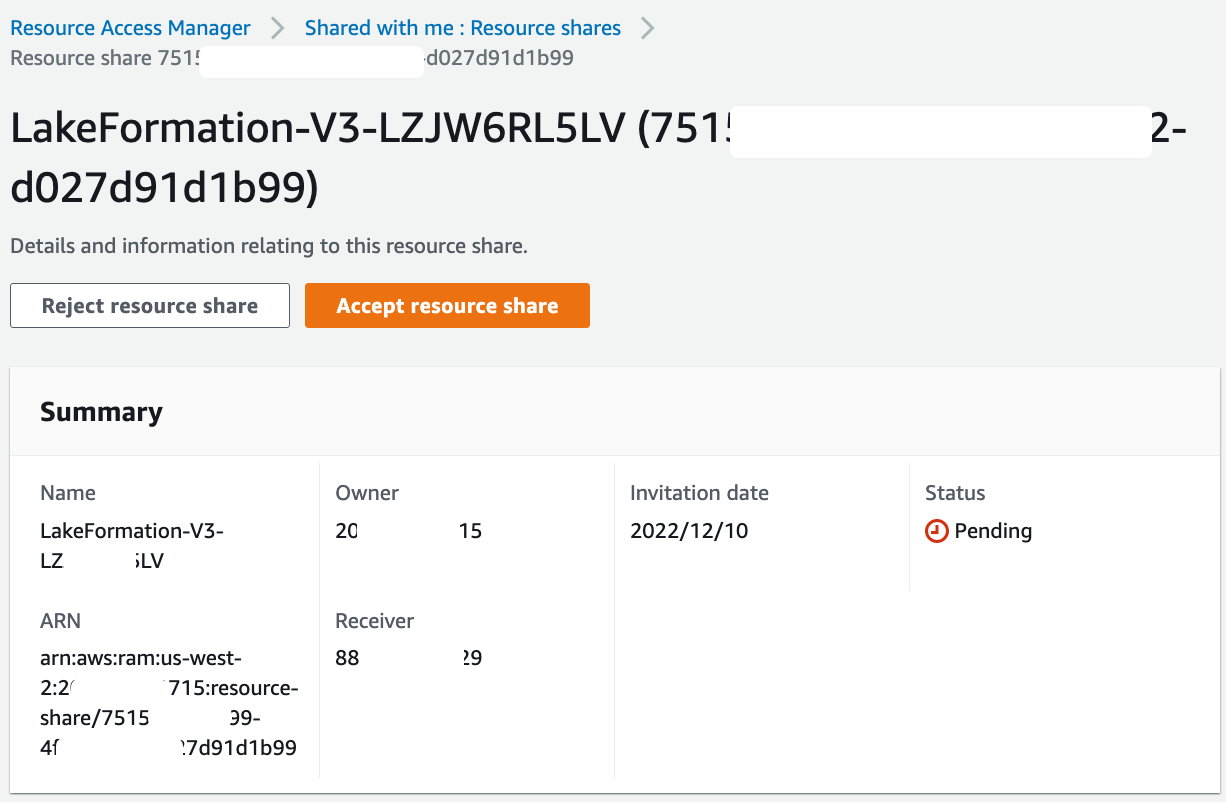
进入RAM Console,接受从central account过来的sharing request。
Crawl source tables in the producer account
Log in as the ProducerSteward user in the producer account to crawl the source tables for the Cards and Retail databases.
Sign in to the Lake Formation console as ProducerSteward.
In the navigation pane, under Administrative roles and tasks, verify that ProducerSteward is configured as the data lake administrator.
In the navigation pane, under Permissions, then choose Administrative roles and tasks, choose LF-Tags.
You can verify the root-level LOB tags that were shared with the producer account.
In the navigation pane, under Data catalog, select Databases. Verify the two databases, i.e., "cards" and "retail" that were shared with the producer account from the previous step.
如果遇到下面报错,通过Revoke "IAMAllowedPrincipals" permission可以解决。
User: arn:aws:iam::<ProducerAccountID>:user/ProducerSteward is not authorized to perform: glue:GetDatabase on resource: arn:aws:glue:us-west-2:<CentralAccountID>:catalog because no resource-based policy allows the glue:GetDatabase action
Create resource links in the producer account for these two databases. These links point at the shared databases and are used by AWS Glue crawler to create the tables.
First, create a resource link for the cards database.
Select the cards database and on the Actions menu, choose Create resource link.
For Resource link name, enter "rl_cards".
Click Create.
Repeat these steps to create a resource link for the retail database. For Resource link name, enter "rl_retail".
After the resource link creation, you should see both the resource link databases as shown in the following screenshot.
Next, grant permissions to the AWS Glue crawler role so that the crawler can crawl the source bucket and create the tables.
Select the rl_cards database and on the Actions menu, choose Grant.
In the Grant data permissions section, select IAM users and roles, and choose the AWS Glue crawler role that was created by the CloudFormation template (for example, stack-producer-AWSGlueServiceRoleDefault-xxxxxx).
后来把role name改成“AWSGlueServiceRole-stack-producer”,只是为了TS,因为怀疑role name前缀对Glue Crawler有影响。下文遇到“AWSGlueServiceRole-stack-producer”,或者“stack-producer-AWSGlueServiceRoleDefault-xxxxxx”的文字或截图,其实都是指同一个role。
...
      RoleName: AWSGlueServiceRole-stack-producer
...
For Databases, choose rl_cards.
For Resource link permissions, select Describe.
Choose Grant.
Repeat these steps for rl_retail.
In the navigation pane, choose Data lake permissions and choose Grant. For IAM users and roles, choose the role stack-producer-AWSGlueServiceRoleDefault-XXXX.
For LF-Tags or catalog resources, select Resources matched by LF-Tags. Enter the key LOB and values Retail and Cards.
For Database permissions, select Create table and Describe. For Table permissions, choose Select, Describe, and Alter.
Click Grant.
Verify grant permissions on the S3 bucket locations corresponding to cards and retail producers to the AWS Glue crawler role. This is completed by the CloudFormation template.
In the navigation pane, under Permissions, on the Data Locations, you should see the locations.
Now we’re ready to run the crawlers. We configure the crawlers that the CloudFormation template created, to point to these resource link databases.
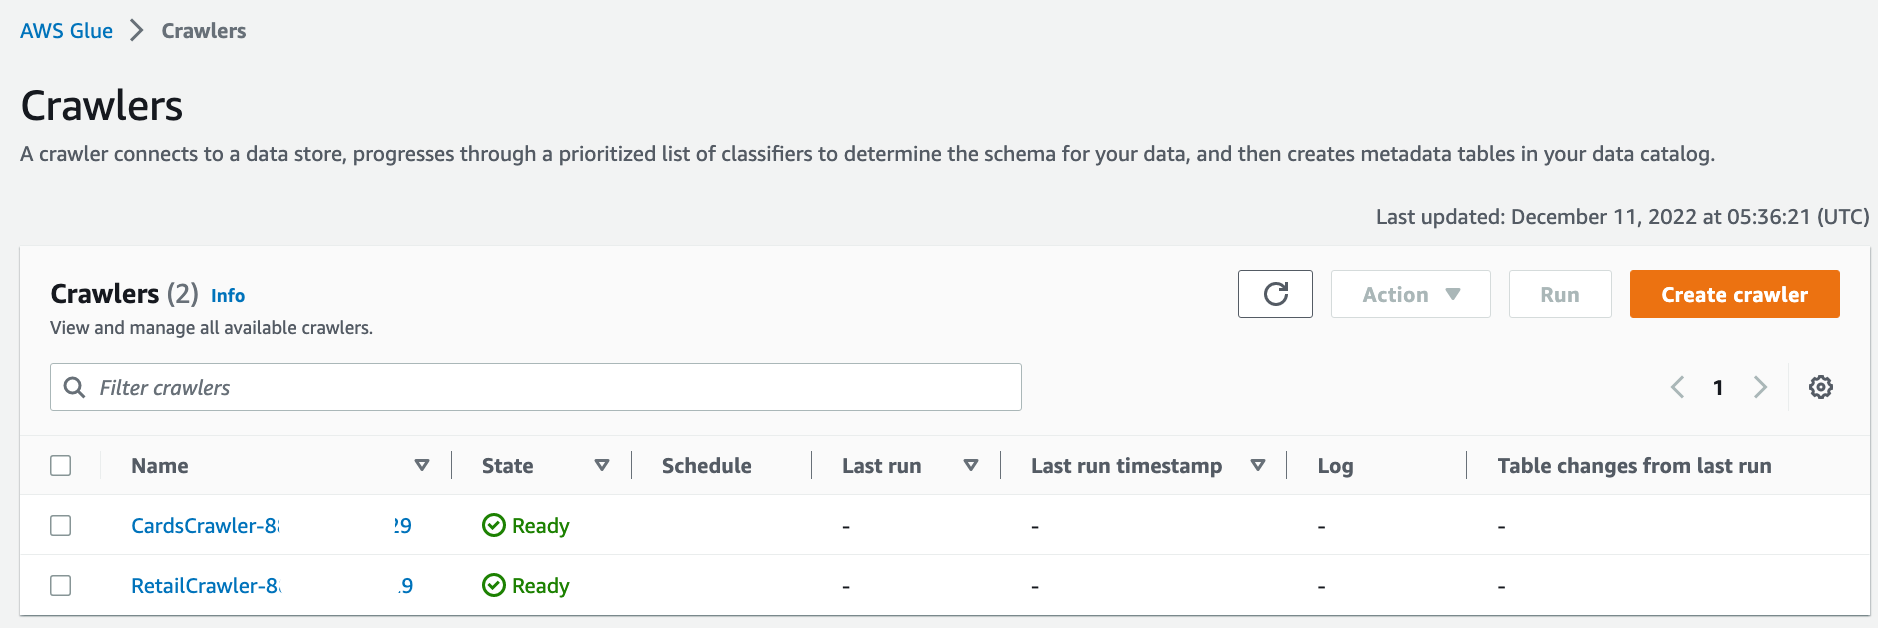
On the AWS Glue console, under Data catalog in the navigation pane, choose Crawlers.
The two crawlers you created should be listed.
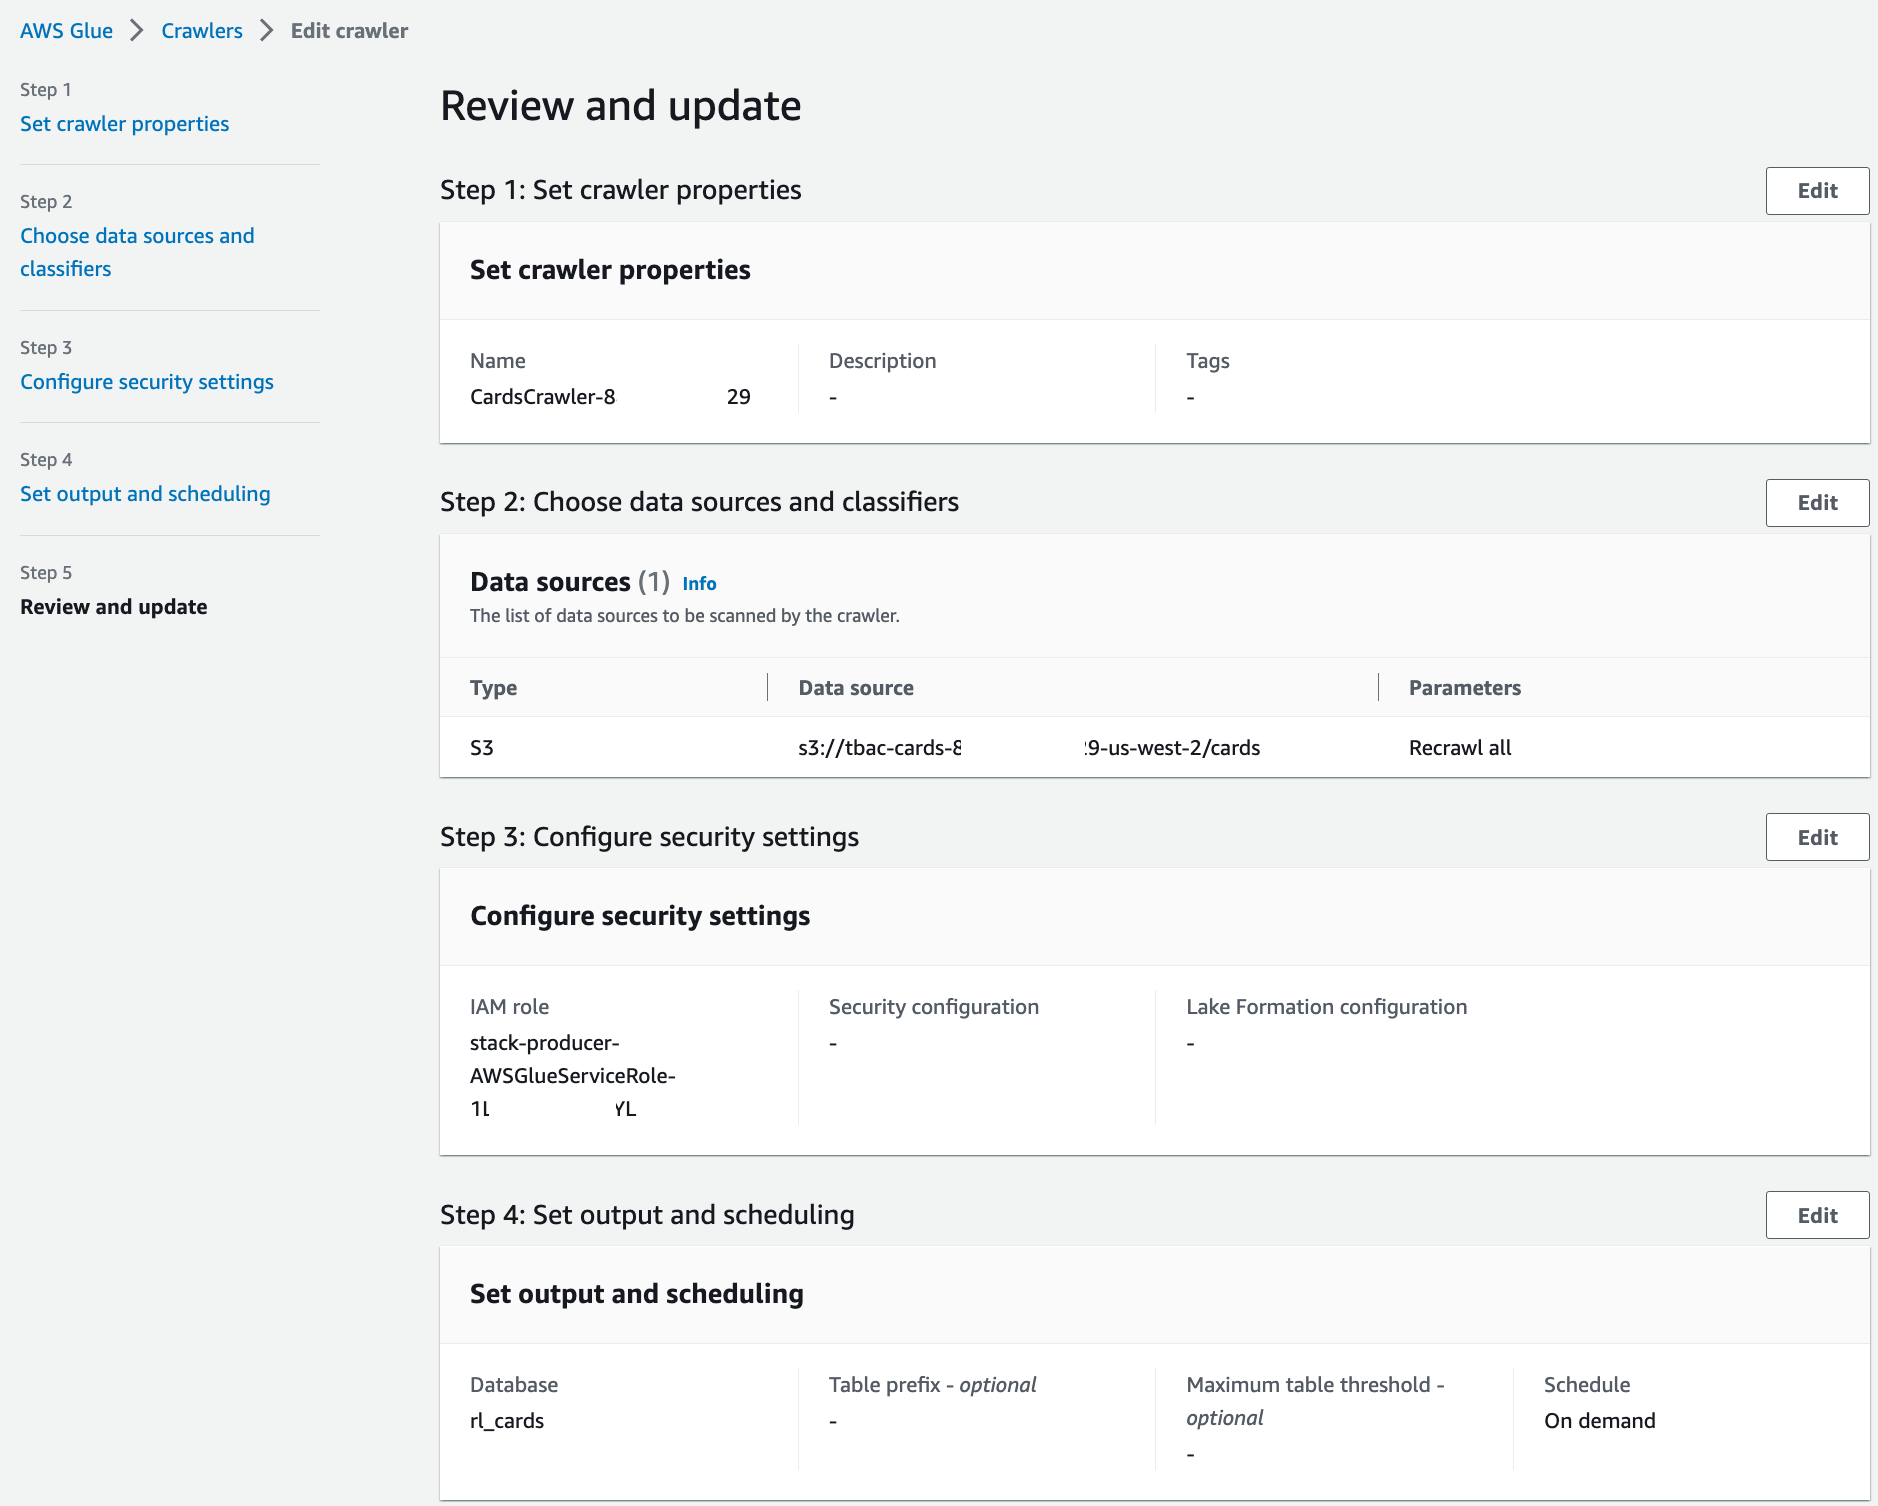
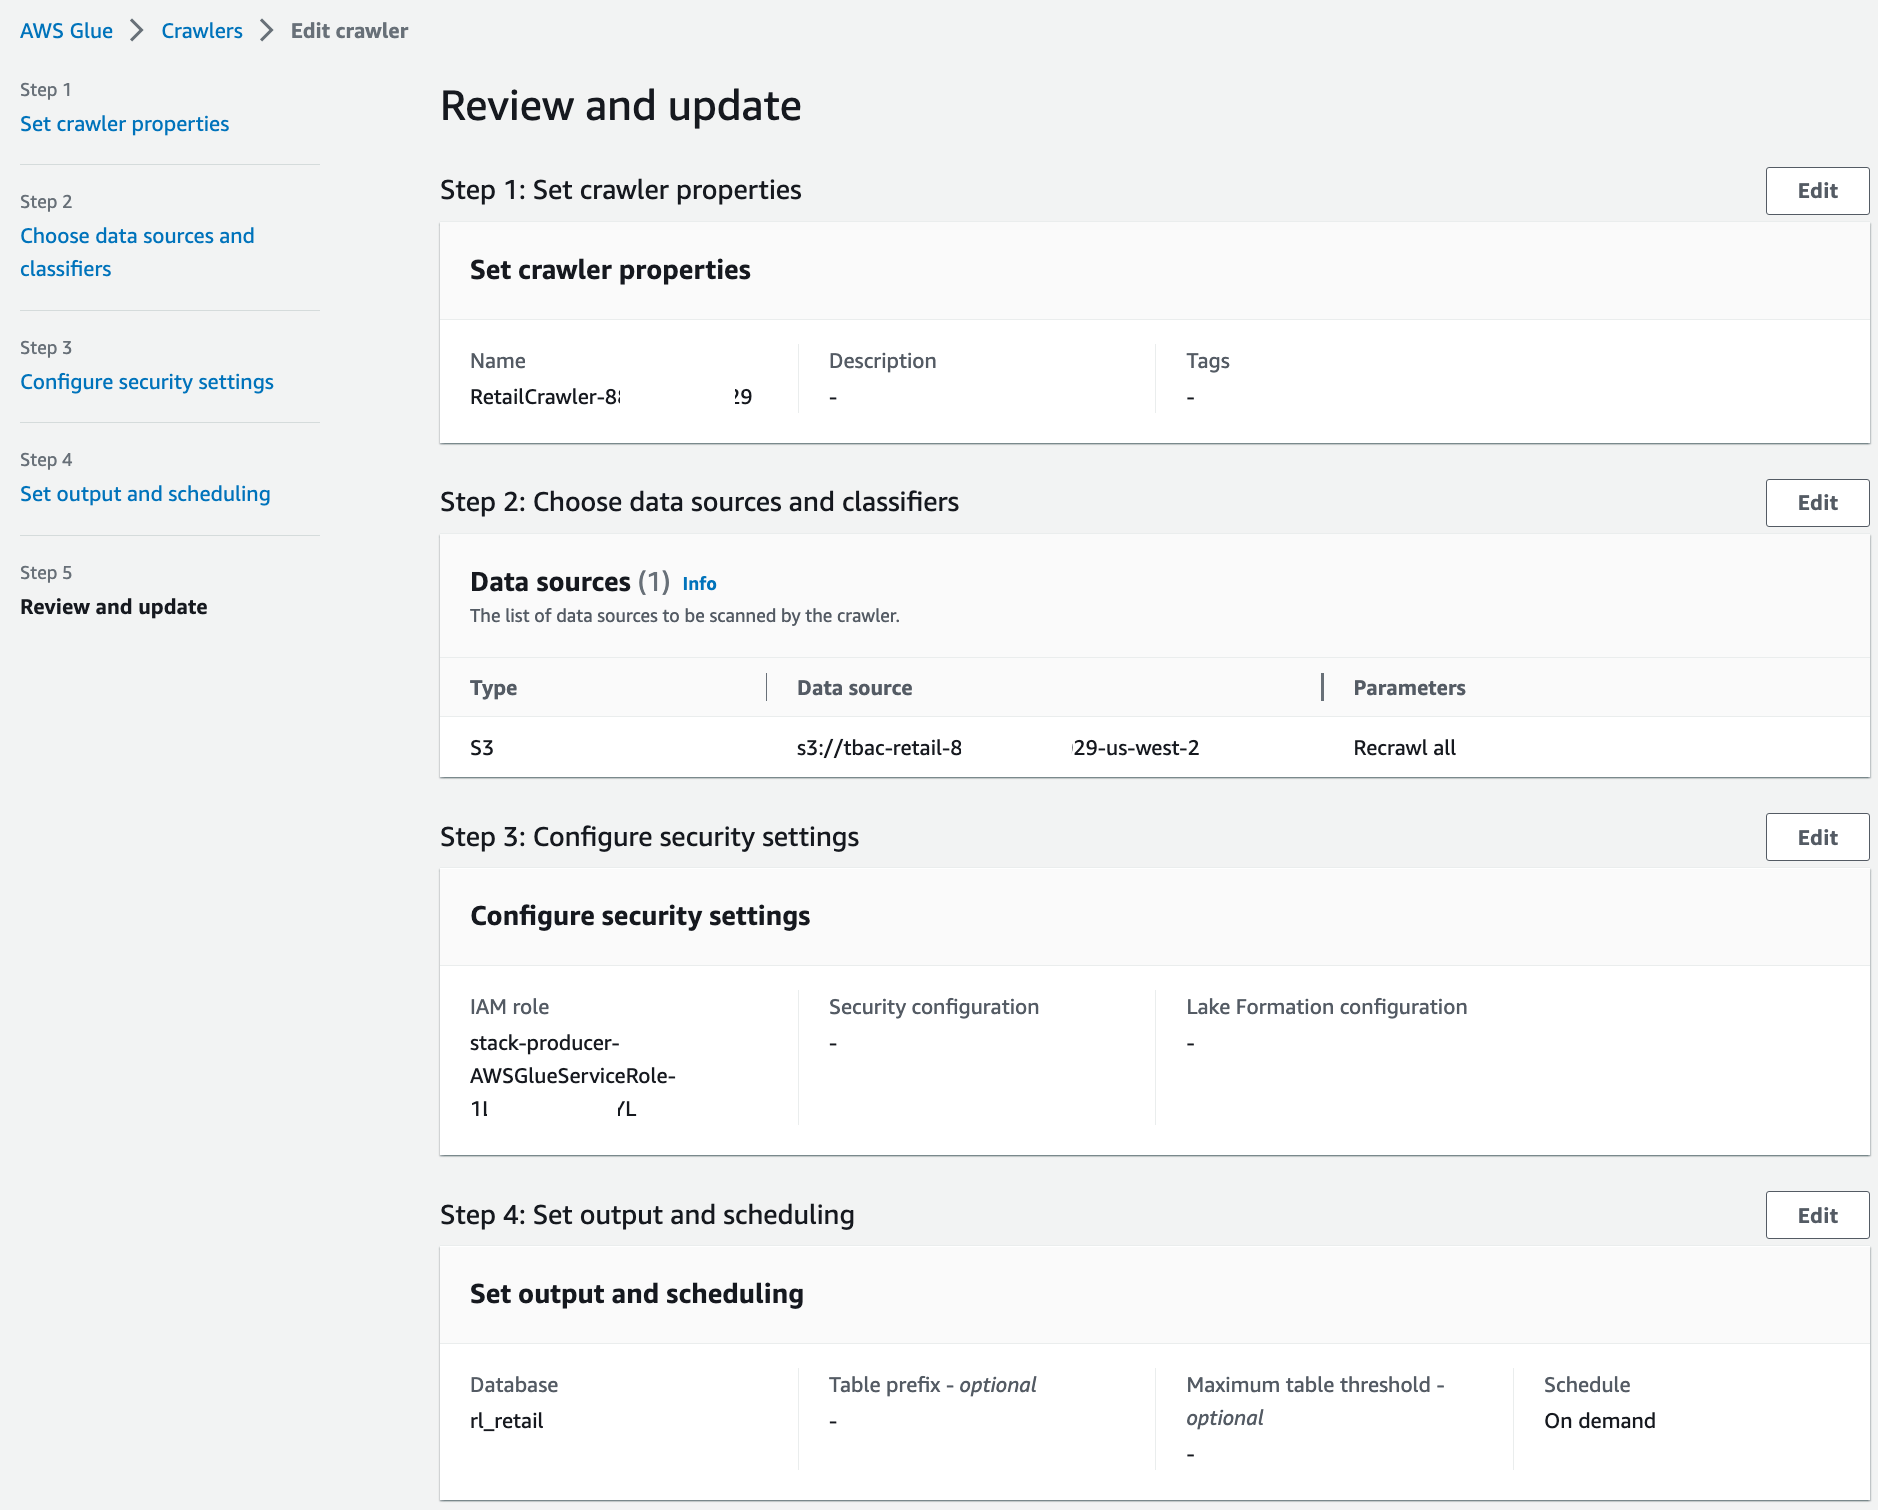
Select the crawler for the cards database, i.e., CardsCrawler-xxxxxxxxxxxx, and on the Action menu, choose Edit crawler.
For the input data store, choose the S3 bucket for the cards producer.
For IAM role, choose the AWS Glue service role created by the CloudFormation template.
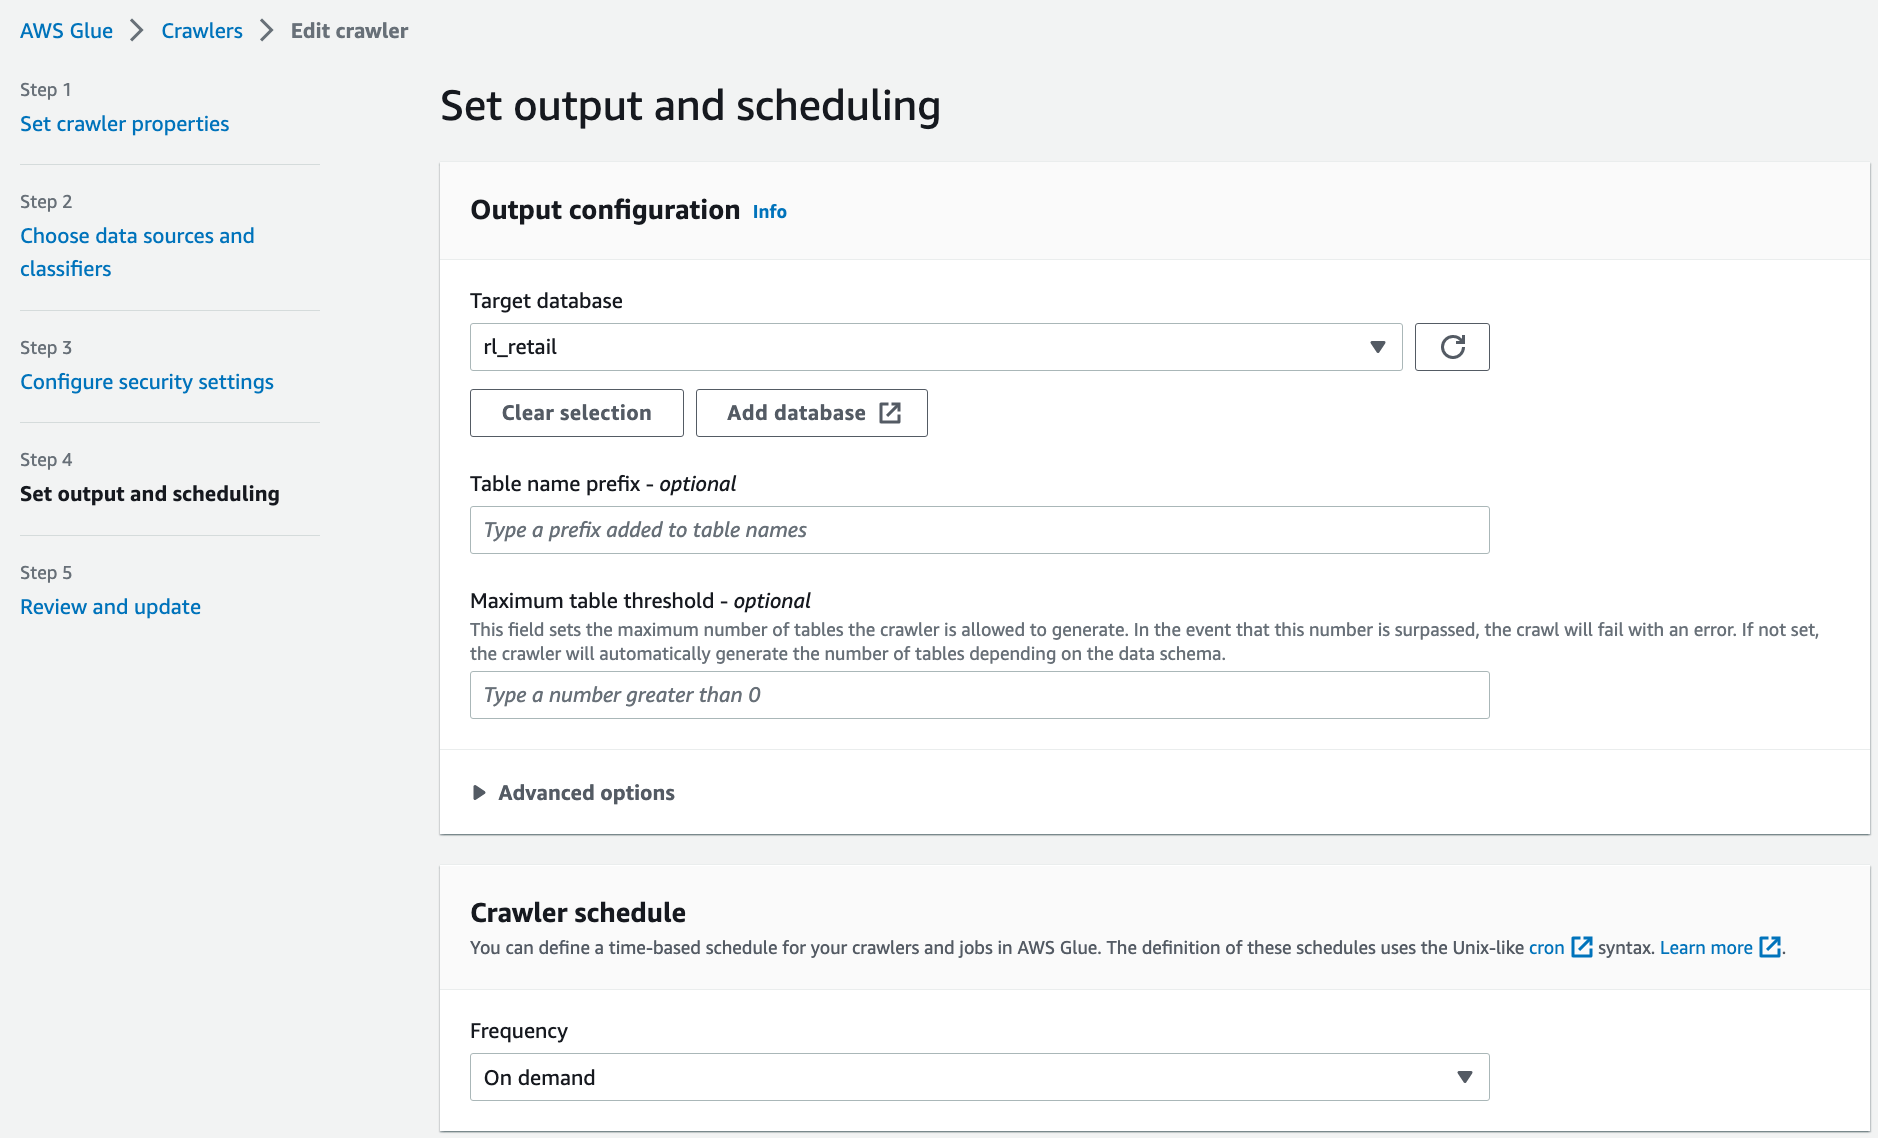
For Schedule, choose Run on demand.
For the output database, choose the resource link database rl_cards corresponding to the cards database.
Verify all the information and choose Save.
Repeat these steps for the crawler corresponding to the retail producer.
Select both crawlers and choose Run crawler.
When the crawlers finish, they create tables corresponding to each producer in their respective resource link databases. The table schemas are present in the shared database in the central account.
对cards和retail databases,uncheck "Use only IAM access control for new tables in this database".
否则会有如下报错
ERROR : Service Principal: glue.amazonaws.com is not authorized to perform: glue:GetTable on resource: arn:aws:glue:<aws-region>:<CentralAccountID>:catalog because no resource-based policy allows the glue:GetTable action (Database name: rl_cards, Table Name: cards)
Configure Lake Formation tags in the central account
Perform fine-grained access control for the tables that the crawlers created to support different consumption use cases using Lake Formation tags.
Tag columns
First, we tag sensitive columns in the cards table corresponding to the cards database, first using the Classification tag that we created earlier.
Log in to central account as IAM user ProducerSteward.
On the Lake Formation console, in the navigation pane, choose Data catalog and then choose Tables.
You should see three tables: the cards table corresponding to cards database, and the reviews and customers tables corresponding to the retail database.
Choose the cards table.
Navigate to the Schema section and choose Edit schema.
Select all the columns and choose Edit tags.
Choose Assign new LF-Tag.
For Assigned keys, enter Classification and for Values, choose Non-Sensitive.
Choose Save.
Next, we selectively tag the sensitive columns.
In the Edit schema section, select columns card number, card holder’s name, cvv/cvv2, and card pin.
Choose Edit tags.
For Assigned keys, enter Classification and for Values, choose Sensitive.
Choose Save.
Choose Save as new version to save the schema.
Tag tables
Next, we tag the reviews and customer tables under the retail database using the LOB:retail tag that we created earlier.
On the Tables page, select the reviews table and on the Actions menu, choose Edit LF-tags.
Choose Assign new LF-Tag.
For Assigned keys, choose LOB:Retail and for Values, choose Reviews.
Choose Save.
Repeat the steps for the "customer" table. Choose "LOB:Retail" for the key and "Customer" for the value.
Grant tag permissions
Grant LF-tag permissions to the external consumer account.
On the Lake Formation console, in the navigation pane, choose Permissions, then choose Administrative roles and tasks and choose LF-tag permissions.
Choose Grant.
For Principals, select External accounts.
For AWS account or AWS organization, enter the AWS account number corresponding to the consumer account.
For LF-Tags, choose Add LF-Tag. For Key, choose "LOB" and for Values, choose "Retail" and "Cards". Repeat these steps for key "Classification" with values "Non-Sensitive" and "Sensitive", and key "LOB:Retail" with values "Reviews" and "Customer".
For Permissions, choose "Describe". For Grantable permissions, choose "Describe".
Choose Grant.
Grant Lake Formation policy tag expression permissions to the external consumer account.
In the consumer account, accept the resource shares.
Uncheck "Use only IAM access control for new databases" and "Use only IAM access control for new tables in new databases".
In the navigation pane, choose Data lake permissions and choose Grant.
In the Principals section, select External accounts. For AWS account or AWS organization, enter the AWS account number corresponding to the consumer account.
For LF-Tags or catalog resources, select Resources matched by LF-Tags. Choose Add LF-Tag. For Key, choose "LOB" and for Values, choose "Retail".
For Database permissions, select "Describe". For Grantable permissions, select "Describe".
Choose Grant.
Repeat these steps to grant permissions on the policy tag expression LOB=Cards.
Grant table permissions
In the navigation pane, choose Data lake permissions and choose Grant.
For Principals, select External accounts. For AWS account or AWS organization, enter the AWS account number corresponding to the consumer account.
For LF-Tags or catalog resources, select Resources matched by LF-Tags. Add key LOB with value Retail, and key LOB:Retail with values Reviews and Customer.
For Table Permissions, select Select and Describe. For Grantable permissions, select Select and Describe.
Choose Grant.
Repeat these steps to grant permissions on the policy tag expressions LOB=Cards and Classification = (Non-Sensitive or Sensitive).
Share and consume tables in the consumer account
When you sign in to the Lake Formation console in the consumer account as ConsumerAdmin, you can see all the tags and the corresponding values that were shared by the producer.
Share and consume tables in the consumer account
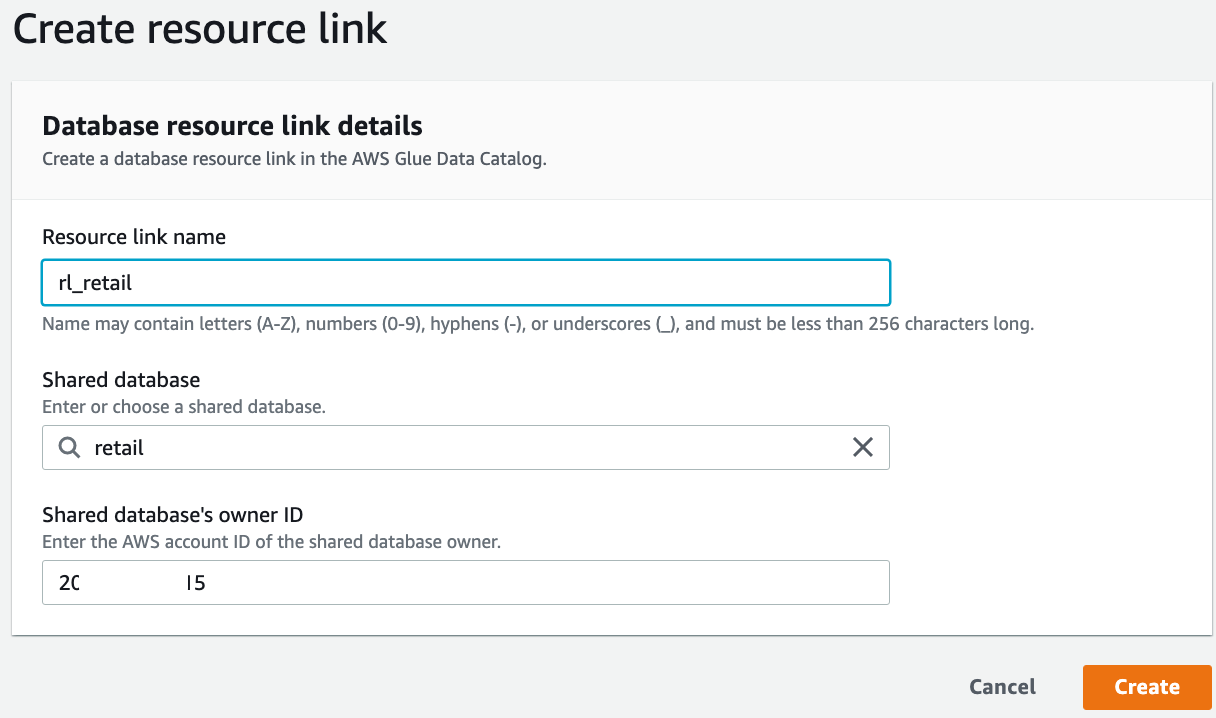
Create a resource link to the shared database
On the Databases page on the Lake Formation console, you can see all the databases that were shared to the consumer account. To create a resource link, complete the following steps:
On the Databases page, select the "cards" database and on the Actions menu, choose Create resource link.
Enter the resource link name as "rl_cards".
Leave the shared database and shared database's owner ID as default.
Choose Create.
Follow the same process to create the "rl_retail" resource link.
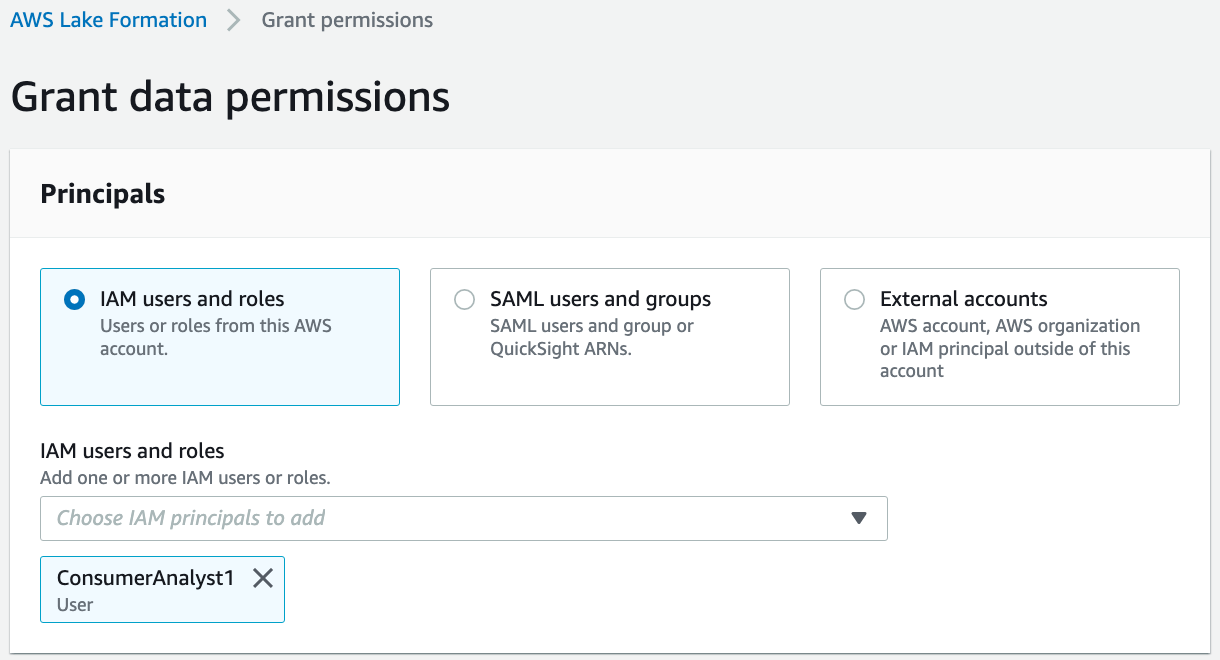
Grant Describe permission to ConsumerAnalyst1
To grant Describe permissions on resource link databases to ConsumerAnalyst1, complete the following steps:
On the Databases page, select the resource database rl_retail and on the Actions menu, choose Grant.
In the Grant data permissions section, select IAM users and roles.
Choose the role ConsumerAnalyst1.
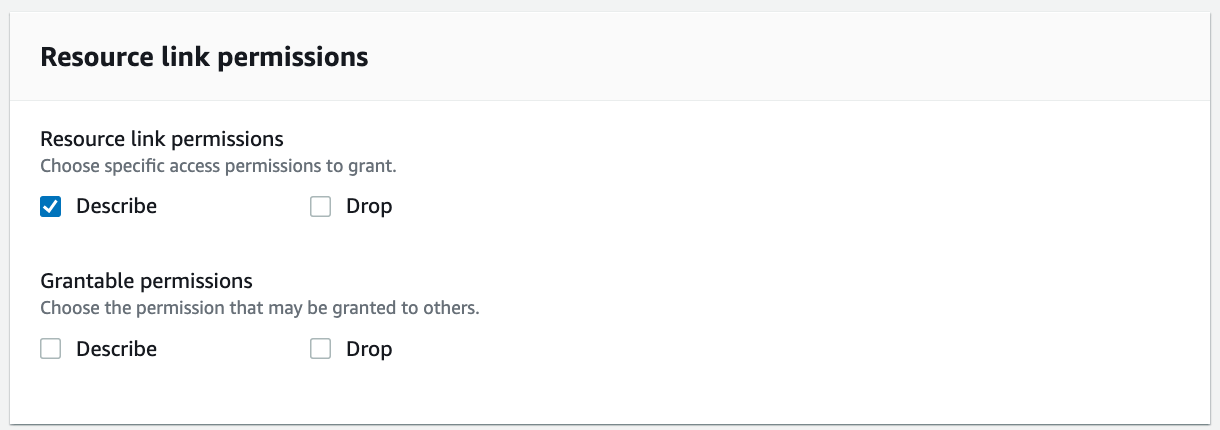
In the Resource link permissions section, select Describe.
Choose Grant.
Follow the same steps to grant rl_cards access to ConsumerAnalyst2.
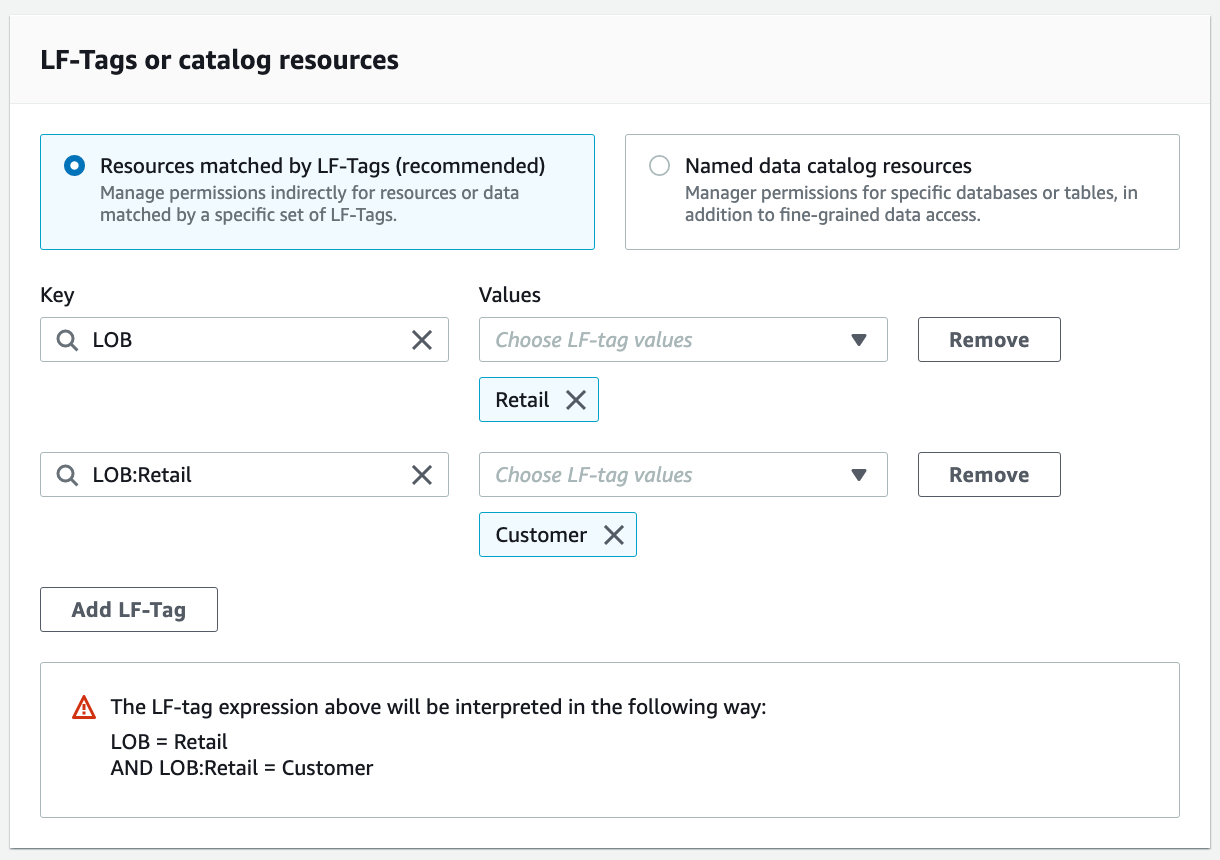
Grant Tag permissions to ConsumerAnalyst1
To grant Tag permissions on the LOB:Retail Customer tag to ConsumerAnalyst1 to access the sales table, complete the following steps:
On the Lake Formation console, on the Data lake permission page, choose Grant.
In the Grant data permissions section, select IAM users and roles. Choose user "ConsumerAnalyst1".
For LF-Tags or catalog resources, select Resources matched by LF-Tags. Add the key "LOB" with value "Retail", and the key "LOB:Retail" with value "Customer".
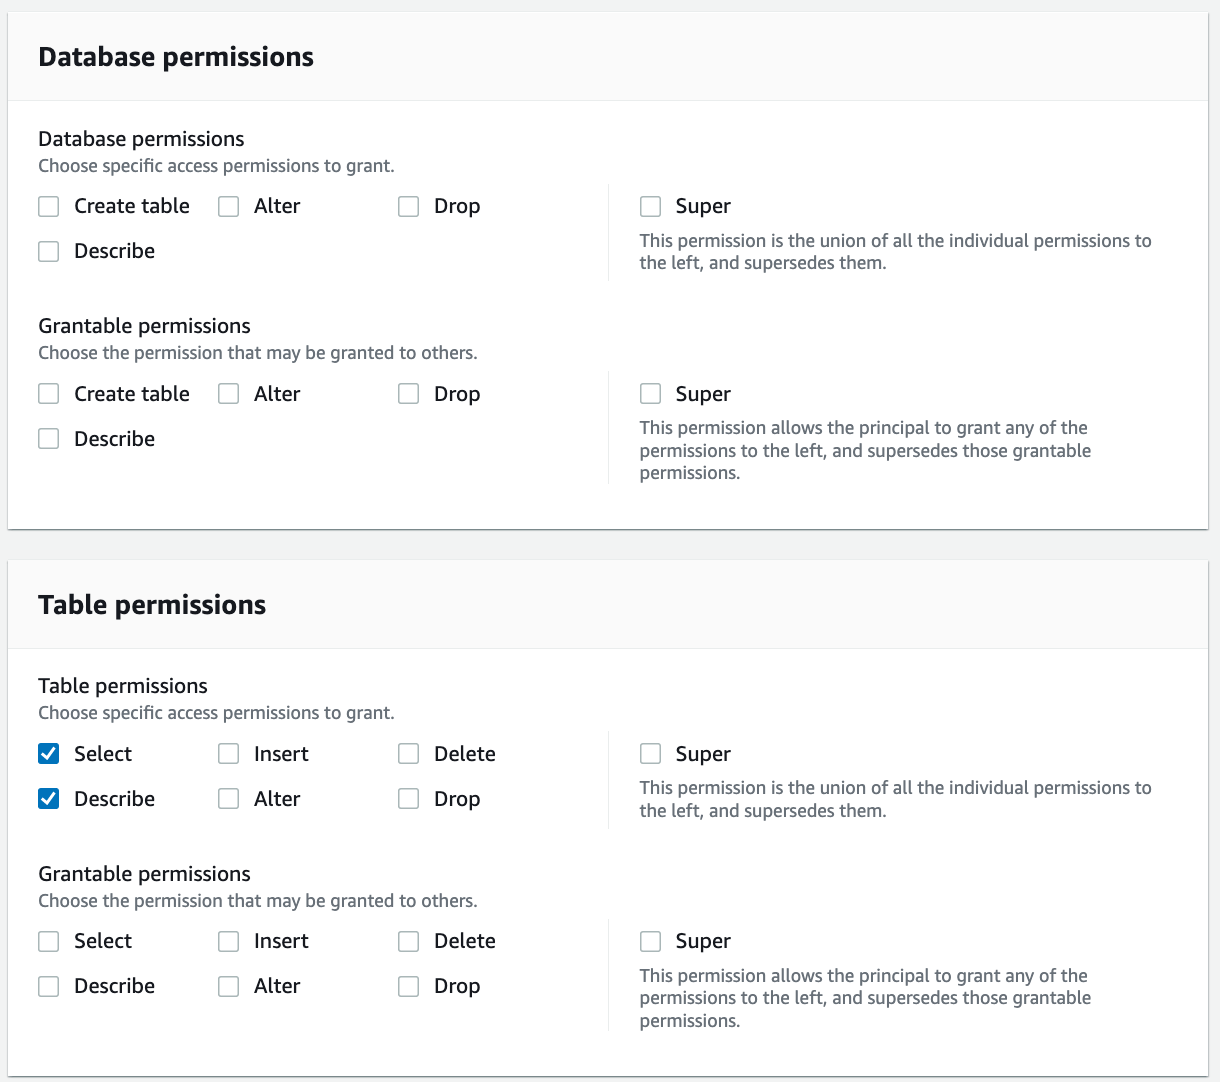
For Table permissions, select Select and Describe.
Choose Grant.
Access to the customers table inside the rl_retail database is granted to ConsumerAnalyst1.
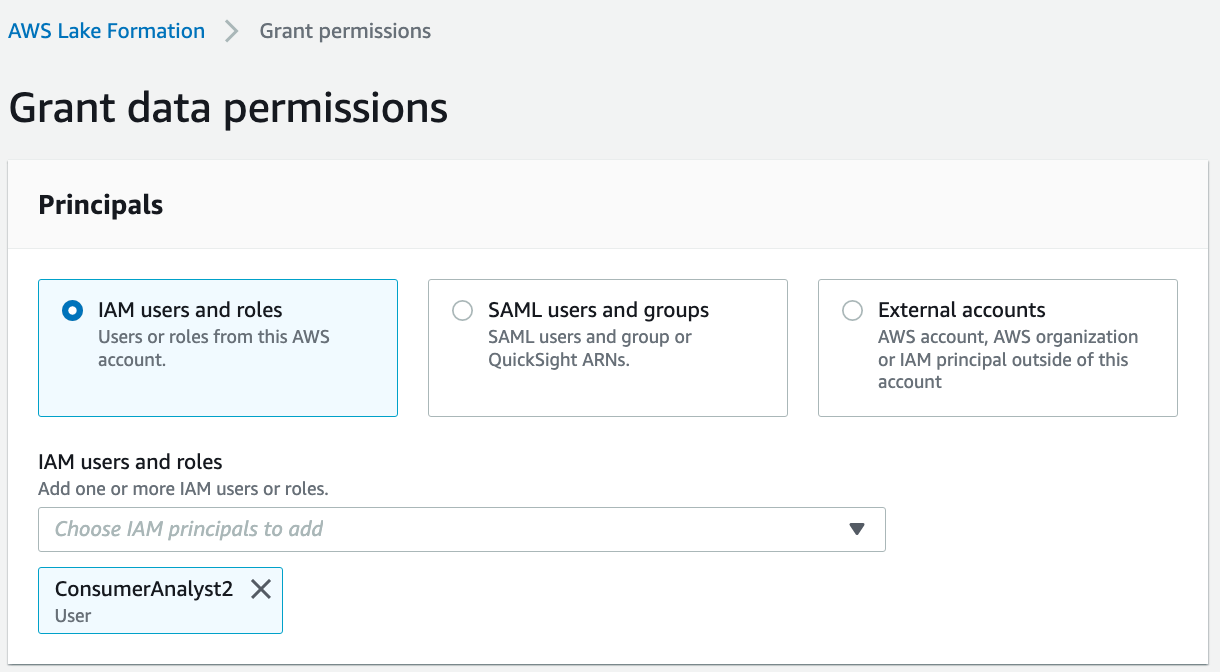
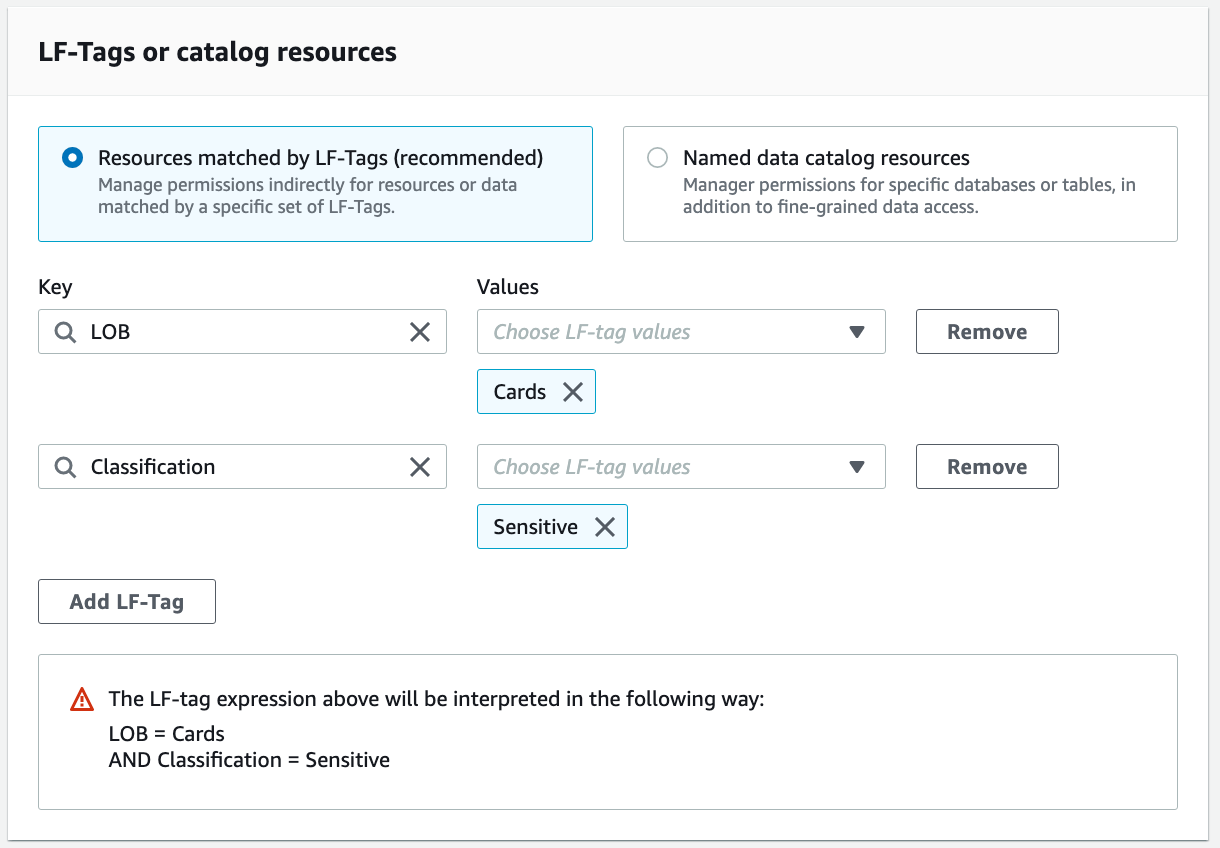
Grant Tag permissions to ConsumerAnalyst2
To grant Tag permissions on the Classification:Sensitive tag to l to access attributes tagged as Sensitive in the cards table, complete the following steps:
On the Lake Formation console, on the Data lake permission page, choose Grant.
In the Grant data permissions section, select IAM users and roles.
Choose the role ConsumerAnalyst2.
For LF-Tags or catalog resources, select Resources matched by LF-Tags.
Add the key LOB with value Cards, and the key Classification with value Sensitive.
For Table permissions, select Select and Describe.
Choose Grant.
Access to attributes tagged as sensitive in the cards table inside the rl_cards database is granted to ConsumerAnalyst2.
Validate the access to ConsumerAnalyst1
To confirm ConsumerAnalyst1 access, complete the following steps:
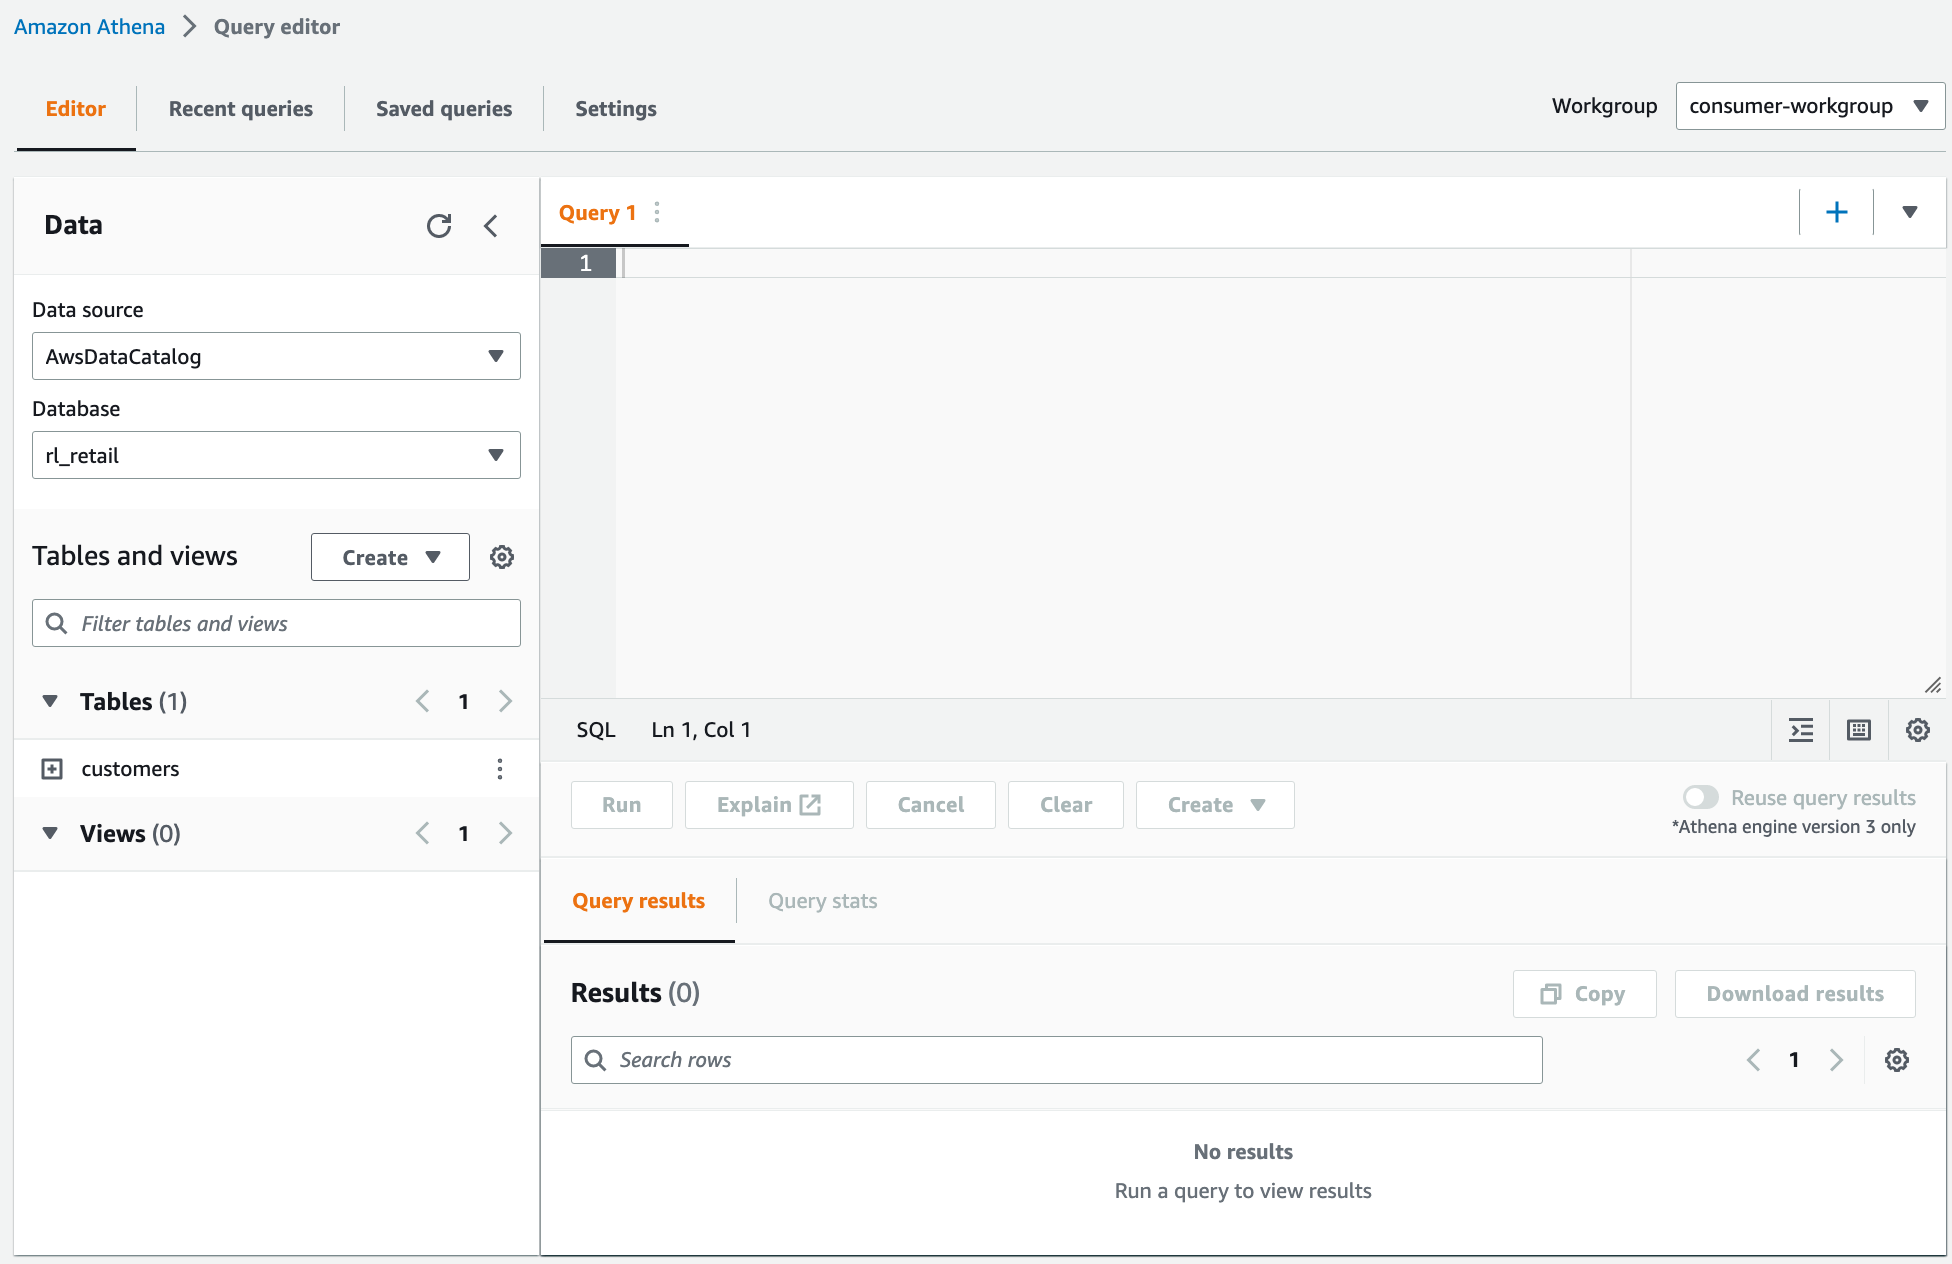
Logon the Athena console using IAM user "ConsumerAnalyst1". For Workgroup, choose consumer-workgroup.
Choose Acknowledge.
Choose the database rl_retail.
You should be able to see the customers table and be able to query.
Validate the access to ConsumerAnalyst2
To confirm ConsumerAnalyst2 access, complete the following steps:
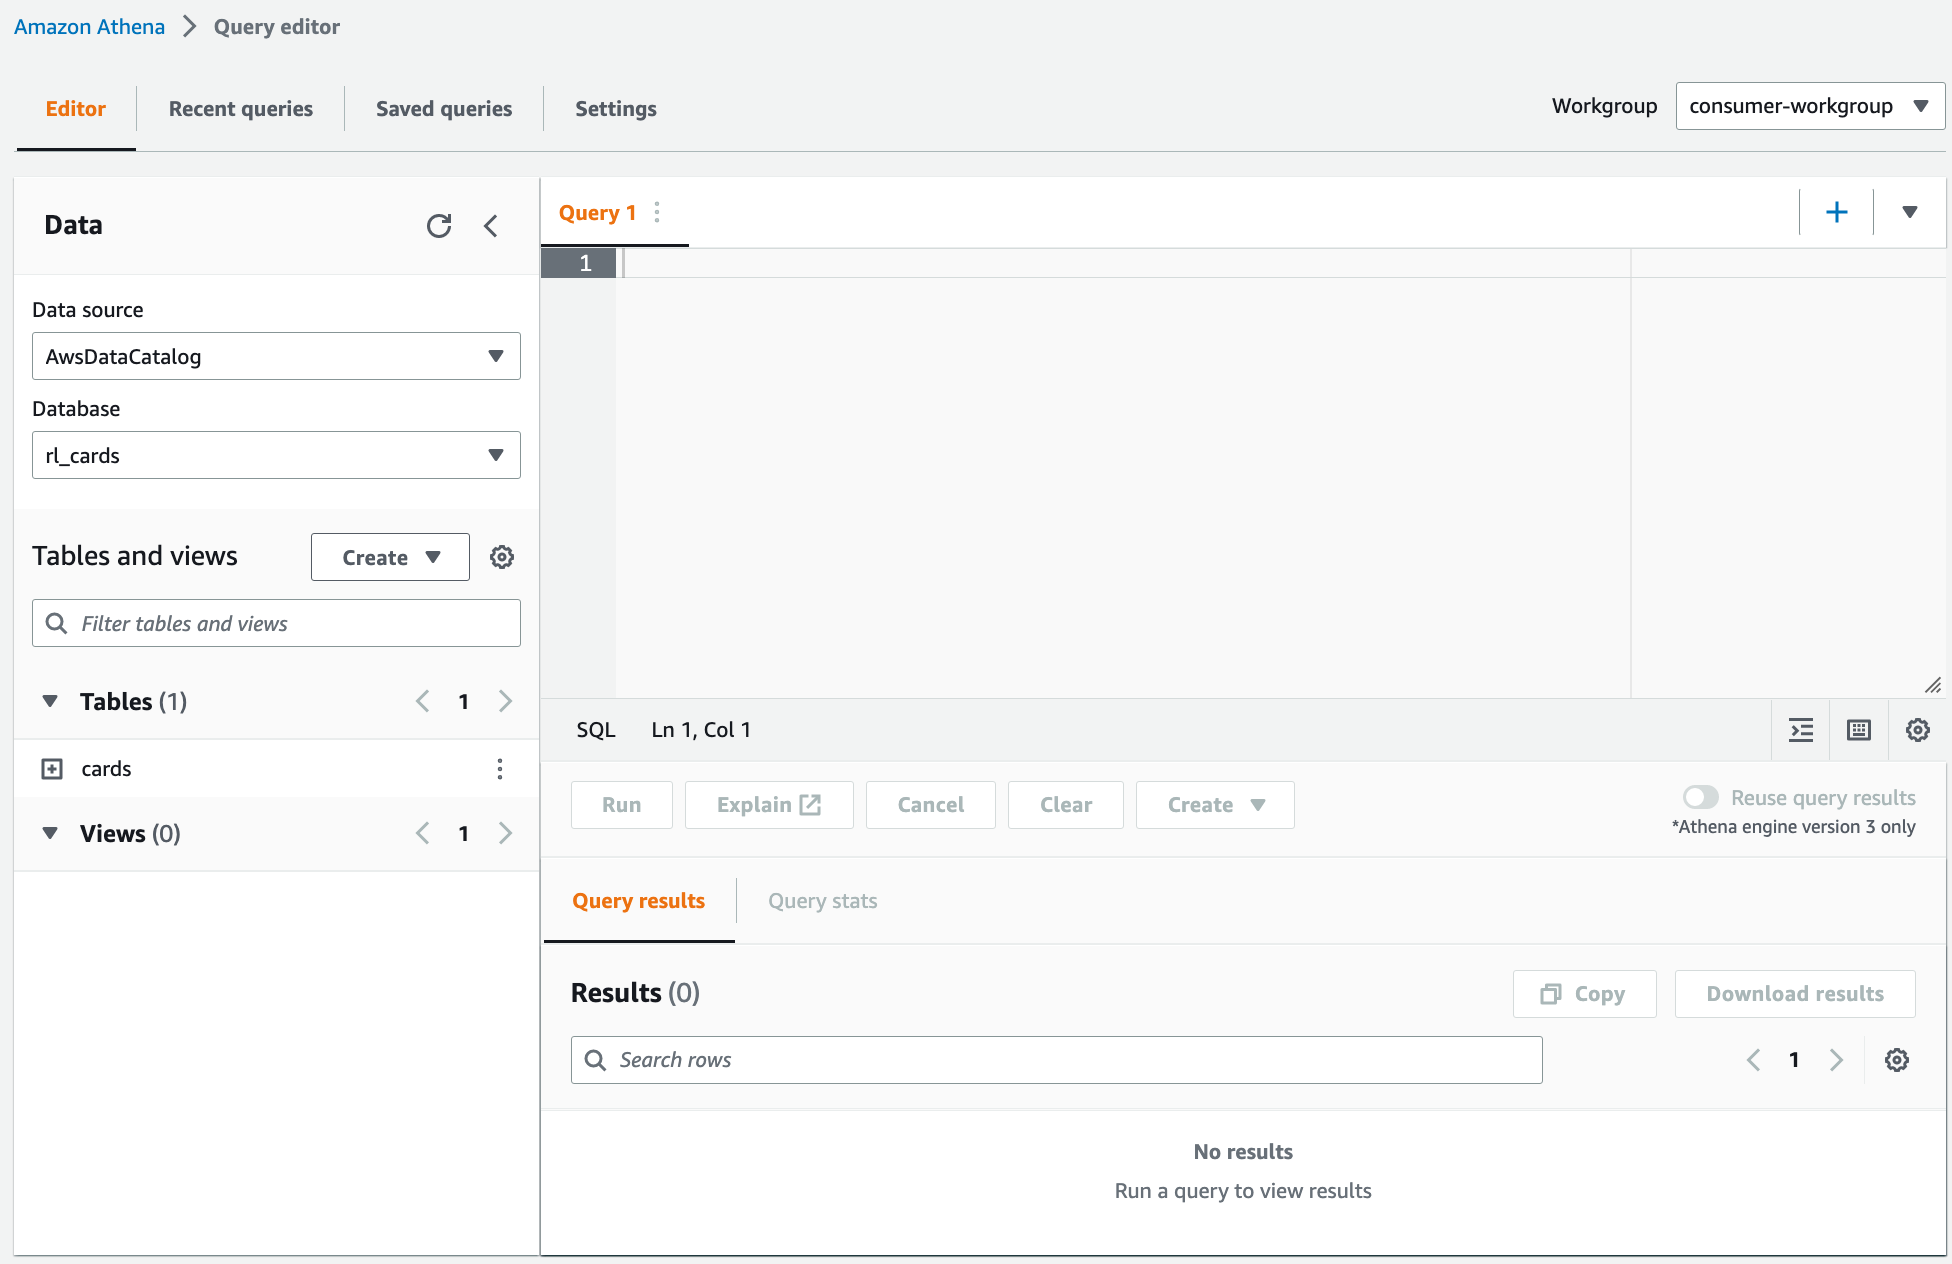
Logon the Athena console using IAM user "ConsumerAnalyst2". for Workgroup, choose consumer-workgroup.
Choose Acknowledge.
Choose the database rl_cards.
You should be able to see only the sensitive attributes from the cards table.
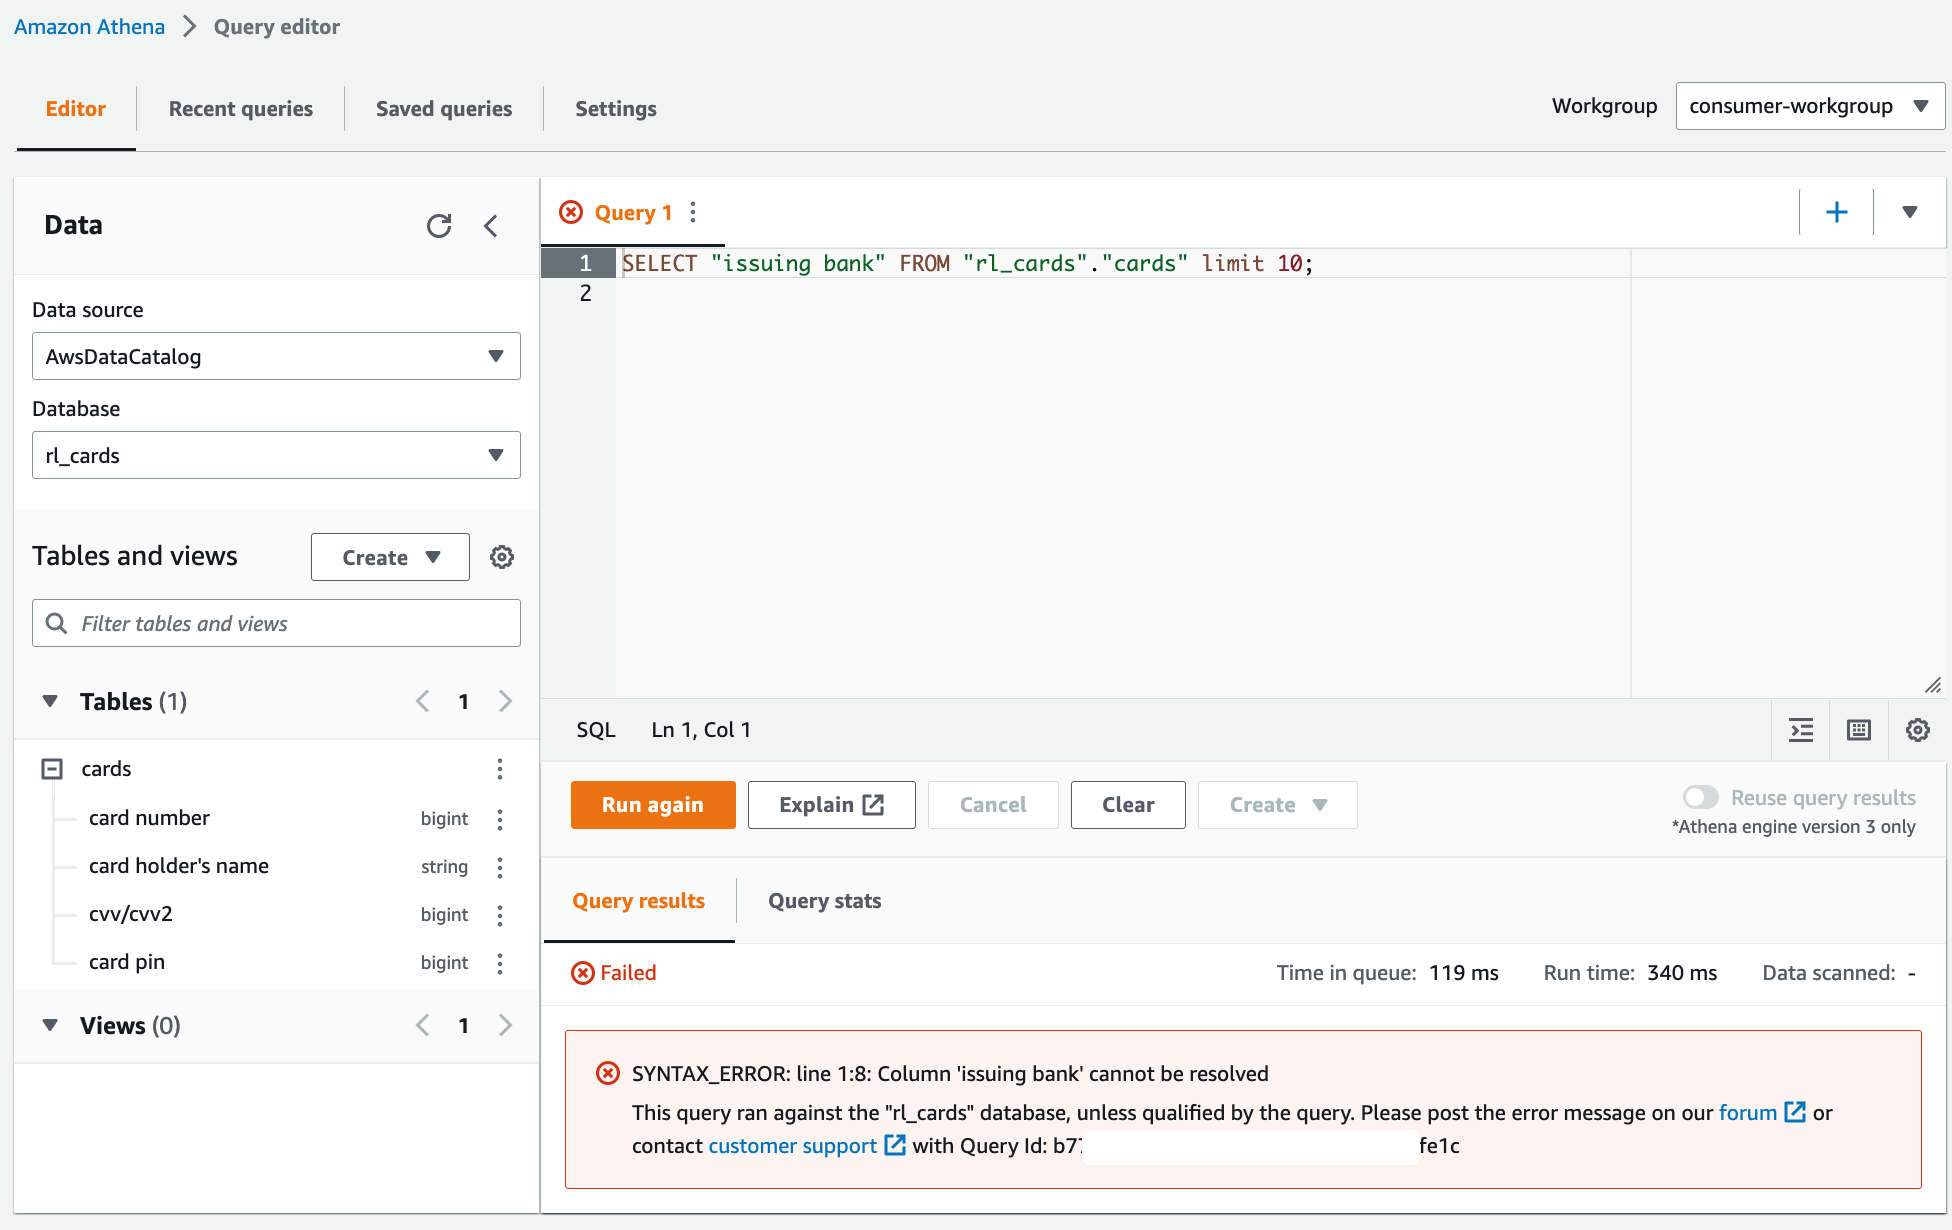
As a thought experiment, you can also check to see the Lake Formation Tag-based access policy behavior on columns to which the user doesn't have policy grants.
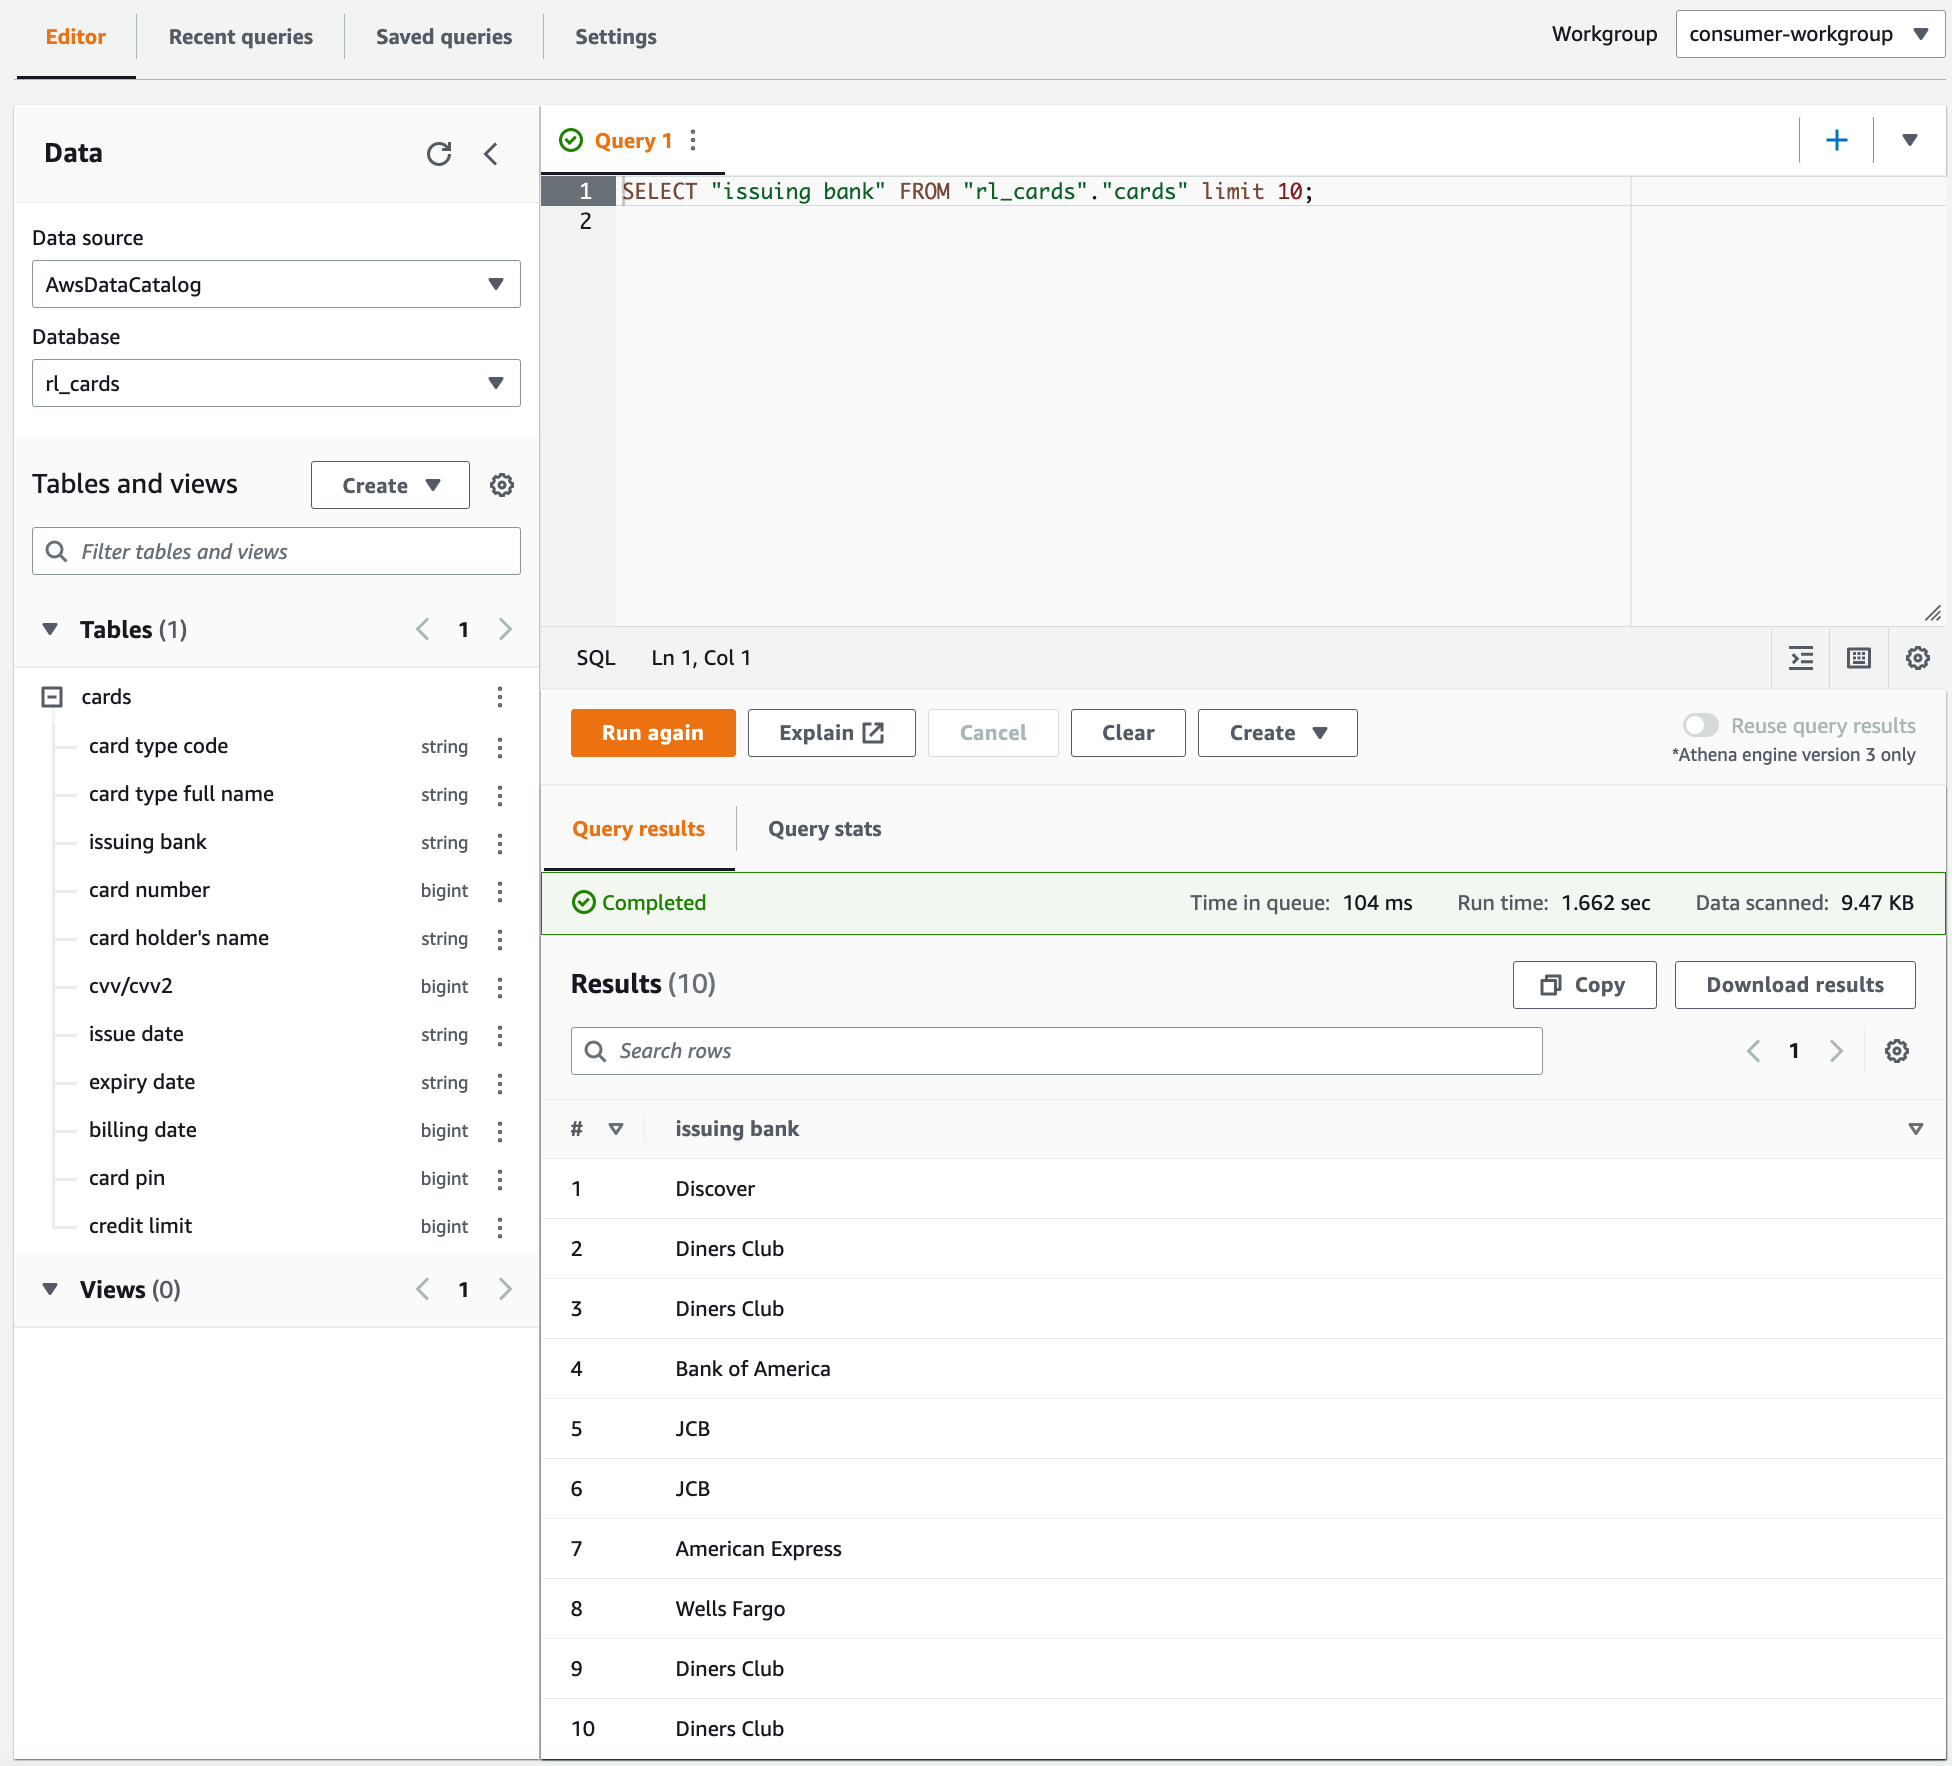
When an untagged column is selected from the table rl_cards.cards, Athena returns an error. For example, you can run the following query to choose the untagged column "issuing bank" which is non-sensitive.
SELECT "issuing bank" FROM "rl_cards"."cards" limit 10;
用ConsumerAdmin用户执行同样的SQL命令:
-
References
https://aws.amazon.com/blogs/big-data/build-a-modern-data-architecture-and-data-mesh-pattern-at-scale-using-aws-lake-formation-tag-based-access-control/
Cross-account best practices and limitations
Step 2: Lake Formation cross-account sharing prerequisites
Cross-account data sharing prerequisites
-