Integrate with your AWS environment with ChatGPT
Architecture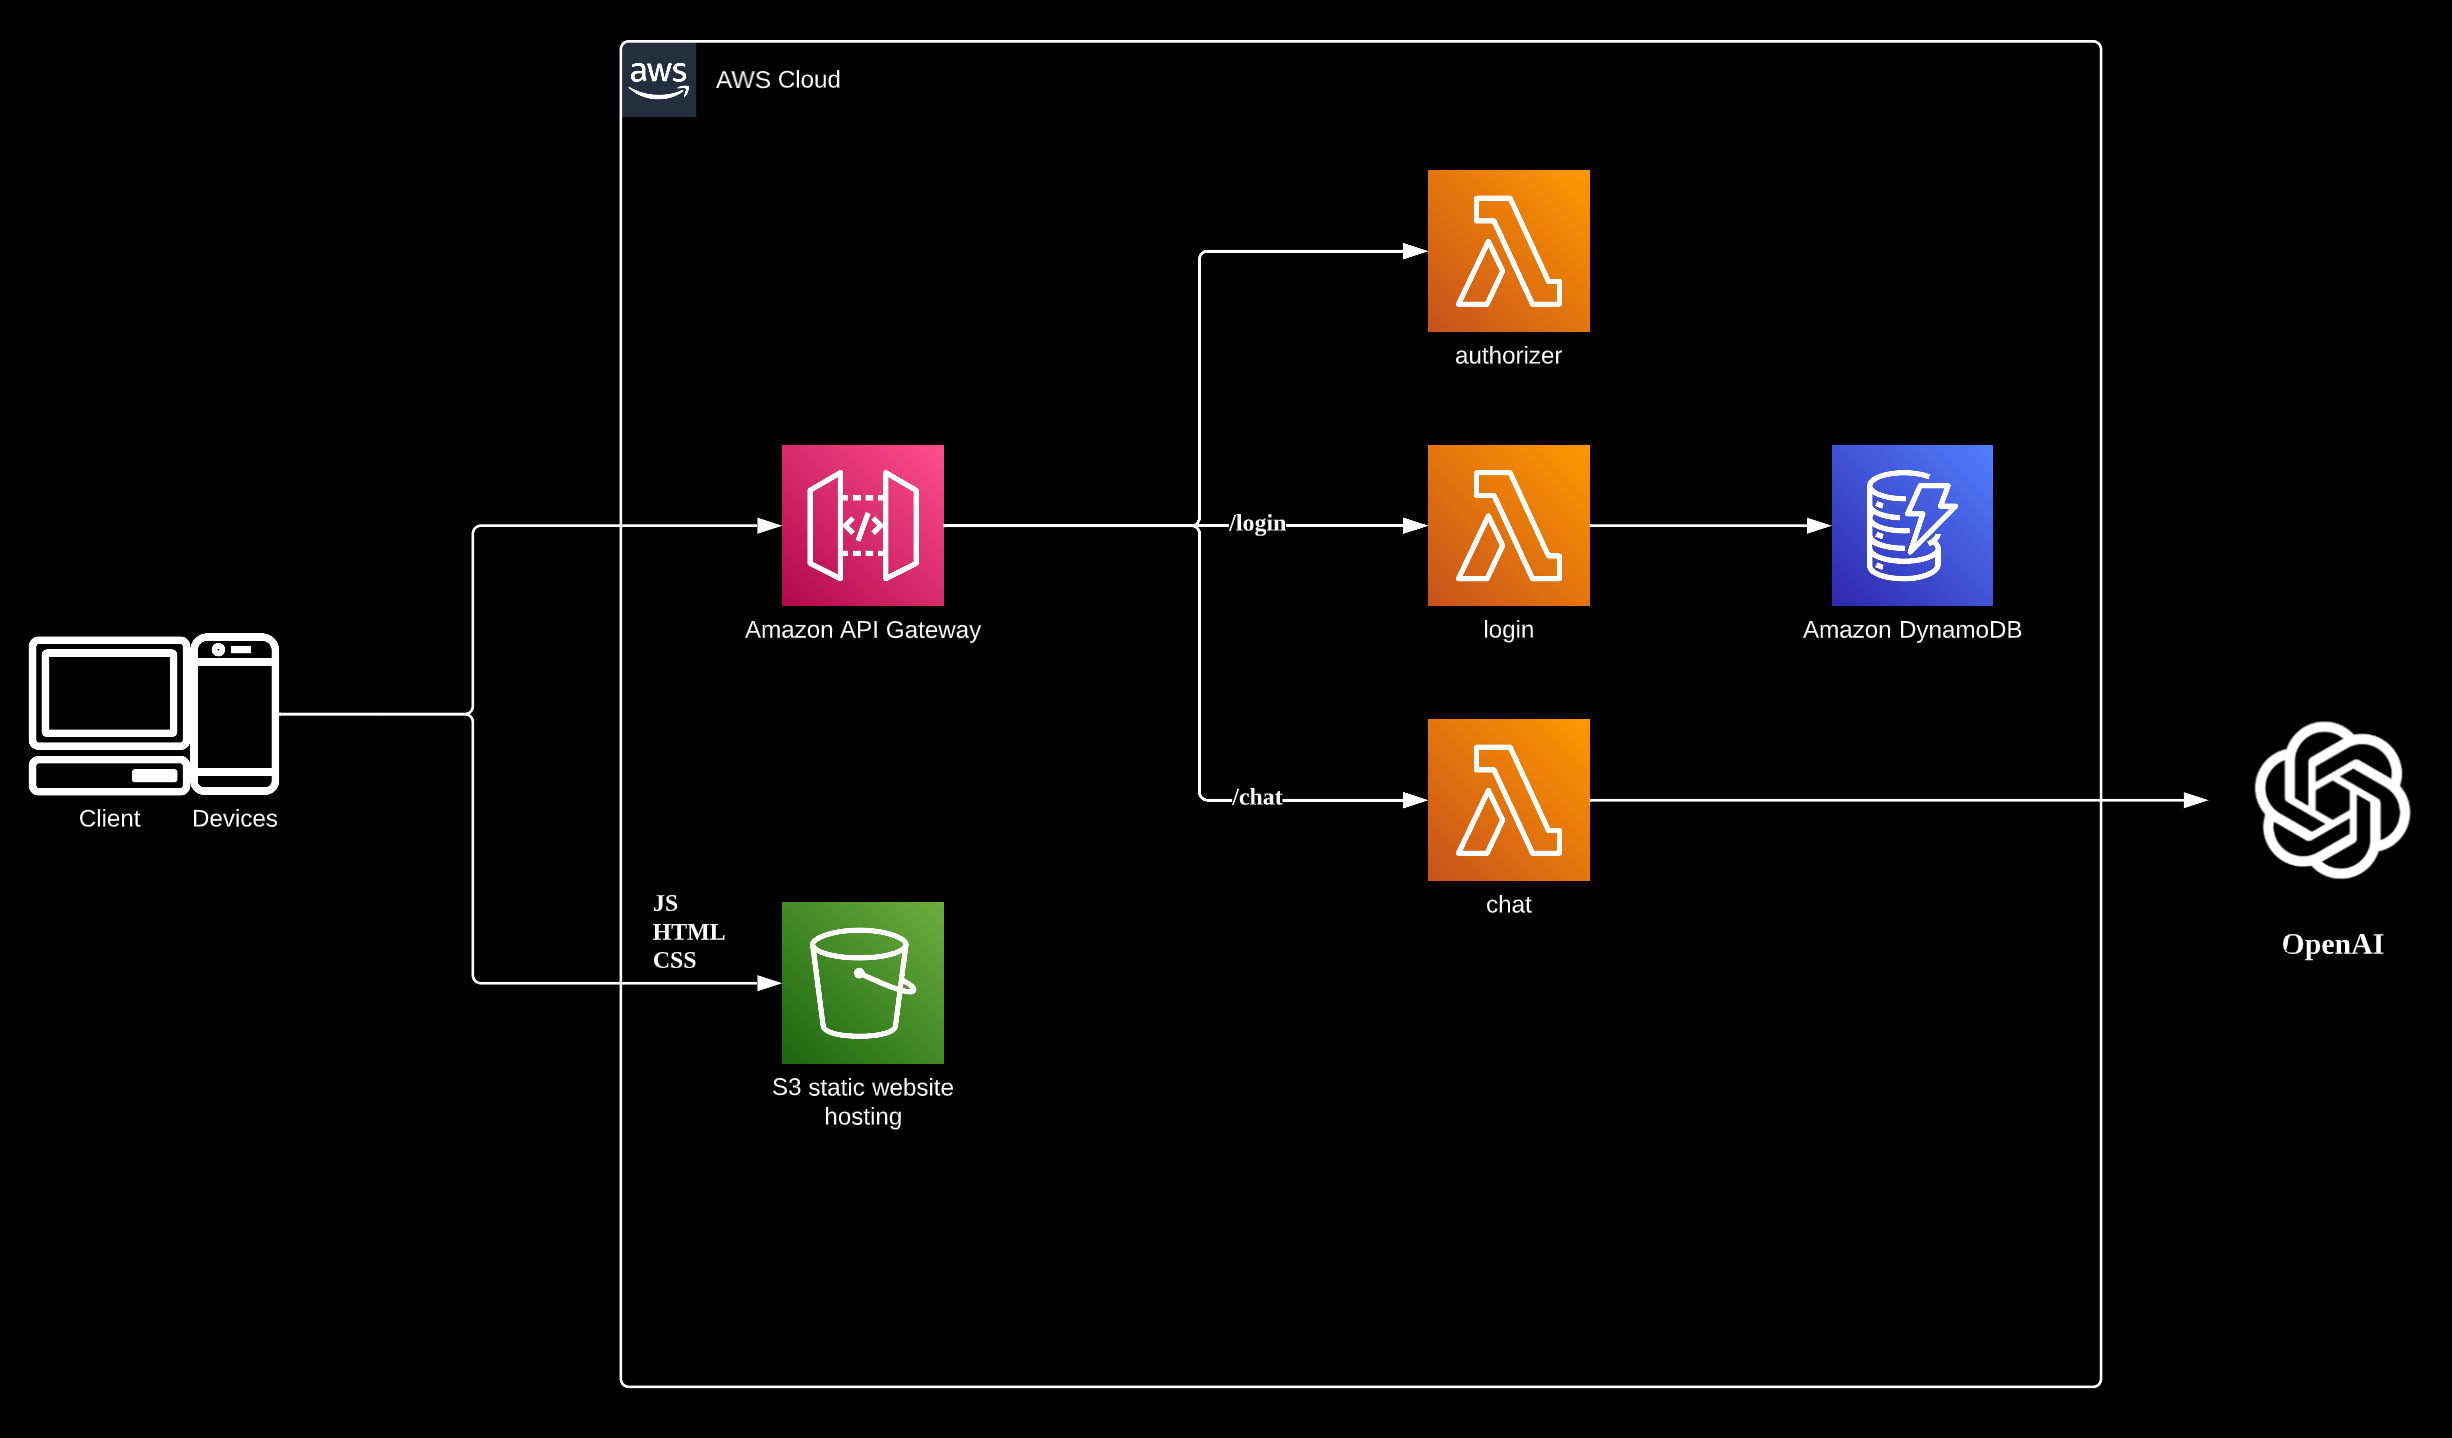
To quickly test the integration of ChatGPT with my environment, I utilized this architecture to gain a quick use experience. However, there are several areas where this deployment can be improved.
Firstly, the AWS HTTP protocol API gateway has a maximum timeout of 30 seconds. After 30 seconds, the HTTP request will be terminated, leading to an HTTP error 503.
Additionally, the web site could be migrated to a containerized environment to provide more control. Currently, the DynamoDB is being used as the identity provider in this demo. To enhance security, a more standardized authentication method could be implemented for authentication purposes.
Login OpenAI with URL https://platform.openai.com/login/.
Generate an API secret key.
设置本地环境
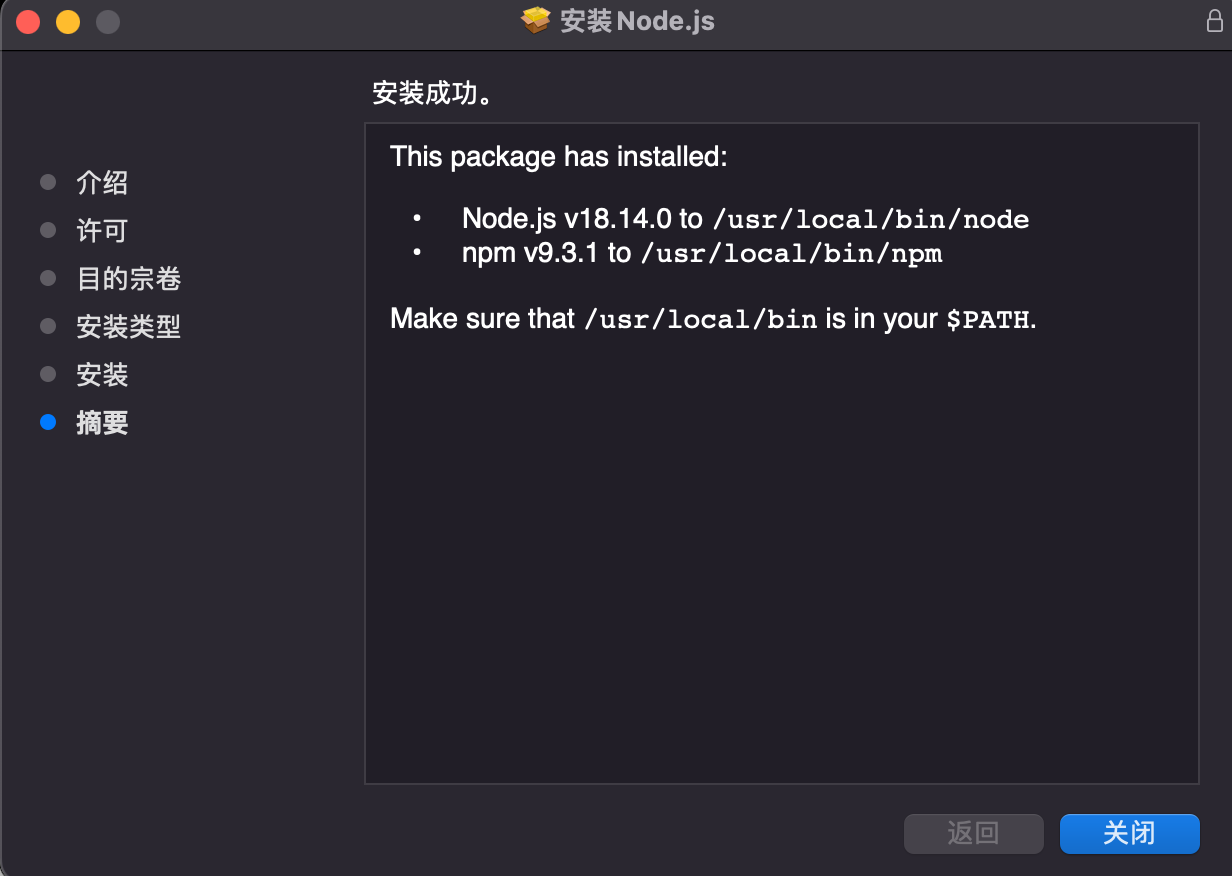
安装 Node.js on MacOS.Download Node.js from https://nodejs.org/en/download/.
Install Node.js after download complete.
获取源代码并构建包
从GitHub下载代码包,保存在当前目录下的chatbotgpt子目录中。% git clone https://github.com/aws-samples/aws-serverless-openai-chatbot-demo.git chatbotgpt
Cloning into 'chatbotgpt'...
remote: Enumerating objects: 102, done.
remote: Counting objects: 100% (102/102), done.
remote: Compressing objects: 100% (89/89), done.
remote: Total 102 (delta 32), reused 73 (delta 13), pack-reused 0
Receiving objects: 100% (102/102), 1.61 MiB | 1.52 MiB/s, done.
Resolving deltas: 100% (32/32), done.
该项目文件夹结构为:
% tree chatbotgpt
chatbotgpt
├── CODE_OF_CONDUCT.md
├── CONTRIBUTING.md
├── LICENSE
├── README.md
├── assets
│   ├── UIdemo.png
│   ├── apigw1.png
│   ├── architecture.png
│   ├── cors.png
│   ├── createlambda1.png
│   ├── daynamo1.png
│   ├── dynamo2.png
│   ├── lambdaauth.png
│   ├── openaikey.png
│   └── runtimeout.png
├── client
│   ├── package-lock.json
│   ├── package.json
│   ├── public
│   │   ├── index.html
│   │   └── robots.txt
│   ├── src
│   │   ├── App.css
│   │   ├── App.js
│   │   ├── commons
│   │   │   ├── apigw.js
│   │   │   ├── localStorage.js
│   │   │   └── use-auth.js
│   │   ├── index.css
│   │   ├── index.js
│   │   └── pages
│   │       ├── chatpage.jsx
│   │       ├── components.jsx
│   │       ├── login.jsx
│   │       └── private-route.jsx
│   └── yarn.lock
└── server
    ├── dynamodb.cli.txt
    ├── lambda_authorization
    │   ├── index.mjs
    │   ├── package-lock.json
    │   ├── package.json
    │   └── yarn.lock
    ├── lambda_chat
    │   ├── index.mjs
    │   ├── package.json
    │   └── yarn.lock
    └── lambda_login
        ├── index.mjs
        ├── package-lock.json
        ├── package.json
        └── yarn.lock

10 directories, 42 files
在server文件夹中,包含后端Lambda function code。在client文件夹中,包含前端网页的代码。
分别转到server文件夹下的各个Lambda function文件夹,安装依赖项并打包制作成zip后的代码文件,上传到Amazon Lambda。
NB
我在login的Lambda中对region和table name的设置做了细微的调整(for AWS global)和修正(原hard code的DynamoDB table名字不正确)。
// Copyright Amazon.com, Inc. or its affiliates. All Rights Reserved.
// SPDX-License-Identifier: MIT-0

import jwt from "jsonwebtoken";
import bcryptjs from "bcryptjs";
import { DynamoDBClient, GetItemCommand } from "@aws-sdk/client-dynamodb";

const DEFAULT_REGION = "us-west-2";
const TABLE_NAME = "chat_user_info";

const createToken = (username) => {
  return jwt.sign({ username: username }, process.env.TOKEN_KEY, {
    expiresIn: "24h",
  });
};

// const hashPassword = async (plaintextPassword) => {
//   const hash = await bcrypt.hash(plaintextPassword, 5); //It commonly ranges between 5 and 15. In this demo, we will use 5.
//   console.log(hash);
// };

// const comparePassword = async (plaintextPassword, hash) => {
//   const result = await bcrypt.compare(plaintextPassword, hash);
//   return result;
// };

const formatResponse = (code, errormsg, token) => {
  const response = {
    isAuthorized:(code === 200),
    body: {
      message: errormsg,
      token: token,
    },
  };
  return response;
};

const queryDynamoDb = async (key) => {
  const client = new DynamoDBClient({
    region: DEFAULT_REGION,
    TableName: TABLE_NAME,
  });
  const params = {
    Key: { username: { S: key } },
    TableName: TABLE_NAME,
  };
  const command = new GetItemCommand(params);
  try {
    const results = await client.send(command);
    console.log(results);
    if (!results.Item) {
      return null;
    } else {
      console.log(results.Item);
      return results.Item.password.S;
    }
  } catch (err) {
    console.error(err);
    return null;
  }
};

export const handler = async (event) => {
  //query user in DB
  const body = JSON.parse(event.body);
  console.log(body);
  const password = await queryDynamoDb(body.username);

  //if user is not found, return 403
  if (!password) {
    return formatResponse(403, "User not found", "");
  }

  //if the password is not match, return 403
  if (password !== body.password) {
    return formatResponse(403, "Invalid credential", "");
  }

  //create jwt token
  const token = createToken(body.username);
  return formatResponse(200, "success", token);
};
要制作zip文件,执行以下命令:
% cd server/lambda_login
% npm install
% zip -r lambda_login.zip .
% cd ..
% cd lambda_chat
% npm install
added 10 packages, and audited 11 packages in 14s

1 package is looking for funding
  run `npm fund` for details

found 0 vulnerabilities
% zip -r lambda_chat.zip .
% cd ..
% cd lambda_authorization
% npm install
added 11 packages, and audited 12 packages in 1s

1 package is looking for funding
  run `npm fund` for details

found 0 vulnerabilities
% zip -r lambda_auth.zip .
% cd ..
创建Lambda函数
创建Lambda函数处理聊天会话
首先创建一个IAM role,这里使用的名称是role_lambda_chatgpt。它用来给Lambda function login赋予必要的权限。它上面挂了AWSLambdaVPCAccessExecutionRole这个AWS managed IAM policy以及如下的DynamoDB inline policy。{
"Version": "2012-10-17",
"Statement": [
{
"Action": [
"dynamodb:BatchGetItem",
"dynamodb:Describe*",
"dynamodb:List*",
"dynamodb:GetItem",
"dynamodb:Query",
"dynamodb:Scan",
"dynamodb:PartiQLSelect"
],
"Effect": "Allow",
"Resource": "arn:aws:dynamodb:us-west-2:<111122223333>:table/chat_user_info"
}
]
}
它的trust relationship如下所示:
{
    "Version": "2012-10-17",
    "Statement": [
        {
            "Effect": "Allow",
            "Principal": {
                "Service": "lambda.amazonaws.com"
            },
            "Action": "sts:AssumeRole"
        }
    ]
}
再创建一个IAM role,这里使用的名称是role_lambda_chatgpt_basic。它用来给其余2个Lambda function赋予必要的权限。它上面只挂了AWSLambdaVPCAccessExecutionRole这个AWS managed IAM policy。
在AWS Lambda控制台中,创建一个名为openai-chat的函数,选择Node.js作为运行时。将上一步创建的lambda_chat.zip上传到Lambda代码源。OpenAI的接口的响应时间往往会超过3秒(AWS Lambda function默认的timeout),因此要请将这个Lambda函数的超时设置更改为更大的值,这里设置为1分钟。
% aws lambda create-function --function-name openai-chat --runtime nodejs18.x --role arn:aws:iam::<111122223333>:role/role_lambda_chatgpt_basic --zip-file fileb://lambda_chat/lambda_chat.zip --architectures x86_64 --region us-west-2 --memory-size 256 --handler index.handler --timeout 120
{
    "FunctionName": "openai-chat",
    "FunctionArn": "arn:aws:lambda:us-west-2:111122223333:function:openai-chat",
    "Runtime": "nodejs18.x",
    "Role": "arn:aws:iam::<111122223333>:role/role_lambda_chatgpt_basic",
    "Handler": "index.handler",
    "CodeSize": 290459,
    "Description": "",
    "Timeout": 120,
    "MemorySize": 256,
    "LastModified": "2023-02-09T11:35:23.476+0000",
    "CodeSha256": "U96X***m8I=",
    "Version": "$LATEST",
    "TracingConfig": {
        "Mode": "PassThrough"
    },
    "RevisionId": "9902b16d-***-81d519ebc8a1",
    "State": "Pending",
    "StateReason": "The function is being created.",
    "StateReasonCode": "Creating",
    "PackageType": "Zip",
    "Architectures": [
        "x86_64"
    ],
    "EphemeralStorage": {
        "Size": 512
    }
}
创建Lambda 函数用于AWS API Gateway请求鉴权
在AWS Lambda 控制台中,创建一个名为chat-authorizer的Lambda函数。将之前创建的lambda_auth.zip文件上传到Lambda。% aws lambda create-function --function-name chat-authorizer --runtime nodejs18.x --role arn:aws:iam::<111122223333>:role/role_lambda_chatgpt_basic --zip-file fileb://lambda_authorization/lambda_auth.zip --architectures x86_64 --region us-west-2 --memory-size 256 --handler index.handler --timeout 10
{
    "FunctionName": "chat-authorizer",
    "FunctionArn": "arn:aws:lambda:us-west-2:<111122223333>:function:chat-authorizer",
    "Runtime": "nodejs18.x",
    "Role": "arn:aws:iam::<111122223333>:role/role_lambda_chatgpt_basic",
    "Handler": "index.handler",
    "CodeSize": 796317,
    "Description": "",
    "Timeout": 10,
    "MemorySize": 256,
    "LastModified": "2023-02-09T11:39:59.307+0000",
    "CodeSha256": "Y4Mq***5K8=",
    "Version": "$LATEST",
    "TracingConfig": {
        "Mode": "PassThrough"
    },
    "RevisionId": "c23f085c-***-49703ddc002e",
    "State": "Pending",
    "StateReason": "The function is being created.",
    "StateReasonCode": "Creating",
    "PackageType": "Zip",
    "Architectures": [
        "x86_64"
    ],
    "EphemeralStorage": {
        "Size": 512
    }
}
创建Lambda函数来处理用户登录请求
在AWS Lambda控制台中,创建一个名为openai-login的Lambda function。将之前创建的lambda_login.zip文件上传到Lambda。此函数将调用DynamoDB的API来验证用户名和密码,因此这个Lambda function挂的role授予了对相关DynamoDB表的只读权限。% aws lambda create-function --function-name openai-login --runtime nodejs18.x --role arn:aws:iam::<111122223333>:role/role_lambda_chatgpt --zip-file fileb://lambda_login/lambda_login.zip --architectures x86_64 --region us-west-2 --memory-size 256 --handler index.handler --timeout 10
{
    "FunctionName": "openai-login",
    "FunctionArn": "arn:aws:lambda:us-west-2:<111122223333>:function:openai-login",
    "Runtime": "nodejs18.x",
    "Role": "arn:aws:iam::<111122223333>:role/role_lambda_chatgpt",
    "Handler": "index.handler",
    "CodeSize": 883225,
    "Description": "",
    "Timeout": 10,
    "MemorySize": 256,
    "LastModified": "2023-02-09T11:42:09.241+0000",
    "CodeSha256": "Lgdv***9AU=",
    "Version": "$LATEST",
    "TracingConfig": {
        "Mode": "PassThrough"
    },
    "RevisionId": "3d3d3966-***-f81b4f02fbcb",
    "State": "Pending",
    "StateReason": "The function is being created.",
    "StateReasonCode": "Creating",
    "PackageType": "Zip",
    "Architectures": [
        "x86_64"
    ],
    "EphemeralStorage": {
        "Size": 512
    }
}
在名为openai-chat的Lambda function中,配置环境变量,键为OPENAI_API_KEY,配置它的值为自己的OpenAI API KEY的值。
在名为chat-authorizer的Lambda function中,配置环境变量TOKEN_KEY,自定义一个值,该值将作为JWT签名密钥。
在名为openai-login的Lambda function中,配置环境变量TOKEN_KEY,其值与chat-authorizer相同。
7. 创建API Gateway
创建一个名为chatbot的HTTP API
% aws apigatewayv2 create-api --name chatbot --protocol-type HTTP{
"ApiEndpoint": "https://<ApiId>.execute-api.us-west-2.amazonaws.com",
"ApiId": "<ApiId>",
"ApiKeySelectionExpression": "$request.header.x-api-key",
"CreatedDate": "2023-02-09T12:15:16+00:00",
"DisableExecuteApiEndpoint": false,
"Name": "chatbot",
"ProtocolType": "HTTP",
"RouteSelectionExpression": "$request.method $request.path"
}
记下这里返回的<ApiId>,后面见到<ApiId>的地方用这里的值进行替换。% aws apigatewayv2 create-stage --api-id <ApiId> --stage-name "\$default" --auto-deploy
{
    "AutoDeploy": true,
    "CreatedDate": "2023-02-09T12:19:12+00:00",
    "DefaultRouteSettings": {
        "DetailedMetricsEnabled": false
    },
    "LastUpdatedDate": "2023-02-09T12:19:12+00:00",
    "RouteSettings": {},
    "StageName": "$default",
    "StageVariables": {},
    "Tags": {}
}
% aws apigatewayv2 create-route --api-id <ApiId> --route-key 'POST /chat'
{
    "ApiKeyRequired": false,
    "AuthorizationType": "NONE",
    "RouteId": "xs***of",
    "RouteKey": "POST /chat"
}
% aws apigatewayv2 create-route --api-id <ApiId> --route-key 'POST /login'
{
    "ApiKeyRequired": false,
    "AuthorizationType": "NONE",
    "RouteId": "cz***c4",
    "RouteKey": "POST /login"
}
对于/chat路由,创建Lambda authorizer,以及集成到Lambda函数
创建一个Lambda authorizer,使用之前创建的chat-authorizer函数。% aws apigatewayv2 create-authorizer --api-id <ApiId> --authorizer-type REQUEST --authorizer-uri arn:aws:apigateway:us-west-2:lambda:path/2015-03-31/functions/arn:aws:lambda:us-west-2:<111122223333>:function:chat-authorizer/invocations --authorizer-payload-format-version 2.0 --name chat-authorizer --identity-source '$request.header.Authorization' --enable-simple-responses --authorizer-result-ttl-in-seconds 300
{
    "AuthorizerId": "<AuthorizerId>",
    "AuthorizerPayloadFormatVersion": "2.0",
    "AuthorizerResultTtlInSeconds": 300,
    "AuthorizerType": "REQUEST",
    "AuthorizerUri": "arn:aws:apigateway:us-west-2:lambda:path/2015-03-31/functions/arn:aws:lambda:us-west-2:<111122223333>:function:chat-authorizer/invocations",
    "EnableSimpleResponses": true,
    "IdentitySource": [
        "$request.header.Authorization"
    ],
    "Name": "chat-authorizer"
}
记下这里返回的<AuthorizerId>,后面见到<AuthorizerId>的地方用这里的值进行替换。另外,下面的ID与具体路由和集成的对应关系也在这里总结出来:
xs***of ~ /chat的Route ID
cz***c4 ~ /login的Route ID
2u***z9 ~ 与路由/chat对应的integration ID
pv***t3 ~ 与路由/login的integration ID
Grant invoke permission
% aws lambda add-permission \
--statement-id chatgpt \
--action lambda:InvokeFunction \
--function-name "arn:aws:lambda:us-west-2:<111122223333>:function:chat-authorizer" \
--principal apigateway.amazonaws.com \
--source-arn "arn:aws:execute-api:us-west-2:<111122223333>:<ApiId>/authorizers/<AuthorizerId>"
{
    "Statement": "{\"Sid\":\"chatgpt\",\"Effect\":\"Allow\",\"Principal\":{\"Service\":\"apigateway.amazonaws.com\"},\"Action\":\"lambda:InvokeFunction\",\"Resource\":\"arn:aws:lambda:us-west-2:<111122223333>:function:chat-authorizer\",\"Condition\":{\"ArnLike\":{\"AWS:SourceArn\":\"arn:aws:execute-api:us-west-2:<111122223333>:<ApiId>/authorizers/<AuthorizerId>\"}}}"
}
创建Lambda集成,集成目标是之前创建的openai-chat函数。
% aws apigatewayv2 create-integration --api-id <ApiId> --integration-type AWS_PROXY --integration-uri arn:aws:lambda:us-west-2:<111122223333>:function:openai-chat --payload-format-version 2.0
{
    "ConnectionType": "INTERNET",
    "IntegrationId": "2u***z9",
    "IntegrationMethod": "POST",
    "IntegrationType": "AWS_PROXY",
    "IntegrationUri": "arn:aws:lambda:us-west-2:<111122223333>:function:openai-chat",
    "PayloadFormatVersion": "2.0",
    "TimeoutInMillis": 30000
}
The following command grants API Gateway permission to invoke your Lambda function. If API Gateway doesn't have permission to invoke your function, clients receive a
500 Internal Server Error.aws lambda add-permission \
--statement-id chatgpt \
--action lambda:InvokeFunction \
--function-name "arn:aws:lambda:us-west-2:<111122223333>:function:openai-chat" \
--principal apigateway.amazonaws.com \
--source-arn "arn:aws:execute-api:us-west-2:<111122223333>:<ApiId>/*/*/chat"
{
    "Statement": "{\"Sid\":\"chatgpt\",\"Effect\":\"Allow\",\"Principal\":{\"Service\":\"apigateway.amazonaws.com\"},\"Action\":\"lambda:InvokeFunction\",\"Resource\":\"arn:aws:lambda:us-west-2:<111122223333>:function:openai-chat\",\"Condition\":{\"ArnLike\":{\"AWS:SourceArn\":\"arn:aws:execute-api:us-west-2:<111122223333>:<ApiId>/*/*/chat\"}}}"
}
将上面提到的Lambda集成,附加到route “/chat”,并附加到之前创建的Lambda authorizer上。
% aws apigatewayv2 update-route \
--api-id<ApiId> \
--route-id xs***of \
--target integrations/2u***z9 \
--authorization-type CUSTOM \
--authorizer-id <AuthorizerId>
{
    "ApiKeyRequired": false,
    "AuthorizationType": "CUSTOM",
    "AuthorizerId": "<AuthorizerId>",
    "RouteId": "xs***of",
    "RouteKey": "POST /chat",
    "Target": "integrations/2u***z9"
}
对于"/login"路由,创建并附加一个Lambda integration,集成目标是之前创建的“openai-login”函数
% aws apigatewayv2 create-integration --api-id<ApiId> --integration-type AWS_PROXY --integration-uri arn:aws:lambda:us-west-2:<111122223333>:function:openai-login --payload-format-version 2.0
{
    "ConnectionType": "INTERNET",
    "IntegrationId": "pv***t3",
    "IntegrationMethod": "POST",
    "IntegrationType": "AWS_PROXY",
    "IntegrationUri": "arn:aws:lambda:us-west-2:<111122223333>:function:openai-login",
    "PayloadFormatVersion": "2.0",
    "TimeoutInMillis": 30000
}
% aws lambda add-permission \
--statement-id chatgpt \
--action lambda:InvokeFunction \
--function-name "arn:aws:lambda:us-west-2:<111122223333>:function:openai-login" \
--principal apigateway.amazonaws.com \
--source-arn "arn:aws:execute-api:us-west-2:<111122223333>:<ApiId>/*/*/login"
{
    "Statement": "{\"Sid\":\"chatgpt\",\"Effect\":\"Allow\",\"Principal\":{\"Service\":\"apigateway.amazonaws.com\"},\"Action\":\"lambda:InvokeFunction\",\"Resource\":\"arn:aws:lambda:us-west-2:<111122223333>:function:openai-login\",\"Condition\":{\"ArnLike\":{\"AWS:SourceArn\":\"arn:aws:execute-api:us-west-2:<111122223333>:<ApiId>/*/*/login\"}}}"
}
% aws apigatewayv2 update-route \
--api-id<ApiId> \
--route-id cz***c4 \
--target integrations/pv***t3
{
    "ApiKeyRequired": false,
    "AuthorizationType": "NONE",
    "RouteId": "cz***c4",
    "RouteKey": "POST /login",
    "Target": "integrations/pv***t3"
}
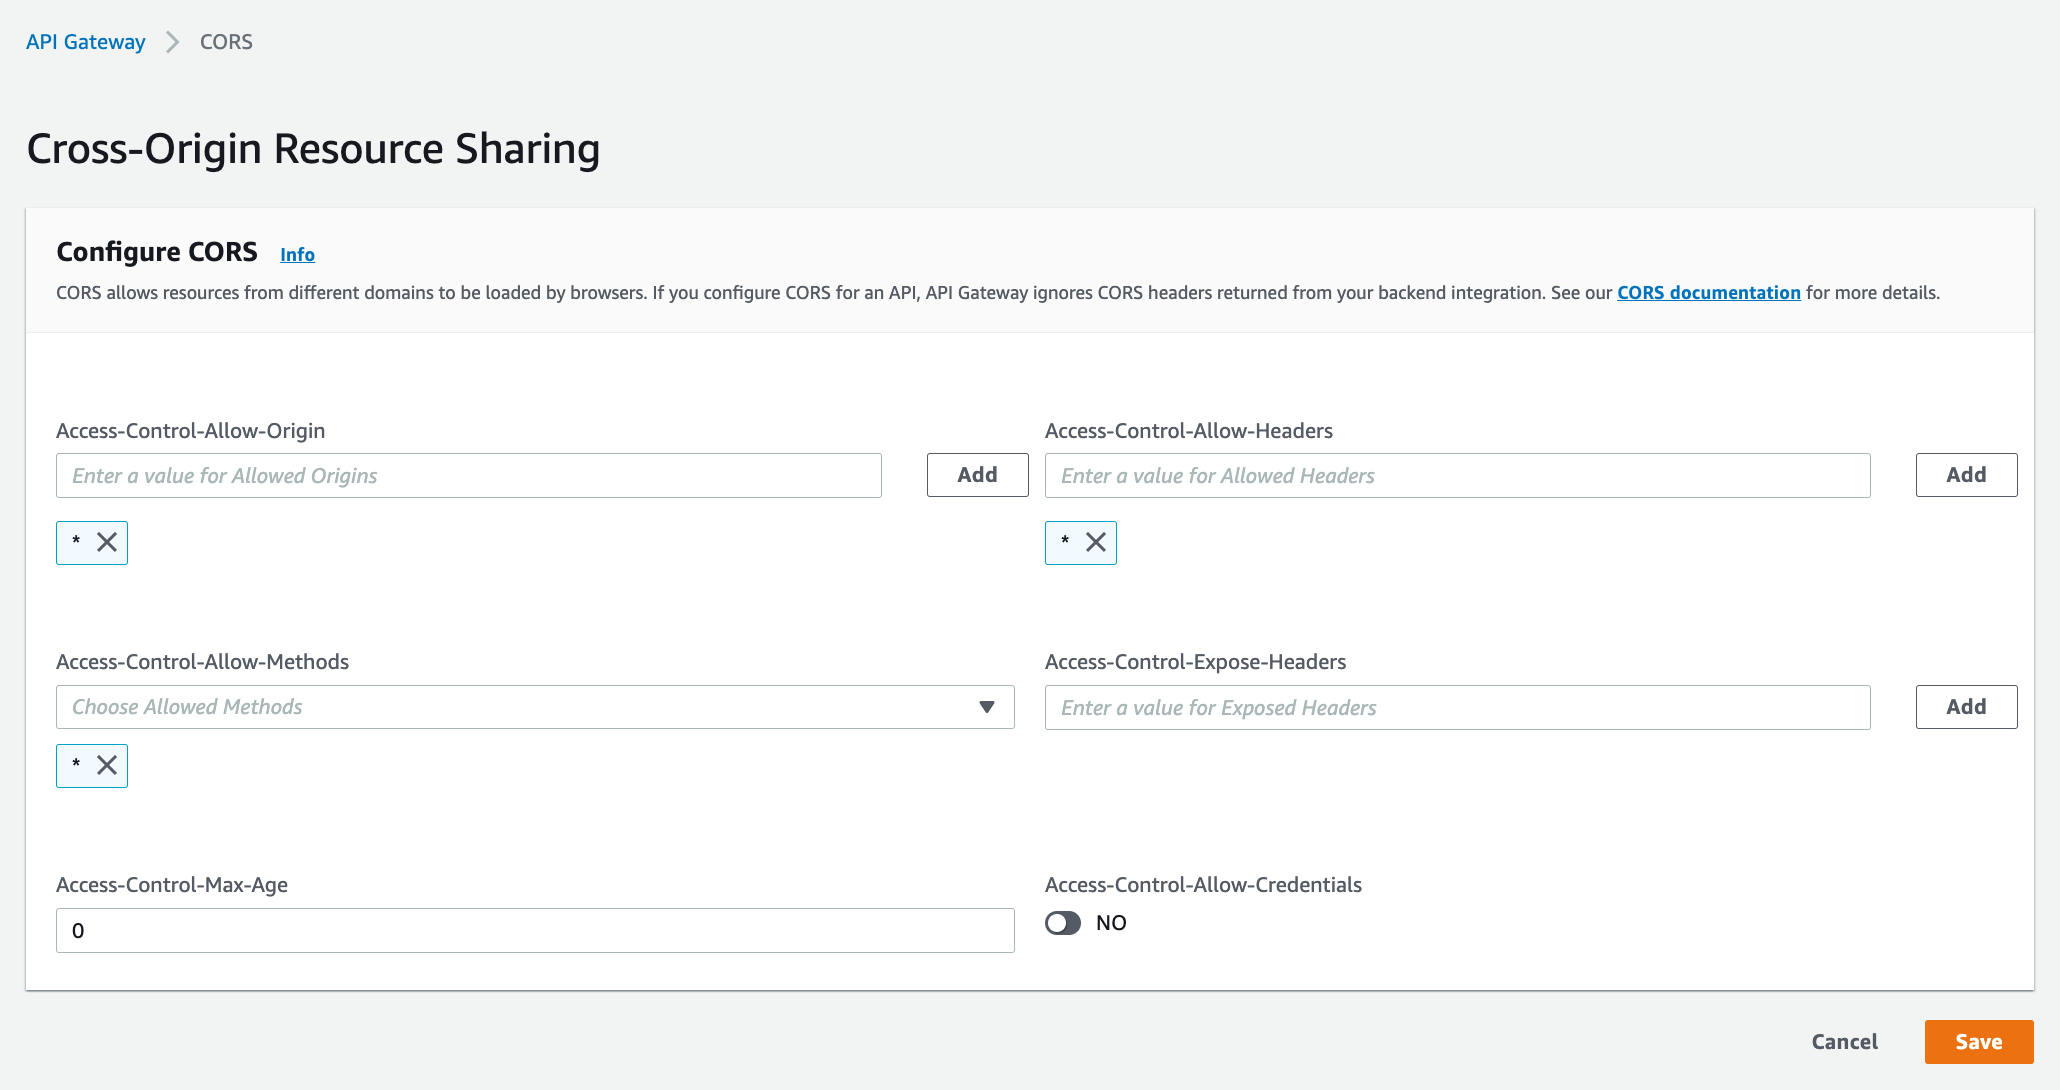
设置CORS
Enable CORS.% aws apigatewayv2 update-api --api-id <ApiId> --cors-configuration AllowOrigins="*",AllowHeaders="*",AllowMethods="*",AllowCredentials=false,ExposeHeaders="",MaxAge=0
{
    "ApiEndpoint": "https://<ApiId>.execute-api.us-west-2.amazonaws.com",
    "ApiId": "<ApiId>",
    "ApiKeySelectionExpression": "$request.header.x-api-key",
    "CorsConfiguration": {
        "AllowCredentials": false,
        "AllowHeaders": [
            "*"
        ],
        "AllowMethods": [
            "*"
        ],
        "AllowOrigins": [
            "*"
        ],
        "ExposeHeaders": [
            ""
        ],
        "MaxAge": 0
    },
    "CreatedDate": "2023-02-09T12:15:16+00:00",
    "DisableExecuteApiEndpoint": false,
    "Name": "chatbot",
    "ProtocolType": "HTTP",
    "RouteSelectionExpression": "$request.method $request.path",
    "Tags": {}
}
效果:
创建DynamoDB表
本演示应用使用Amazon DynamoDB存储用户名和密码凭证。为了简化演示,暂未实现注册功能和密码加密存储功能,你可以直接将用户和明文密码添加到DynamoDB的表中,或者参考代码包中的AWS CLI。打开Amazon DynamoDB控制台,创建一个表名chat_user_info,分区键名为username,字符串类型。
% aws dynamodb create-table --attribute-definitions AttributeName=username,AttributeType=S --table-name chat_user_info --key-schema AttributeName=username,KeyType=HASH --provisioned-throughput ReadCapacityUnits=1,WriteCapacityUnits=1
{
    "TableDescription": {
        "AttributeDefinitions": [
            {
                "AttributeName": "username",
                "AttributeType": "S"
            }
        ],
        "TableName": "chat_user_info",
        "KeySchema": [
            {
                "AttributeName": "username",
                "KeyType": "HASH"
            }
        ],
        "TableStatus": "CREATING",
        "CreationDateTime": "2023-02-09T20:58:37.191000+08:00",
        "ProvisionedThroughput": {
            "NumberOfDecreasesToday": 0,
            "ReadCapacityUnits": 1,
            "WriteCapacityUnits": 1
        },
        "TableSizeBytes": 0,
        "ItemCount": 0,
        "TableArn": "arn:aws:dynamodb:us-west-2:<111122223333>:table/chat_user_info",
        "TableId": "eabc4530-***-c6b479292842"
    }
}
将用户名和密码对添加到表中。添加一个字符串类型的新属性password,用于存放用户对应的密码。
% vim item.json
{
    "username": {"S": "eXample"},
    "password": {"S": "Example"}
}
% aws dynamodb put-item \
--table-name chat_user_info \
--item file://item.json \
--return-consumed-capacity TOTAL \
--return-item-collection-metrics SIZE
{
    "ConsumedCapacity": {
        "TableName": "chat_user_info",
        "CapacityUnits": 1.0
    }
}
9. 部署S3托管网站
创建S3存储桶,并启用静态网站托管功能
详情可参考:https://docs.aws.amazon.com/AmazonS3/latest/userguide/WebsiteHosting.html将存储桶配置为静态网站时,必须启用静态网站托管、配置索引文档并设置权限。
在Amazon S3控制台上创建一个名为<Bucket-name>(请替换成自己的S3存储桶名称)的S3存储桶。在“属性”选项卡中启用此存储桶的静态网站托管功能。在索引文档中,输入索引文档的文件名
index.html。% aws s3 mb s3://<Bucket-name>
make_bucket: <Bucket-name>
% aws s3 website s3://<Bucket-name> --index-document index.html
S3存储桶的公共访问如果被阻止了,更改权限设置。
aws s3control delete-public-access-block --account-id <111122223333>
将以下策略(请修改<Bucket-name>为实际存储桶名称。另外,如果使用AWS China账号,ARN的前缀修改为arn:aws-cn:...。)
% vim bucketpolicy.json
{
    "Version": "2012-10-17",
    "Statement": [
        {
            "Sid": "PublicReadGetObject",
            "Effect": "Allow",
            "Principal": "*",
            "Action": [
                "s3:GetObject"
            ],
            "Resource": [
                "arn:aws:s3:::<Bucket-name>/*"
            ]
        }
    ]
}
应用上面定义的S3 bucket policy,以允许能从Internet访问。
% aws s3api put-bucket-policy --bucket <Bucket-name> --policy file://bucketpolicy.json
编译网站静态文件
在本地环境中,转到client/src/commons文件夹,将apigw.js的第一行的API Gateway ID根据实际情况进行更新。% cd client/src/commons
% vim apigw.js
// Copyright Amazon.com, Inc. or its affiliates. All Rights Reserved.
// SPDX-License-Identifier: MIT-0


//Change to your own API Gateway endpoint
const API_endpoint = 'https://<ApiId>.execute-api.us-west-2.amazonaws.com/';
export const getAnswer = async(respid,text,headers) =>{
    const options ={
        method:'POST',
        // mode: 'no-cors',
        headers:headers,
        body:JSON.stringify({id:respid,prompt:text})
    }
    try {
        var resp = await fetch(API_endpoint+'chat', options);

        if (!resp.ok){
            const data = await resp.text();
            throw (Error(`Error: ${resp.status},${data}`));
        }
        var data = await resp.json() ;
        return data;
    } catch (err) {
        throw err;
    }
}

export const loginAuth = async(username,password) =>{
    const options ={
        method:'POST',
        headers:{'Content-Type': 'application/json',
          'Access-Control-Allow-Origin':'*'},
        body:JSON.stringify({username:username,password:password})
    }
    try {
        var resp = await fetch(API_endpoint+'login', options);
        if (!resp.ok) {
            console.log('resp.ok');
            const data = await resp.json();

            throw (Error(`Error: ${resp.status},${data.msg}`));
        }
        var data = await resp.json() ;

        return data;
    } catch (err) {
        throw err;
    }
}
% cd ../..
在client目录下,然后运行这些命令来编译静态网站的文件。
% npm install
npm WARN deprecated svgo@1.3.2: This SVGO version is no longer supported. Upgrade to v2.x.x.
npm WARN deprecated stable@0.1.8: Modern JS already guarantees Array#sort() is a stable sort, so this library is deprecated. See the compatibility table on MDN: https://developer.mozilla.org/en-US/docs/Web/JavaScript/Reference/Global_Objects/Array/sort#browser_compatibility
npm WARN deprecated sourcemap-codec@1.4.8: Please use @jridgewell/sourcemap-codec instead
npm WARN deprecated rollup-plugin-terser@7.0.2: This package has been deprecated and is no longer maintained. Please use @rollup/plugin-terser

added 1529 packages, and audited 1530 packages in 1m

3 packages are looking for funding
  run `npm fund` for details

6 high severity vulnerabilities

To address all issues (including breaking changes), run:
  npm audit fix --force

Run `npm audit` for details.
% npm run build
> gptapp@0.1.0 build
> react-scripts build

Creating an optimized production build...
Compiled with warnings.

[eslint]
src/App.js
  Line 5:50:  'Link' is defined but never used  no-unused-vars

Search for the keywords to learn more about each warning.
To ignore, add // eslint-disable-next-line to the line before.

File sizes after gzip:

  133.7 kB  build/static/js/main.f04a3f6d.js
  541 B     build/static/css/main.073c9b0a.css

The project was built assuming it is hosted at /.
You can control this with the homepage field in your package.json.

The build folder is ready to be deployed.
You may serve it with a static server:

  yarn global add serve
  serve -s build

Find out more about deployment here:

  https://cra.link/deployment
当npm run build命令运行完成后,它将在client文件夹中生成一个名为build的文件夹。该文件夹包含了要部署到Amazon S3网站的所有静态文件。
% cd ../..
% ls
build			package.json		yarn.lock
node_modules		public
package-lock.json	src
将此文件夹上传到S3。
% aws s3 sync ./build/ s3://<Bucket-name>/
upload: build/asset-manifest.json to s3://<Bucket-name>/asset-manifest.json
upload: build/index.html to s3://<Bucket-name>/index.html
upload: build/static/css/main.073c9b0a.css.map to s3://<Bucket-name>/static/css/main.073c9b0a.css.map
upload: build/static/js/main.f04a3f6d.js.LICENSE.txt to s3://<Bucket-name>/static/js/main.f04a3f6d.js.LICENSE.txt
upload: build/robots.txt to s3://<Bucket-name>/robots.txt
upload: build/static/css/main.073c9b0a.css to s3://<Bucket-name>/static/css/main.073c9b0a.css
upload: build/static/js/main.f04a3f6d.js to s3://<Bucket-name>/static/js/main.f04a3f6d.js
upload: build/static/js/main.f04a3f6d.js.map to s3://<Bucket-name>/static/js/main.f04a3f6d.js.map
现在您可以通过浏览器中访问S3静态网站,使用预先设置在DynamoDB表中的用户名和密码来登录进入。Amazon S3静态托管网站的访问端点可以在“属性”选项卡中找到。
References
使用Amazon Lambda等无服务器产品构建自己的ChatGPT应用
Controlling and managing access to an HTTP API in API Gateway
Configuring CORS for an HTTP API
GitHub - aws-samples / openbanking-brazilian-auth-samples