Use DNS alias name to access FSx file system
Amazon FSx for Windows File Server provides a default DNS name for every file system that you can use to access the data on your file system. You can also access your file systems using a DNS alias of your choosing. With DNS aliases, you can continue using existing DNS names to access data stored on FSx when migrating file system storage from on-premises to FSx, without needing to update any tools or applications.
To access FSx file systems using DNS aliases, perform the following three steps:
1. Associate DNS aliases with FSx file system.
2. Configure service principal names (SPNs) for file system’s computer object. (This is required to get Kerberos authentication when accessing your file system using DNS aliases.)
3. Update or create a DNS CNAME record for the file system and the DNS alias.
Step 1: Associate DNS aliases with your FSx file system
You can associate DNS aliases with existing FSx for Windows File Server file systems, when you create new file systems, and when you create a new file system from a backup using the FSx console, CLI, and API.
This procedure describes how to associate DNS aliases when creating a new file system using the FSx console. For information about associating DNS aliases with existing file systems, and details about using the CLI and API, see Managing DNS aliases.
To associate DNS aliases when creating a new file system
1. Open FSx console.
2. Create a new file system.
3. In the Access - optional section of the Create file system wizard, enter the DNS aliases that you want to associate with your file system.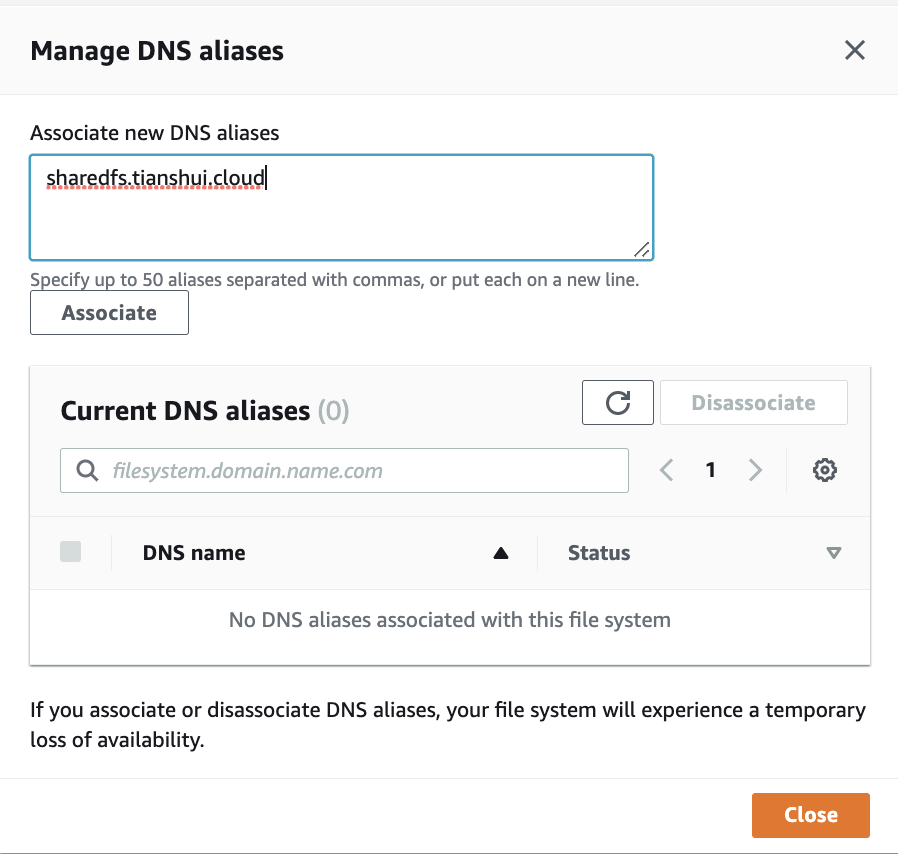
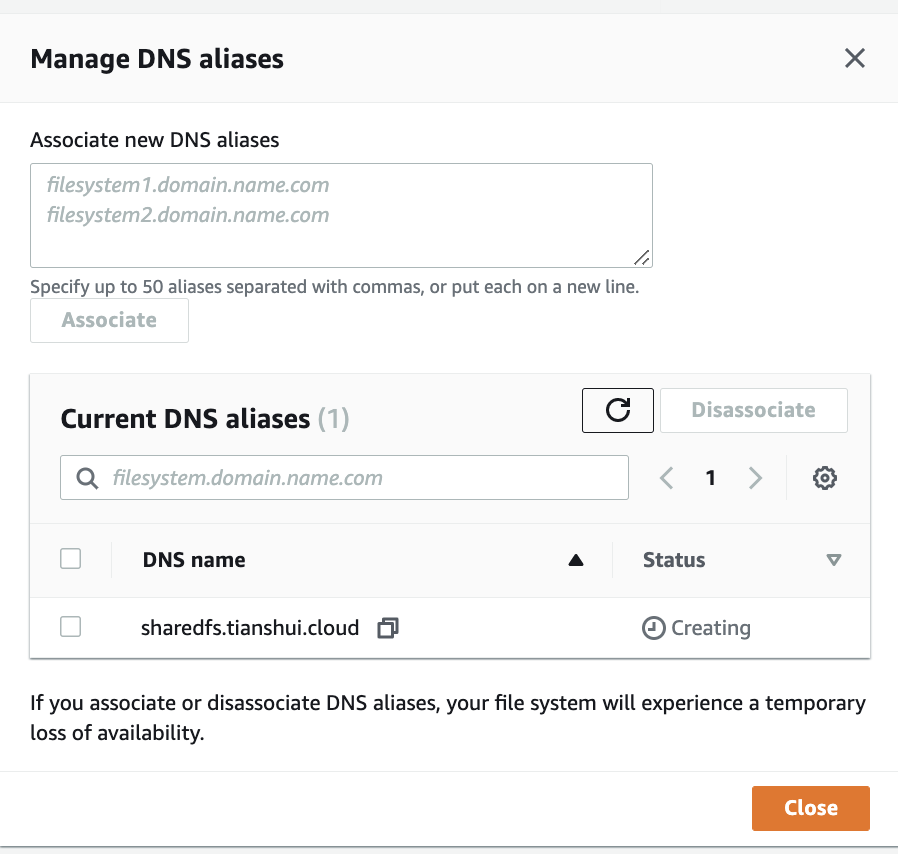
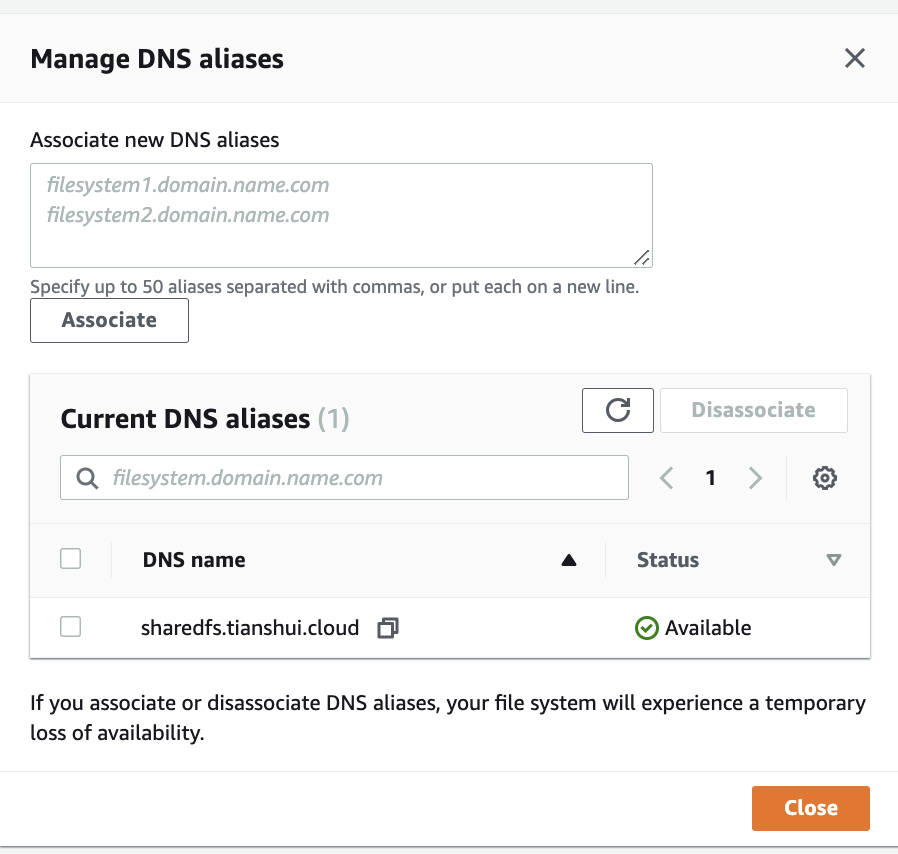
Use the following guidelines when specifying DNS aliases:
- Must be formatted as a FQDN hostname.domain, for example, accounting.example.com.
- Can contain alphanumeric characters and hyphens (‐).
- Cannot start or end with a hyphen.
- Can start with a numeric.
For DNS alias names, FSx stores alphabetic characters as lowercase letters (a-z), regardless of how you specify them: as uppercase letters, lowercase letters, or the corresponding letters in escape codes.
For Maintenance preferences, make any changes that you want.
In the Tags - optional section, add any tags that you need, and then choose Next.
4. Review the file system configuration shown on the Create file system page. Choose Create file system to create the file system.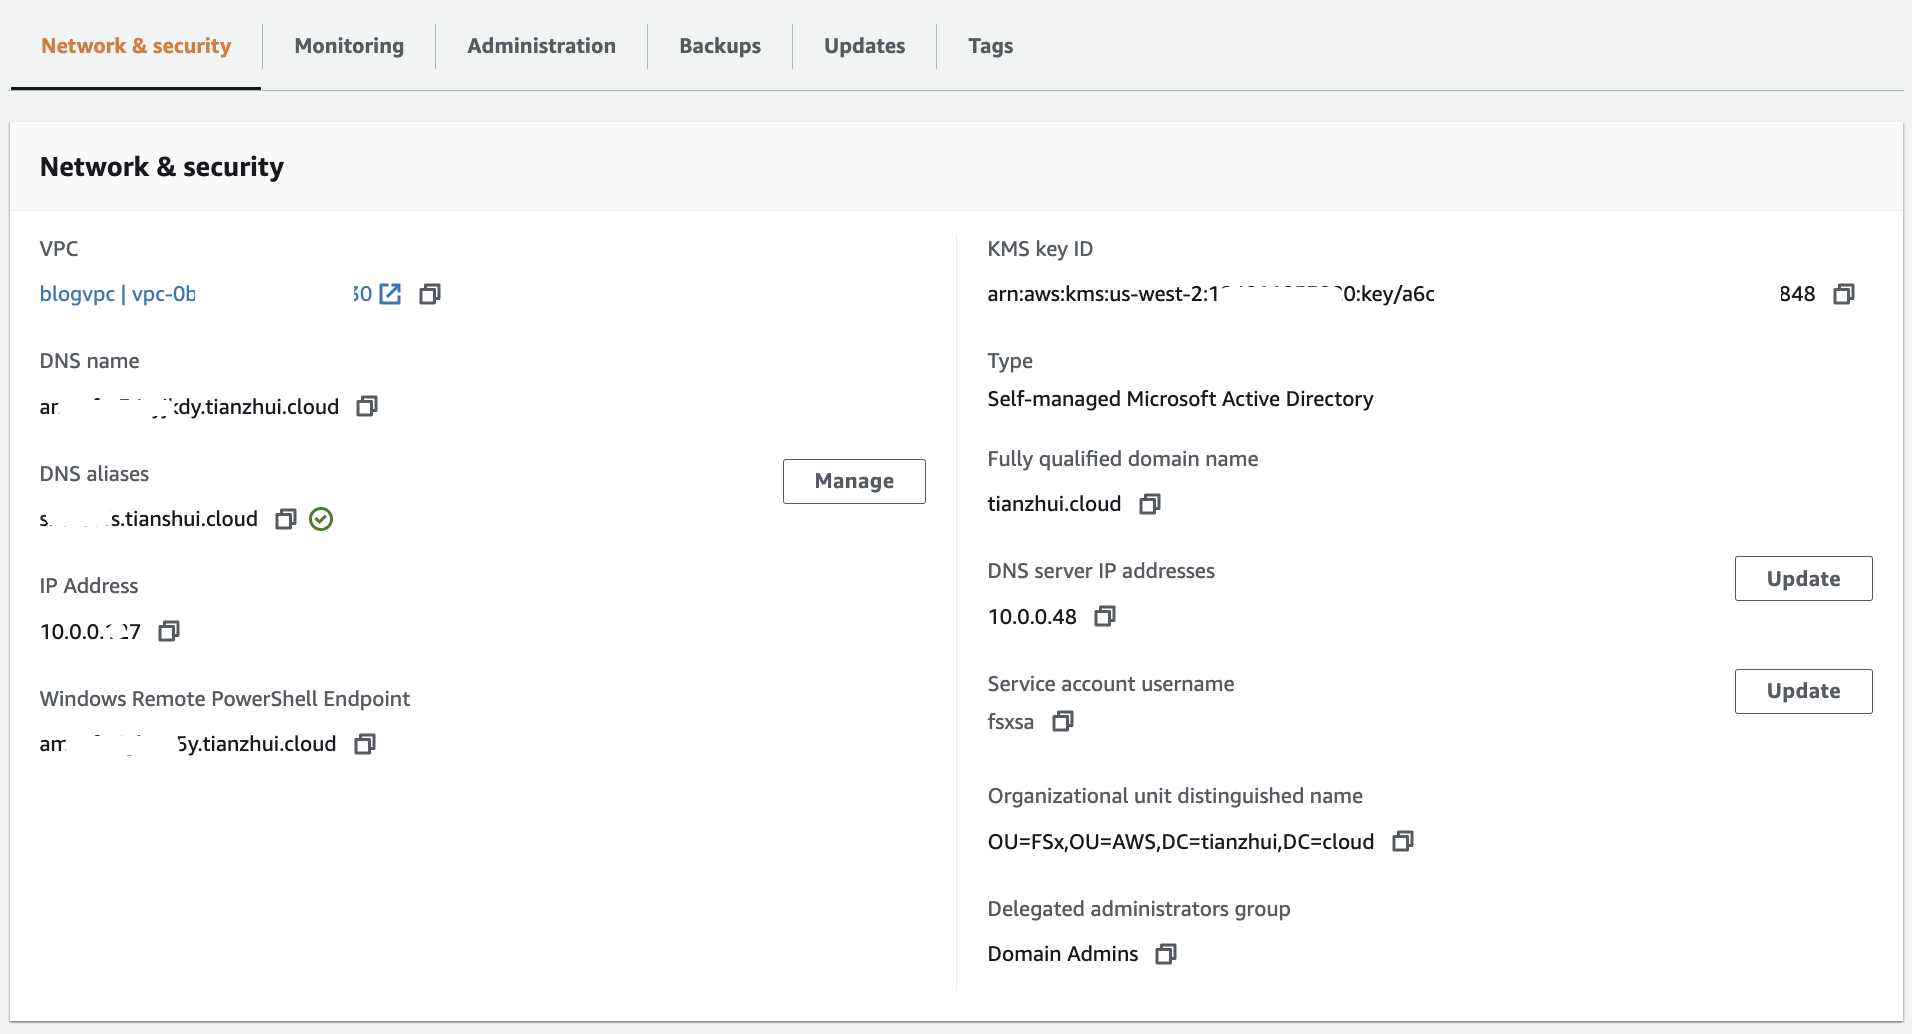
Step 2: Configure service principal names (SPNs) for Kerberos
We recommend that you use Kerberos-based authentication and encryption in transit with FSx. Kerberos provides the most secure authentication for clients that access your file system.
To enable Kerberos authentication for clients that access FSx using a DNS alias, you must add service principal names (SPNs) that correspond to the DNS alias on your FSx file system’s AD computer object. An SPN can only be associated with a single AD computer object at a time. If you have existing SPNs for the DNS name configured for your original file system's AD computer object, you must delete them first.
There are two required SPNs for Kerberos authentication:
HOST/alias
HOST/alias.domain
If the alias is finance.domain.com, the following are the two required SPNs:
HOST/finance
HOST/finance.domain.com
Note
You will need to delete any existing HOST SPNs that correspond to the DNS alias on the AD computer object before you create new HOST SPNs for your FSx file system's AD computer object. Attempts to set SPNs for FSx file system will fail if an SPN for the DNS alias exists in the AD.
The following procedures describes how to do the following:
- Find any existing DNS alias SPNs on the original file system's AD computer object.
- Delete the existing SPNs found, if any.
- Create new DNS alias SPNs for FSx file system's AD computer object.
Log on to a Windows server and join to AD.
To install the required PowerShell AD module
1. Log on to a Windows instance joined to the AD to which your FSx file system is joined.
2. Open PowerShell as administrator.
3. Install the PowerShell AD module using the following command.
Install-WindowsFeature RSAT-AD-PowerShellReturn:
Success Restart Needed Exit Code      Feature Result
------- -------------- ---------      --------------
True    No             Success        {Remote Server Administration Tools, Activ...
To find and delete existing DNS alias SPNs on the original file system's AD computer object
1. Find any existing SPNs by using the following commands.
Replace alias_fqdn with the DNS alias that you associated with the file system. Here, I use sharedfs.tianzhui.cloud.
## Find SPNs for original file system's AD computer object
$ALIAS = "alias_fqdn"
SetSPN /Q ("HOST/" + $ALIAS)
SetSPN /Q ("HOST/" + $ALIAS.Split(".")[0])
For example, to find SPNs for original file system's AD computer object.
$ALIAS = "sharedfs.tianzhui.cloud"
SetSPN /Q ("HOST/" + $ALIAS)
SetSPN /Q ("HOST/" + $ALIAS.Split(".")[0])
Return:Checking domain DC=tianzhui,DC=cloud No such SPN found. Checking domain DC=tianzhui,DC=cloud No such SPN found.From the output, we found there is existing SPN with name amznfsx34tyjkdy.tianzhui.cloud.
2. Delete the existing HOST SPNs returned in the previous step by using the following example script.
- Replace alias_fqdn with the full DNS alias that you associated with the file system.
- Replace file_system_DNS_name with the original file system's DNS name.
## Delete SPNs for original file system's AD computer object
$Alias = "alias_fqdn"
$FileSystemDnsName = "file_system_dns_name"
$FileSystemHost = (Resolve-DnsName ${FileSystemDnsName} | Where Type -eq 'A')[0].Name.Split(".")[0]
$FSxAdComputer = (Get-AdComputer -Identity ${FileSystemHost})

SetSPN /D ("HOST/" + ${Alias}) ${FSxAdComputer}.Name
SetSPN /D ("HOST/" + ${Alias}.Split(".")[0]) ${FSxAdComputer}.Name
For example, to delete SPNs for original file system's AD computer object.
$Alias = "sharedfs.tianzhui.cloud"
$FileSystemDnsName = "amznfsx34tyjkdy.tianzhui.cloud"
$FileSystemHost = (Resolve-DnsName ${FileSystemDnsName} | Where Type -eq 'A')[0].Name.Split(".")[0]
$FSxAdComputer = (Get-AdComputer -Identity ${FileSystemHost})

SetSPN /D ("HOST/" + ${Alias}) ${FSxAdComputer}.Name
SetSPN /D ("HOST/" + ${Alias}.Split(".")[0]) ${FSxAdComputer}.Name
Return:Unregistering ServicePrincipalNames for CN=amznfsx34tyjkdy,OU=FSx,OU=AWS,DC=tianzhui,DC=cloud
HOST/sharedfs.tianzhui.cloud
Updated object
Unregistering ServicePrincipalNames for CN=amznfsx34tyjkdy,OU=FSx,OU=AWS,DC=tianzhui,DC=cloud
HOST/sharedfs
Updated object
Check again.
$ALIAS = "sharedfs.tianzhui.cloud"
SetSPN /Q ("HOST/" + $ALIAS)
SetSPN /Q ("HOST/" + $ALIAS.Split(".")[0])
Return:Checking domain DC=tianzhui,DC=cloud No such SPN found. Checking domain DC=tianzhui,DC=cloud No such SPN found.
To set SPNs on your FSx file system’s AD computer object
1. Set new SPNs for your FSx file system by running the following commands.
- Replace file_system_DNS_name with the DNS name that the NEW FSx assigned to the file system. To find your file system's DNS name on the FSx console, choose File systems, choose your file system, and then choose the Network & security pane on the file system details page.
- Replace alias_fqdn with the full DNS alias that you associated with the file system.
Make sure there is no AD object with the same "msDS-AdditionalDnsHostname".
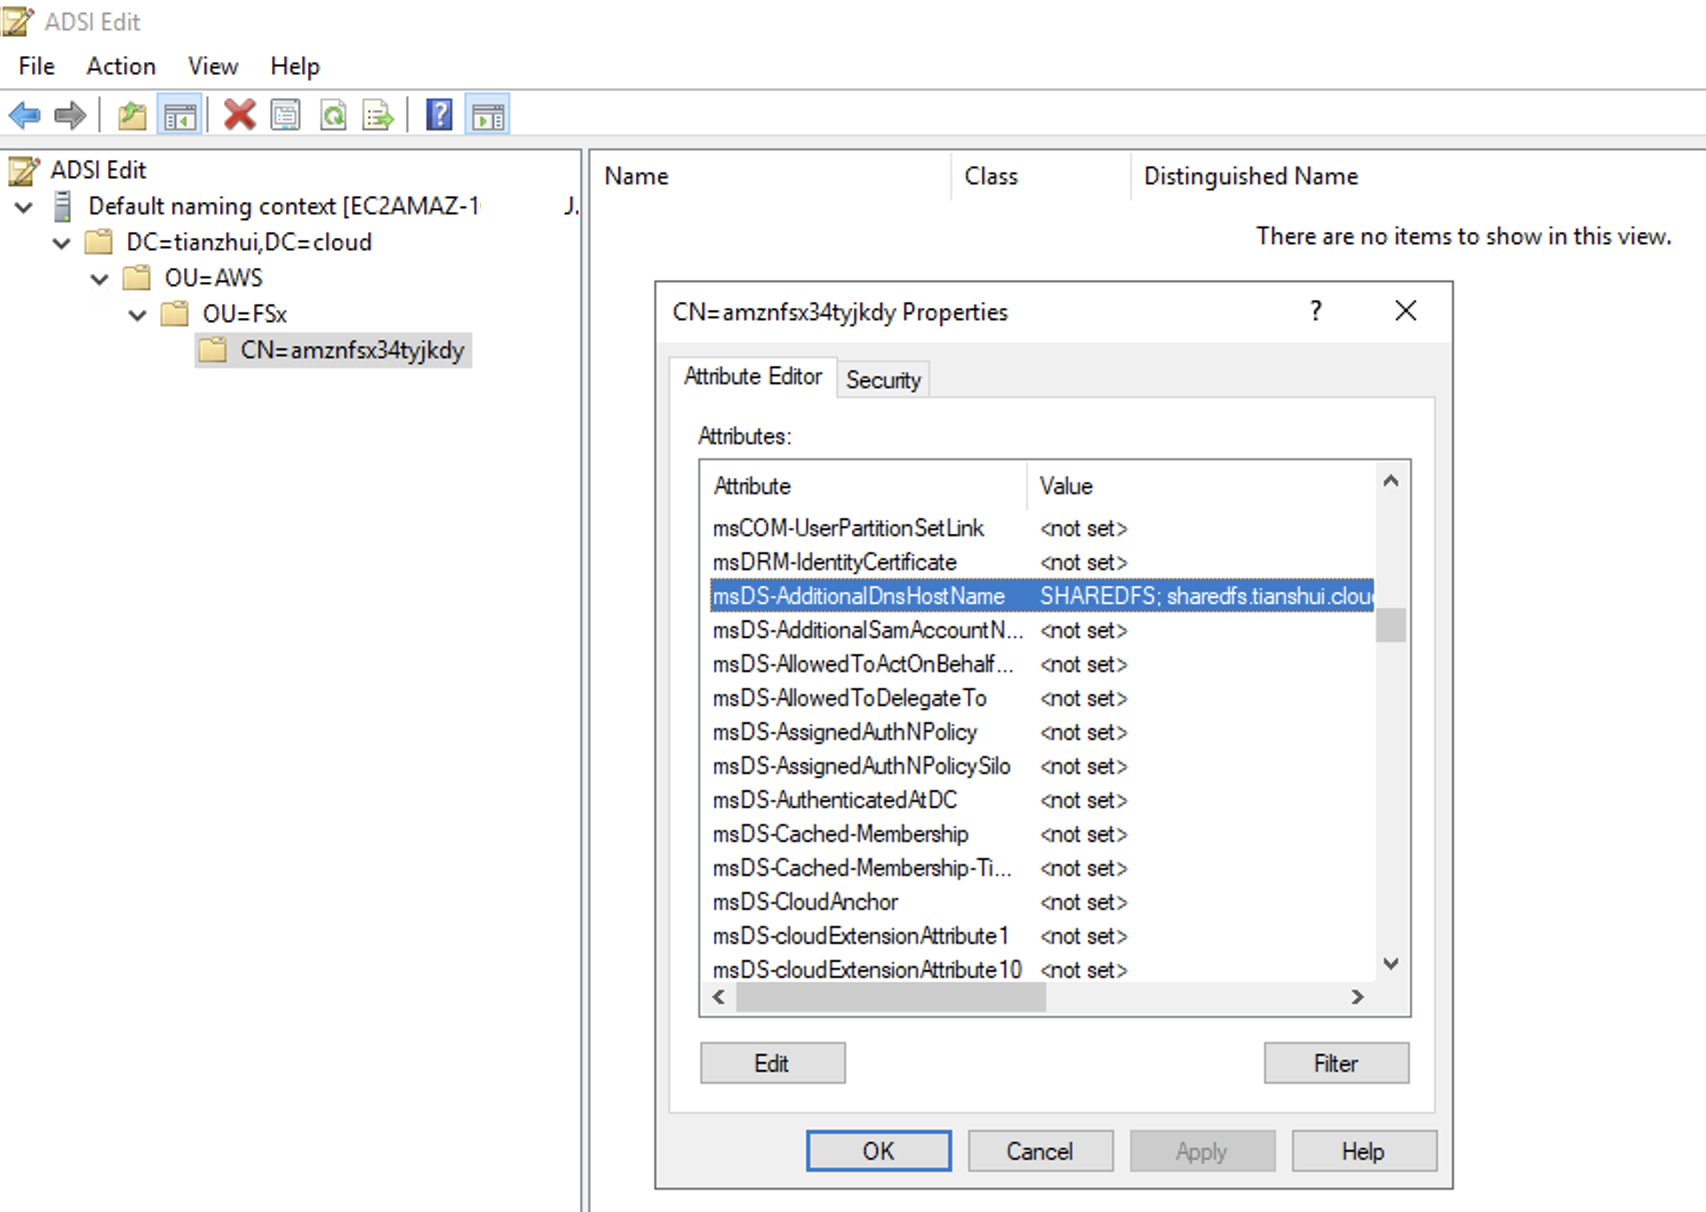
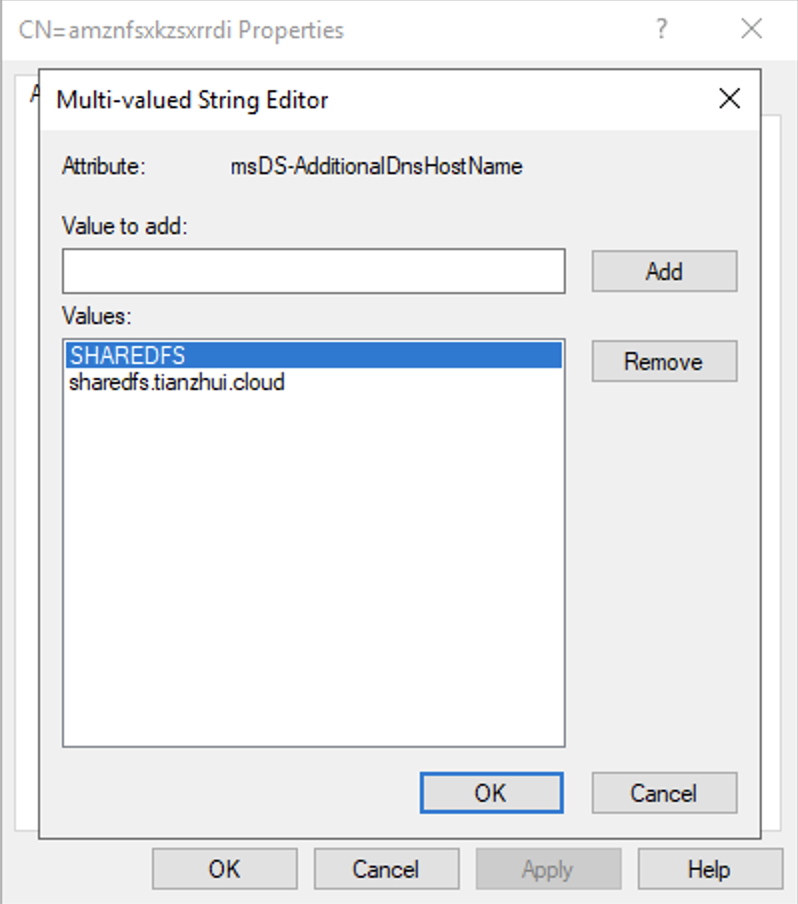
## Set SPNs for FSx file system AD computer object
$FSxDnsName = "file_system_DNS_name"
$Alias = "alias_fqdn"
$FileSystemHost = (Resolve-DnsName $FSxDnsName | Where Type -eq 'A')[0].Name.Split(".")[0]
$FSxAdComputer = (Get-AdComputer -Identity $FileSystemHost)

Set-AdComputer -Identity $FSxAdComputer -Add @{"msDS-AdditionalDnsHostname"="$Alias"}
SetSpn /S ("HOST/" + $Alias.Split('.')[0]) $FSxAdComputer.Name
SetSpn /S ("HOST/" + $Alias) $FSxAdComputer.Name
For example, to set SPNs for FSx file system AD computer object.
$FSxDnsName = "amznfsxkx2h3n7k.tianzhui.cloud"
$Alias = "sharedfs.tianzhui.cloud"
$FileSystemHost = (Resolve-DnsName $FSxDnsName | Where Type -eq 'A')[0].Name.Split(".")[0]
$FSxAdComputer = (Get-AdComputer -Identity $FileSystemHost)

Set-AdComputer -Identity $FSxAdComputer -Add @{"msDS-AdditionalDnsHostname"="$Alias"}
SetSpn /S ("HOST/" + $Alias.Split('.')[0]) $FSxAdComputer.Name
SetSpn /S ("HOST/" + $Alias) $FSxAdComputer.Name
Return:Checking domain DC=tianzhui,DC=cloud
Registering ServicePrincipalNames for CN=amznfsxkx2h3n7k,OU=FSx,OU=AWS,DC=tianzhui,DC=cloud
HOST/sharedfs
Updated object
Checking domain DC=tianzhui,DC=cloud
Registering ServicePrincipalNames for CN=amznfsxkx2h3n7k,OU=FSx,OU=AWS,DC=tianzhui,DC=cloud
HOST/sharedfs.tianzhui.cloud
Updated object
Note
Setting an SPN for FSx file system will fail if an SPN for the DNS alias exists in the AD for the original file system's computer object. For information about finding and deleting existing SPNs, see To find and delete existing DNS alias SPNs on the original file system's Active Directory computer object.
2. Verify that the new SPNs are configured for the DNS alias using the following example script. Ensure that the response includes two HOST SPNs, HOST/alias and HOST/alias_fqdn, as described previously in this procedure. Replace file_system_DNS_name with the DNS name that FSx assigned to your file system. To find your file system's DNS name on the FSx console, choose File systems, choose your file system, and then choose the Network & security pane on the file system details page.
## Verify SPNs on FSx file system AD computer object
$FileSystemDnsName = "file_system_dns_name"
$FileSystemHost = (Resolve-DnsName ${FileSystemDnsName} | Where Type -eq 'A')[0].Name.Split(".")[0]
$FSxAdComputer = (Get-AdComputer -Identity ${FileSystemHost})
SetSpn /L ${FSxAdComputer}.Name
For example, to verify SPNs on FSx file system AD computer object.
$FileSystemDnsName = "amznfsxkx2h3n7k.tianzhui.cloud"
$FileSystemHost = (Resolve-DnsName ${FileSystemDnsName} | Where Type -eq 'A')[0].Name.Split(".")[0]
$FSxAdComputer = (Get-AdComputer -Identity ${FileSystemHost})
SetSpn /L ${FSxAdComputer}.Name
Return:Registered ServicePrincipalNames for CN=amznfsxkx2h3n7k,OU=FSx,OU=AWS,DC=tianzhui,DC=cloud:
MSServerClusterMgmtAPI/sharedfs.tianzhui.cloud
MSClusterVirtualServer/sharedfs.tianzhui.cloud
HOST/sharedfs.tianzhui.cloud
HOST/SHAREDFS
MSServerClusterMgmtAPI/SHAREDFS
MSClusterVirtualServer/SHAREDFS
MSServerClusterMgmtAPI/amznfsxkx2h3n7k.tianzhui.cloud
MSServerClusterMgmtAPI/amznfsxkx2h3n7k
MSClusterVirtualServer/amznfsxkx2h3n7k.tianzhui.cloud
MSClusterVirtualServer/amznfsxkx2h3n7k
HOST/amznfsxkx2h3n7k.tianzhui.cloud
HOST/amznfsxkx2h3n7k
ehco $FileSystemHost
amznfsxkzsxrrdi
echo $FSxAdComputer:
DistinguishedName : CN=amznfsxkzsxrrdi,OU=FSx,OU=AWS,DC=tianzhui,DC=cloud
DNSHostName       : amznfsxkzsxrrdi.tianzhui.cloud
Enabled           : True
Name              : amznfsxkzsxrrdi
ObjectClass       : computer
ObjectGUID        : 5079a61b-ee44-409b-9d6f-455977138c71
SamAccountName    : AMZNFSXKZSXRRDI$
SID               : S-1-5-21-1202993860-2462621452-57265749-1141
UserPrincipalName :
SetSpn /L amznfsxkzsxrrdi
For information about how to enforce clients to use Kerberos authentication and encryption when connecting to FSx file system, see Enforcing Kerberos authentication using GPOs.
Step 3: Update or create a DNS CNAME record for the file system
After you properly configure SPNs for your file system, you can cut over to FSx by replacing each DNS record that resolved to the original file system with a DNS record that resolves to the default DNS name of the FSx file system.
The dnsserver and activedirectory Windows modules are required to run the commands presented in this section.
To install the required PowerShell cmdlets
1. Log on to a Windows instance joined to the AD that FSx file system is joined to as a user that is a member of a group that has DNS administration permissions (AWSAWS Delegated Domain Name System Administrators in AWS Managed AD, and Domain Admins or another group to which you've delegated DNS administration permissions in your self-managed AD).
2. Open PowerShell as administrator.
3. The PowerShell DNS Server module is required to perform the instructions in this procedure. Install it using the following command.
Install-WindowsFeature RSAT-DNS-ServerReturn:
Success Restart Needed Exit Code      Feature Result
------- -------------- ---------      --------------
True    No             Success        {DNS Server Tools}
To update or create a custom DNS name to your FSx file system
1. Connect to your EC2 instance as a user that is a member of a group that has DNS administration permissions (AWS Delegated Domain Name System Administrators in AWS Managed AD, and Domain Admins or another group to which you've delegated DNS administration permissions in your self-managed AD).
2. At the command prompt, run the following script. This script migrates any existing DNS CNAME records to FSx file system. If none are found, it creates a new DNS CNAME record for the DNS alias alias_fqdn that resolves to the default DNS name for FSx file system. To run the script:
- Replace alias_fqdn with the DNS alias that you associated with the file system.
- Replace file_system_DNS_name with the DNS name FSx has assigned to the file system.
$Alias="alias_fqdn"
$FSxDnsName="file_system_dns_name"
$AliasHost=$Alias.Split('.')[0]
$ZoneName=((Get-WmiObject Win32_ComputerSystem).Domain)
$DnsServerComputerName = (Resolve-DnsName $ZoneName -Type NS | Where Type -eq 'A' | Select -ExpandProperty Name)[0]

Add-DnsServerResourceRecordCName -Name $AliasHost -ComputerName $DnsServerComputerName -HostNameAlias $FSxDnsName -ZoneName $ZoneName
For example.
$Alias="sharedfs.tianzhui.cloud"
$FSxDnsName="amznfsxkx2h3n7k.tianzhui.cloud"
$AliasHost=$Alias.Split('.')[0]
$ZoneName=((Get-WmiObject Win32_ComputerSystem).Domain)
#$DnsServerComputerName = (Resolve-DnsName $ZoneName -Type NS | Where Type -eq 'A' | Select -ExpandProperty Name)[0]
$DnsServerComputerName = (Resolve-DnsName $ZoneName -Type NS | Where Type -eq 'A' | Select -ExpandProperty Name)
Add-DnsServerResourceRecordCName -Name $AliasHost -ComputerName $DnsServerComputerName -HostNameAlias $FSxDnsName -ZoneName $ZoneName
if the command is executed on DNS server, the "-ComputerName" parameter could be skipped.AliasHost: sharedfs
ZoneName: tianzhui.cloud
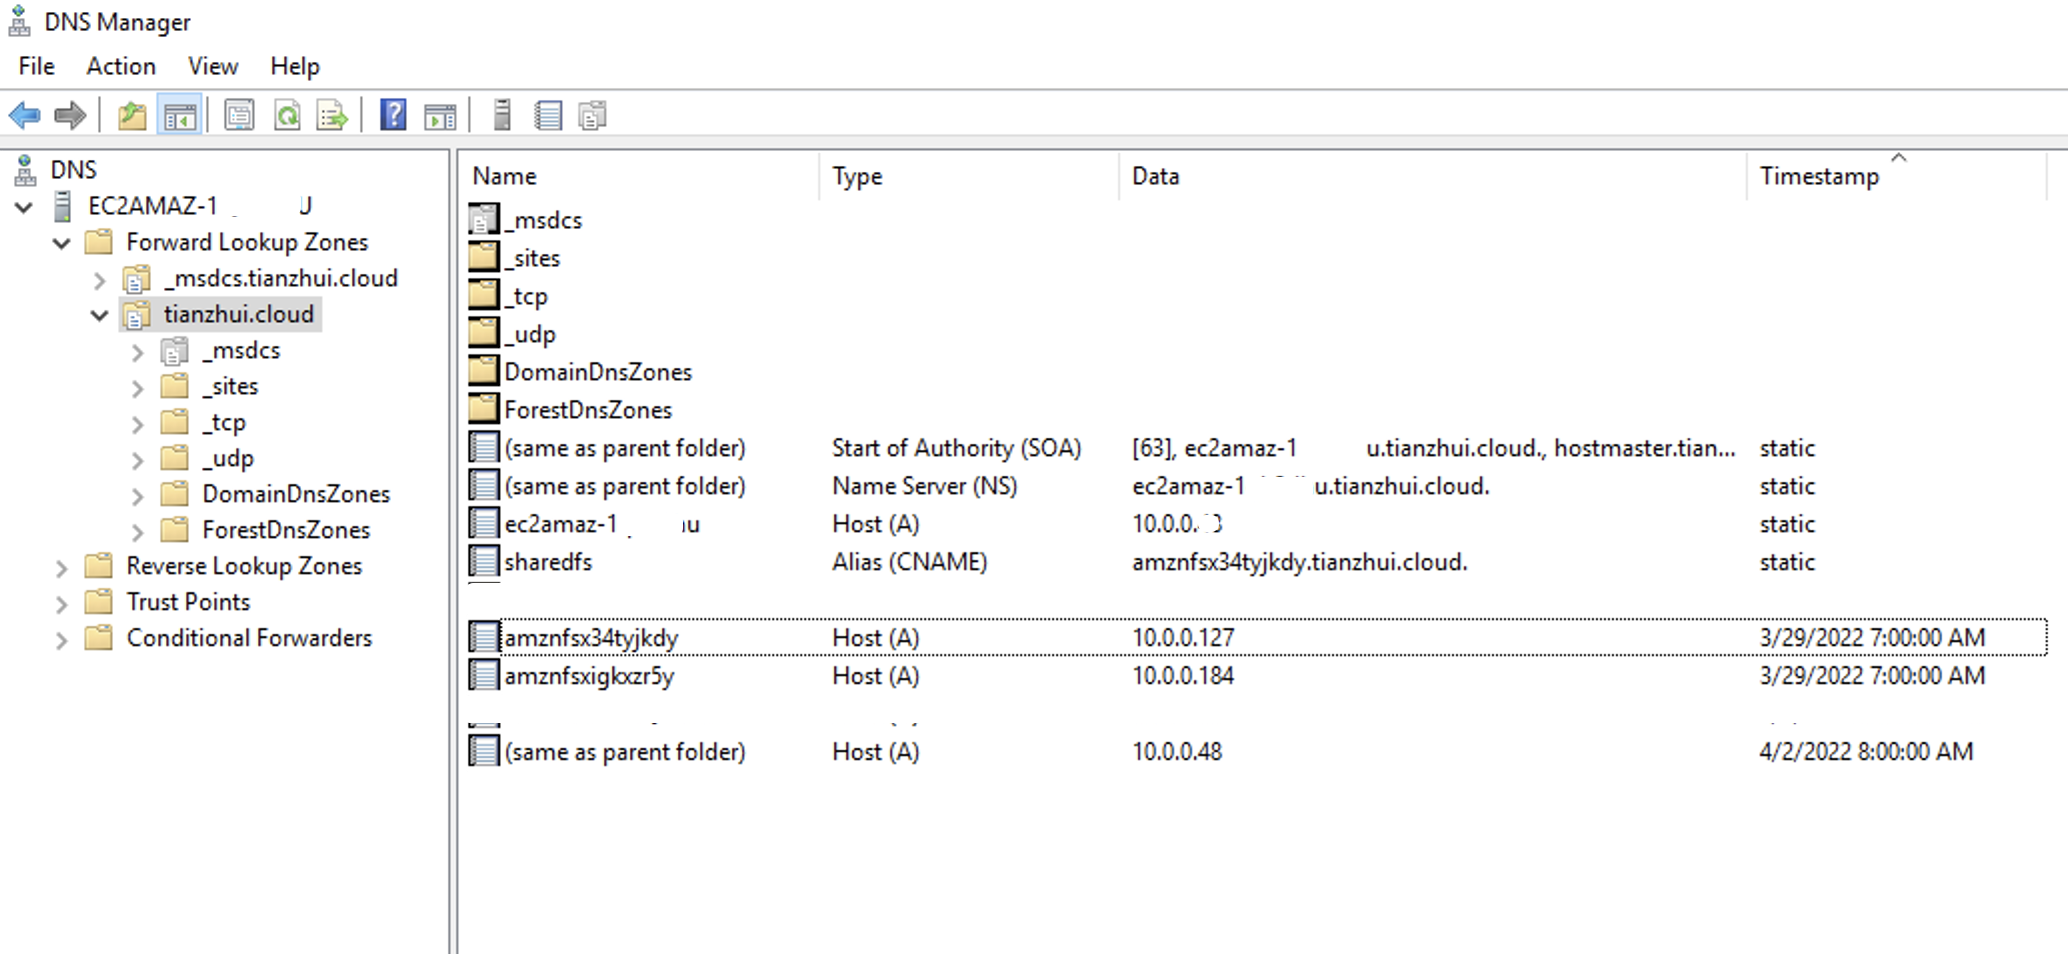
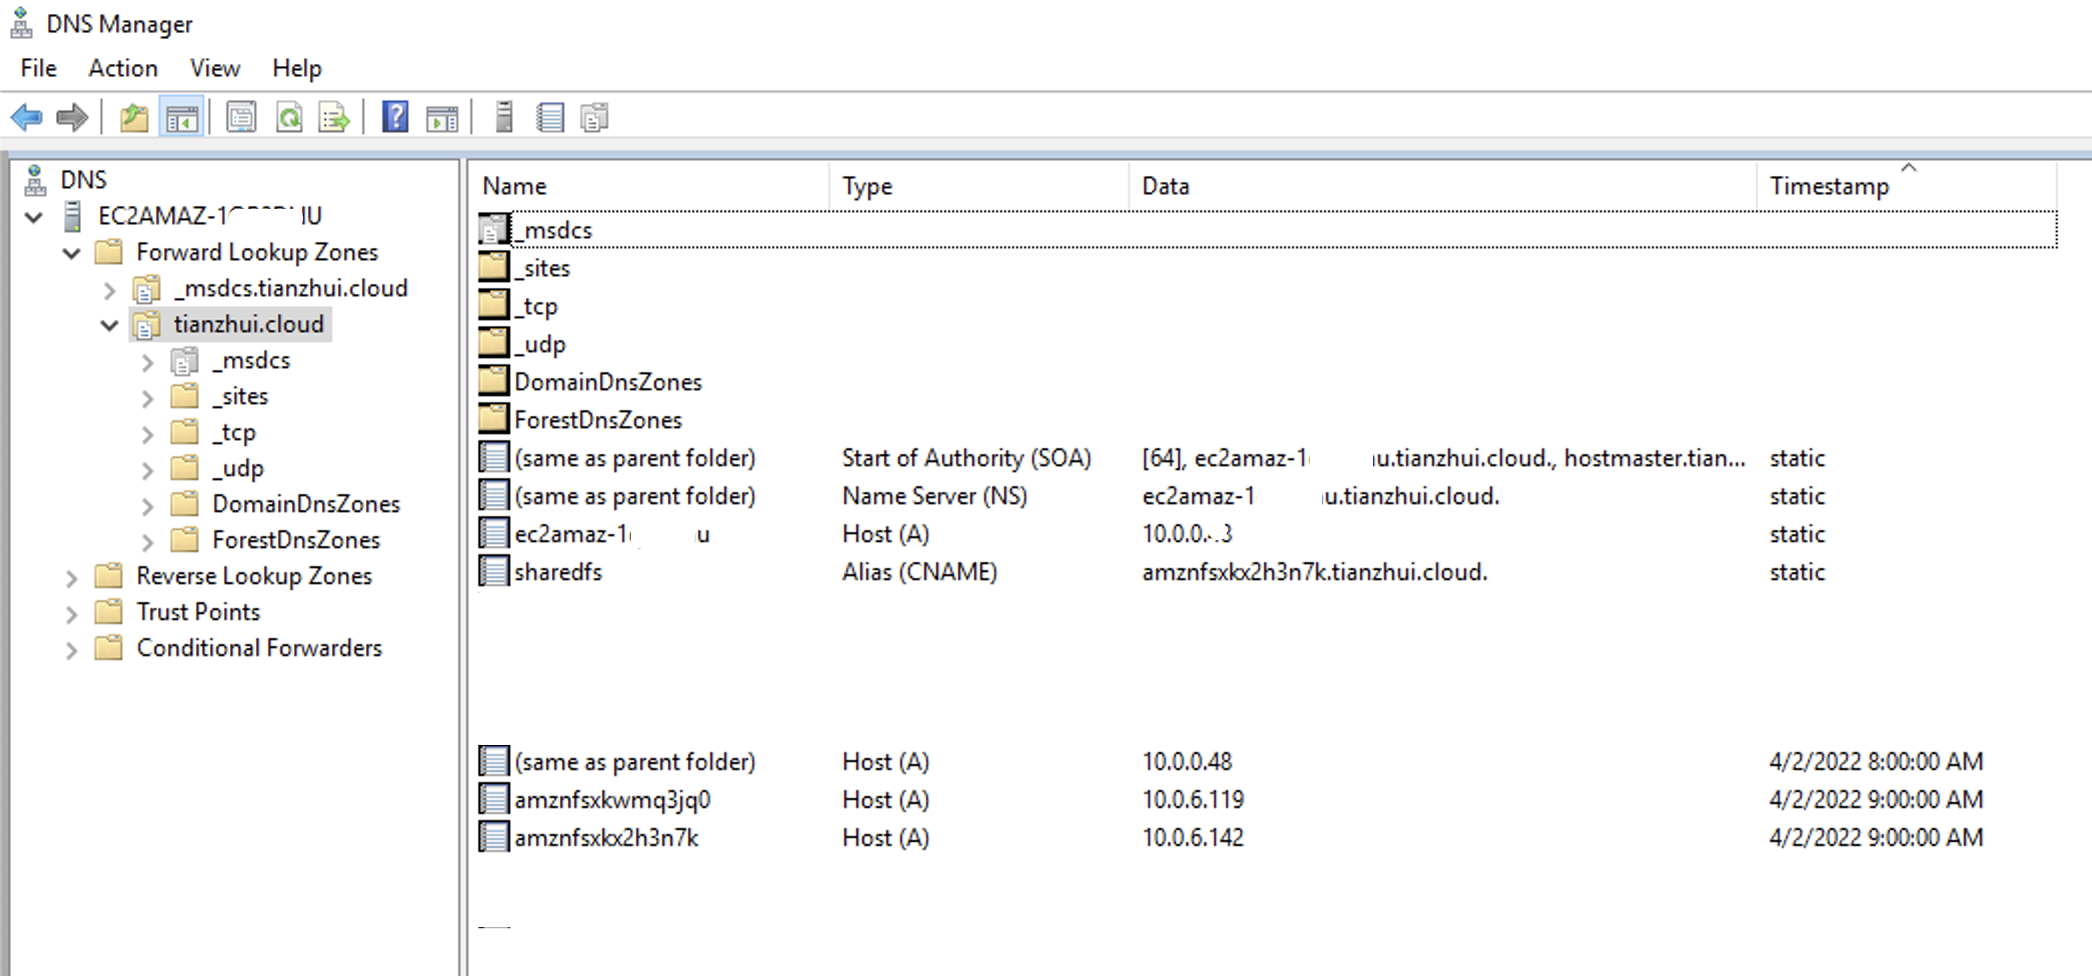
You've now added a DNS CNAME value for FSx file system with the DNS alias. You can now use the DNS alias to access your data.
Note
When updating a DNS CNAME record to point to a FSx file system previously pointed to another file system, clients might not be able to connect with file system for a brief period of time. When the client DNS cache refreshes, they should be able to connect using the DNS alias. For more information, see Can't access the file system using a DNS alias.
Before:
After:
Enforcing Kerberos authentication using GPOs
You can enforce Kerberos authentication when accessing the file system by setting the following Group Policy Objects (GPOs) in your AD:
- Restrict NTLM: Outgoing NTLM traffic to remote servers - Use this policy setting to deny or audit outgoing NTLM traffic from a computer to any remote server running the Windows operating system.
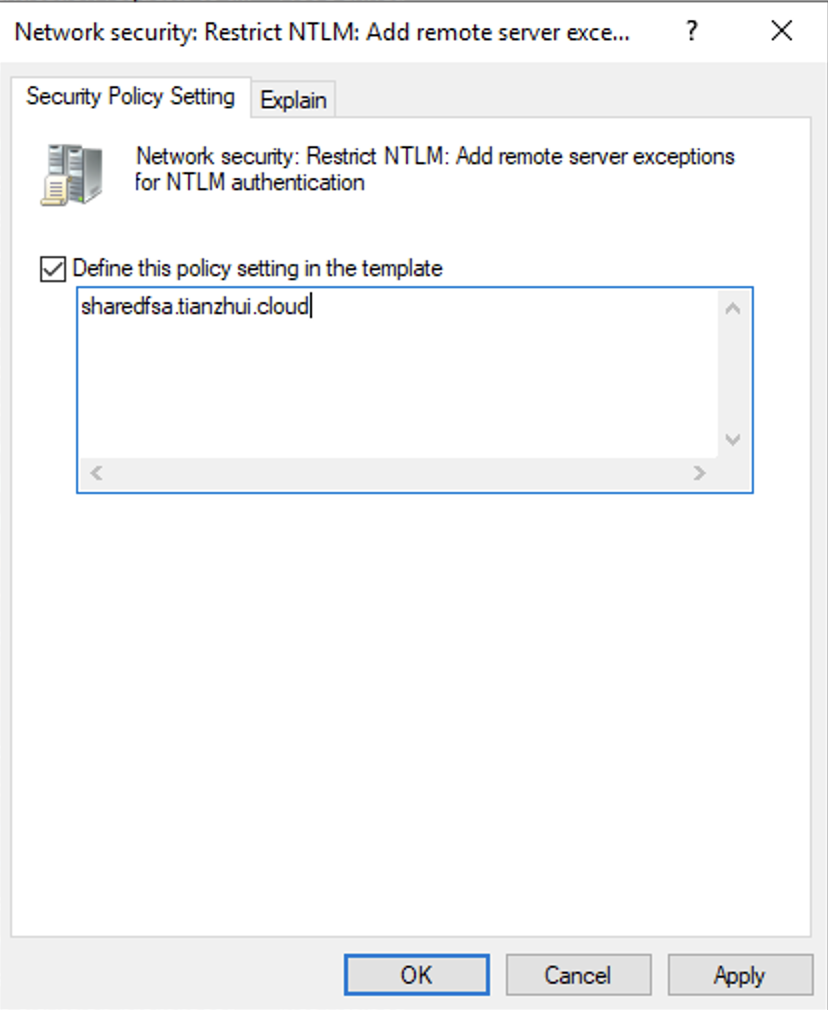
- Restrict NTLM: Add remote server exceptions for NTLM authentication - Use this policy setting to create an exception list of remote servers to which client devices are allowed to use NTLM authentication if the Network security: Restrict NTLM: Outgoing NTLM traffic to remote servers policy setting is configured.
1. Log on to a Windows instance joined to the AD to which FSx file system is joined as an administrator.
2. Choose Start, choose Administrative Tools, and then choose Group Policy Management.
3. Choose Group Policy Objects.
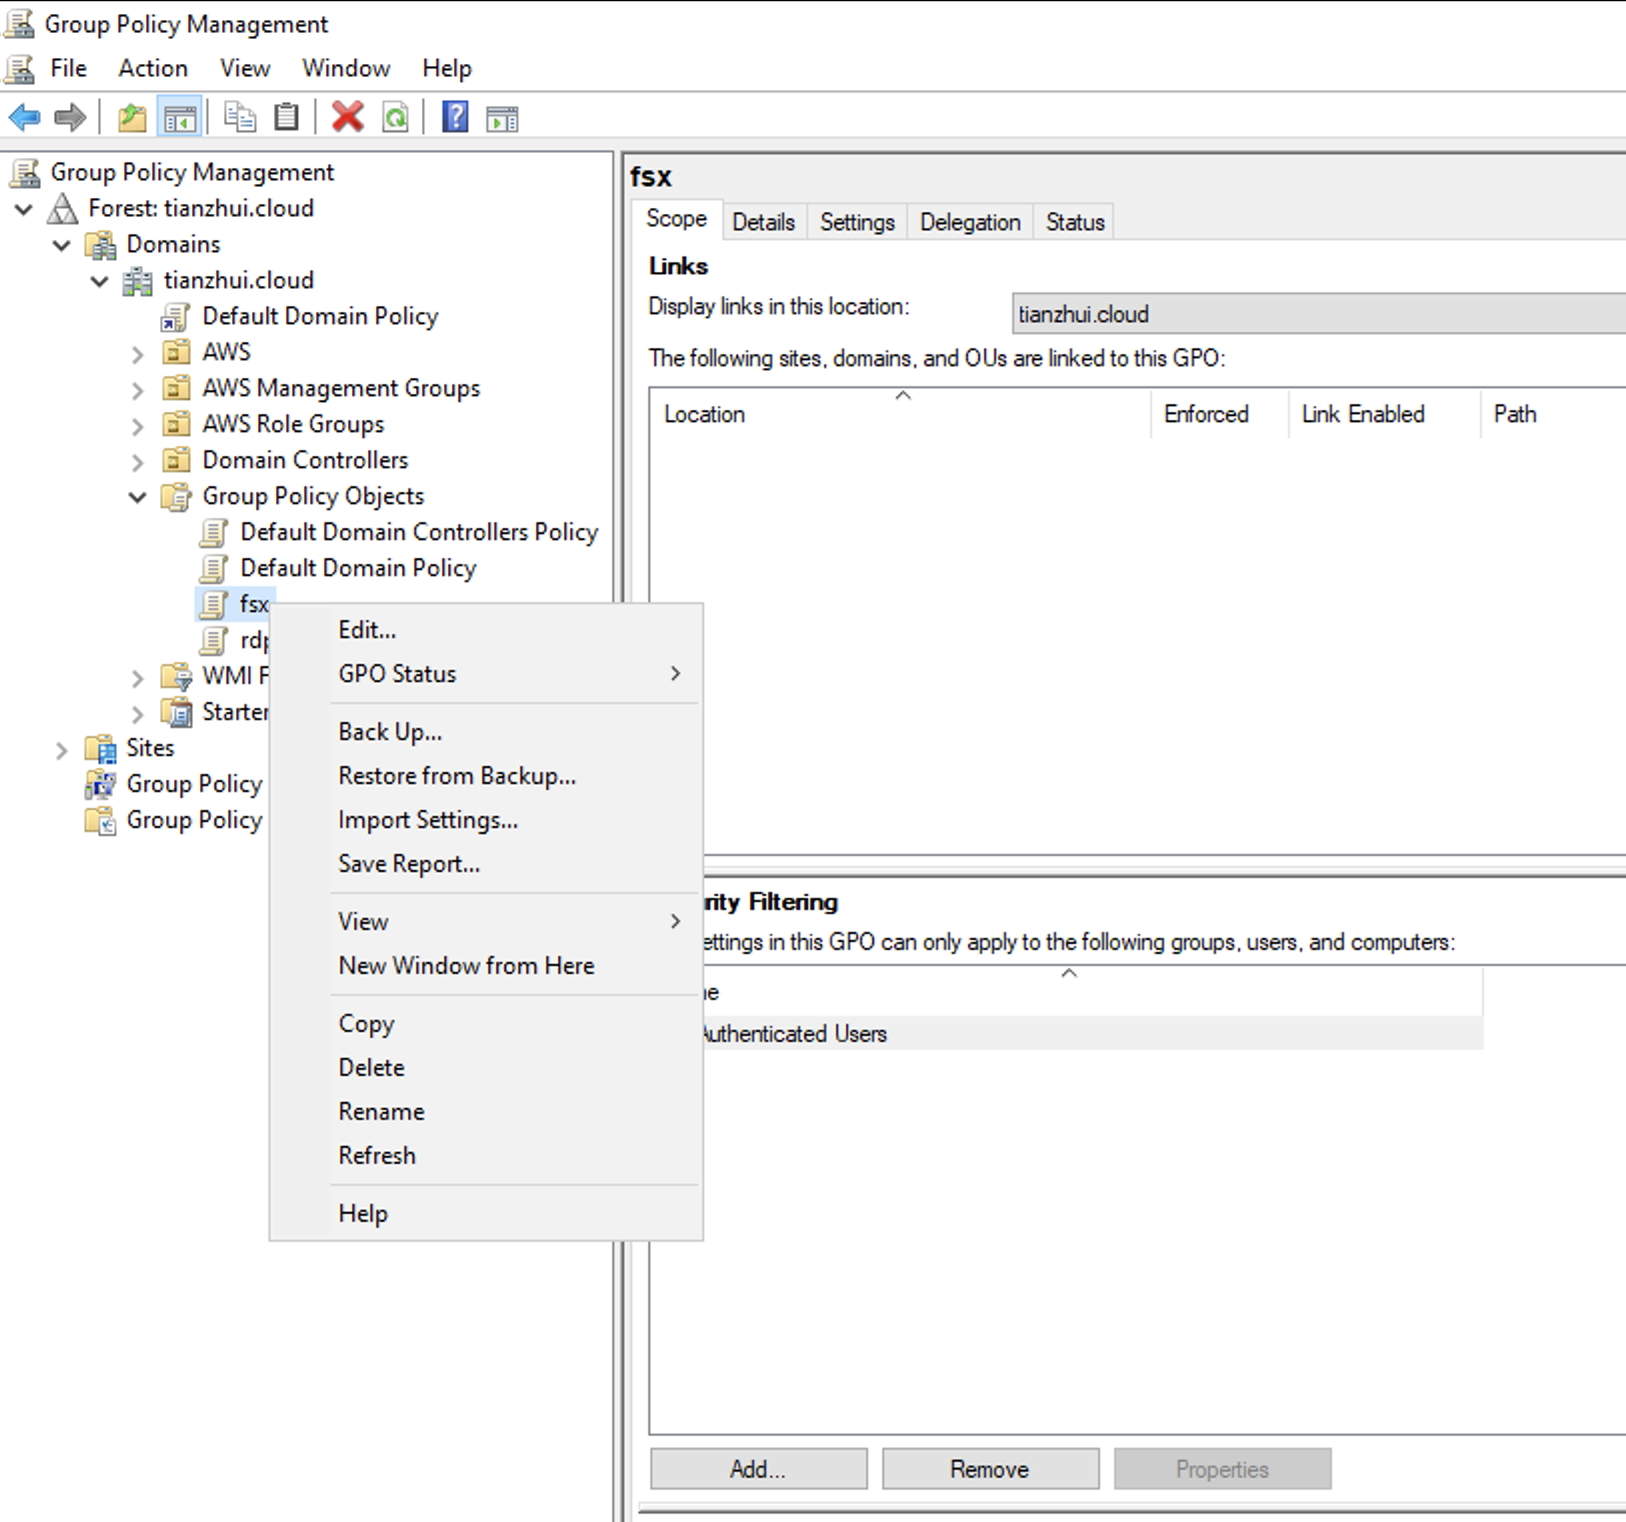
4. Locate the Network Security: Restrict NTLM: Outgoing NTLM traffic to remote servers policy. In the Local security setting tab, open the context (right-click) menu, and choose Properties.
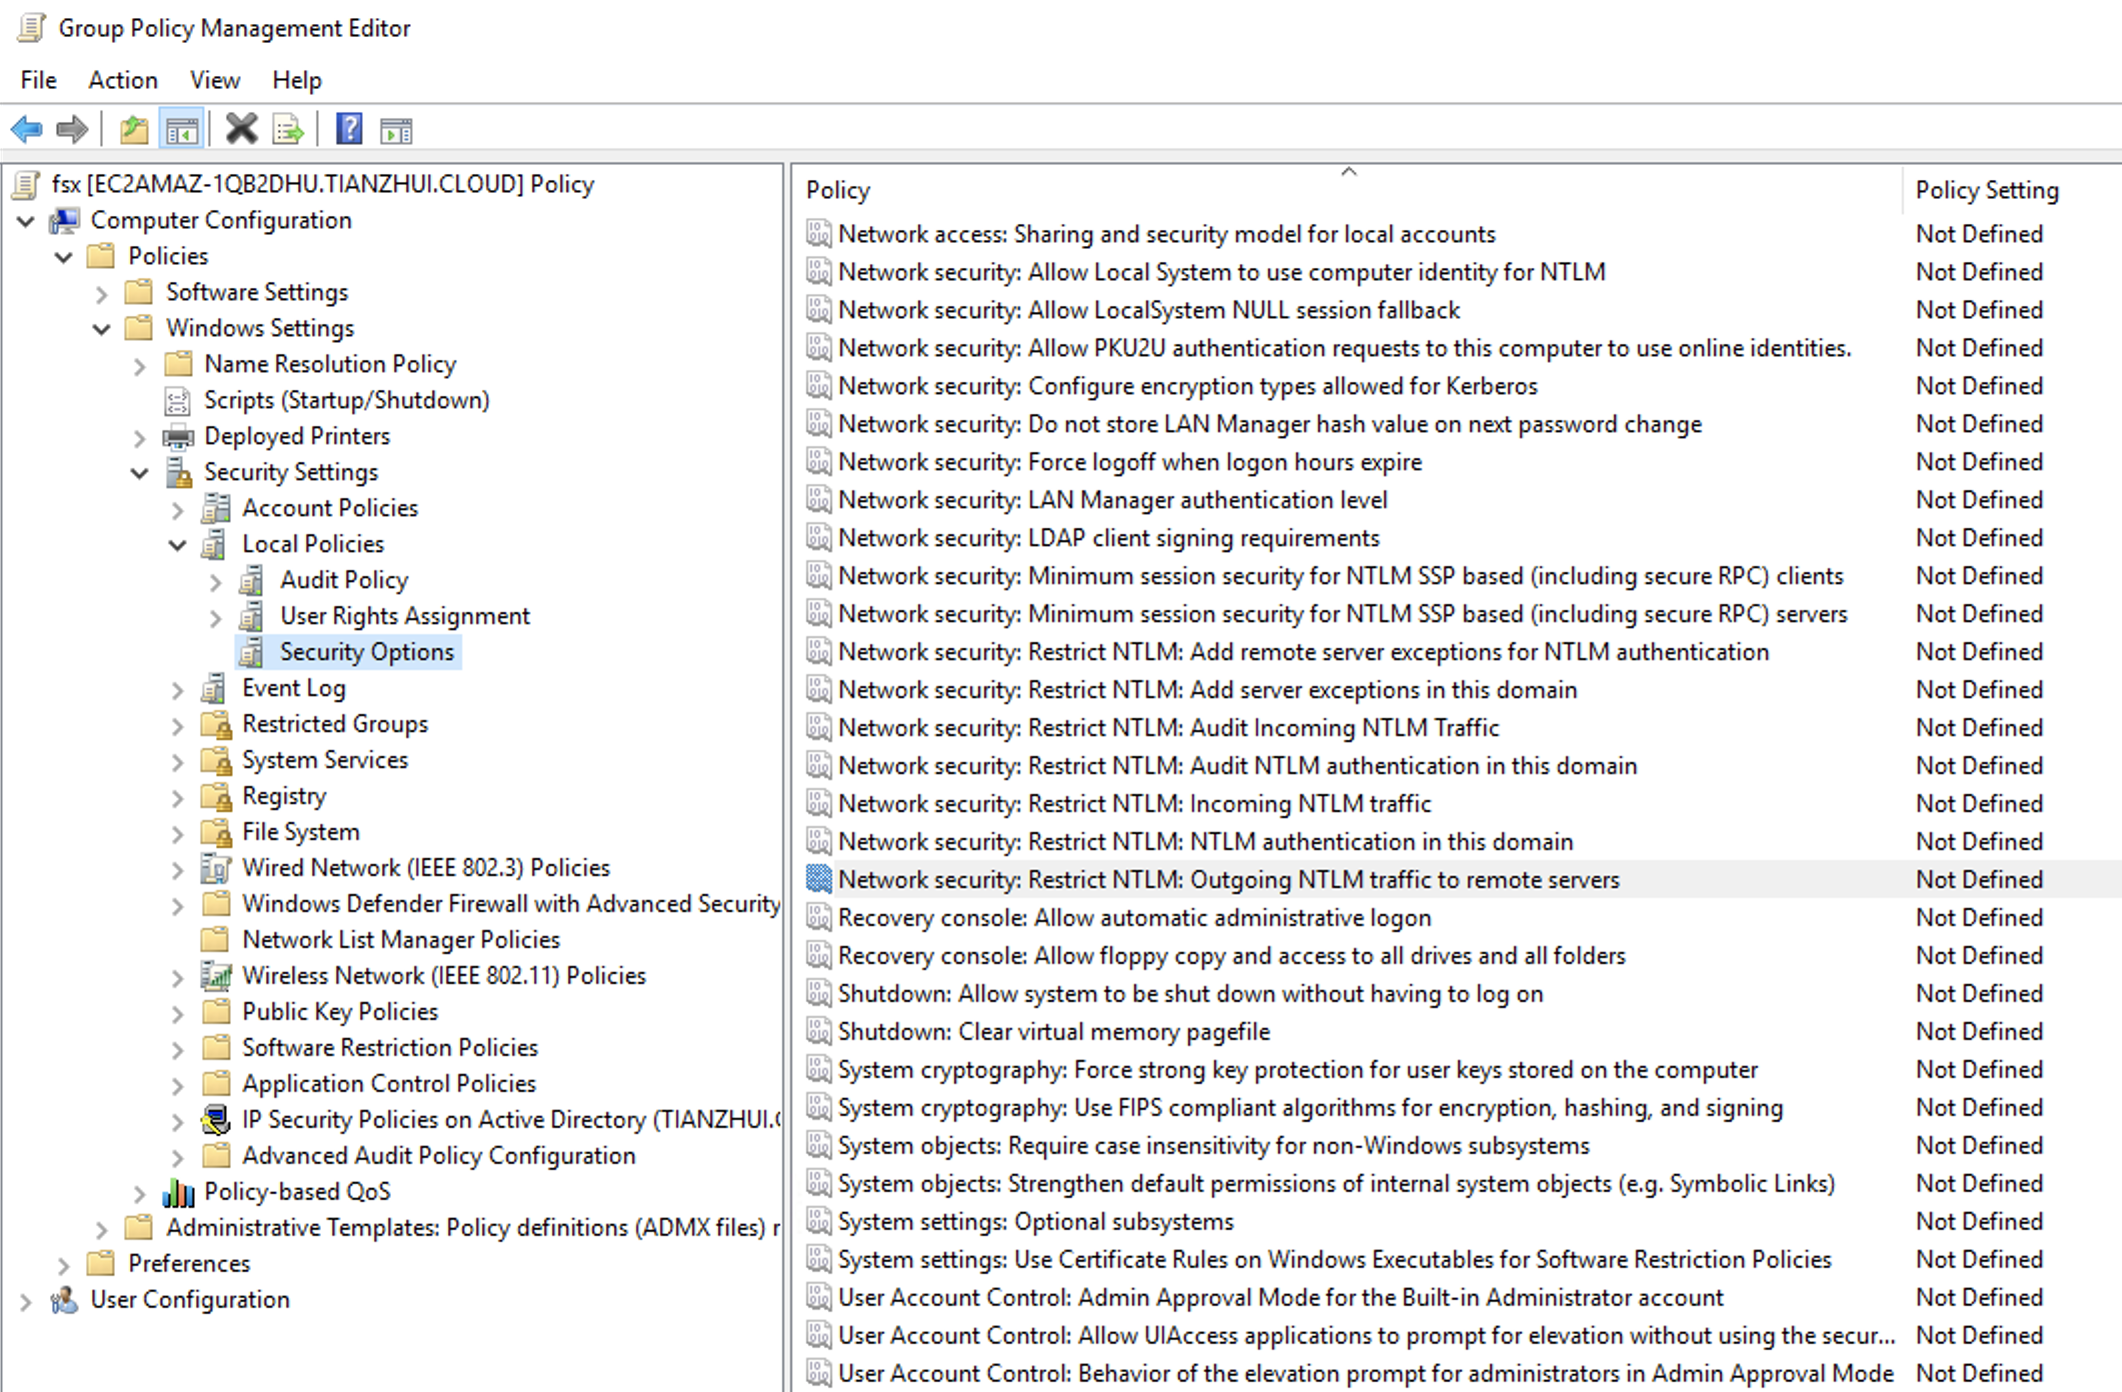
5. Choose Deny all.
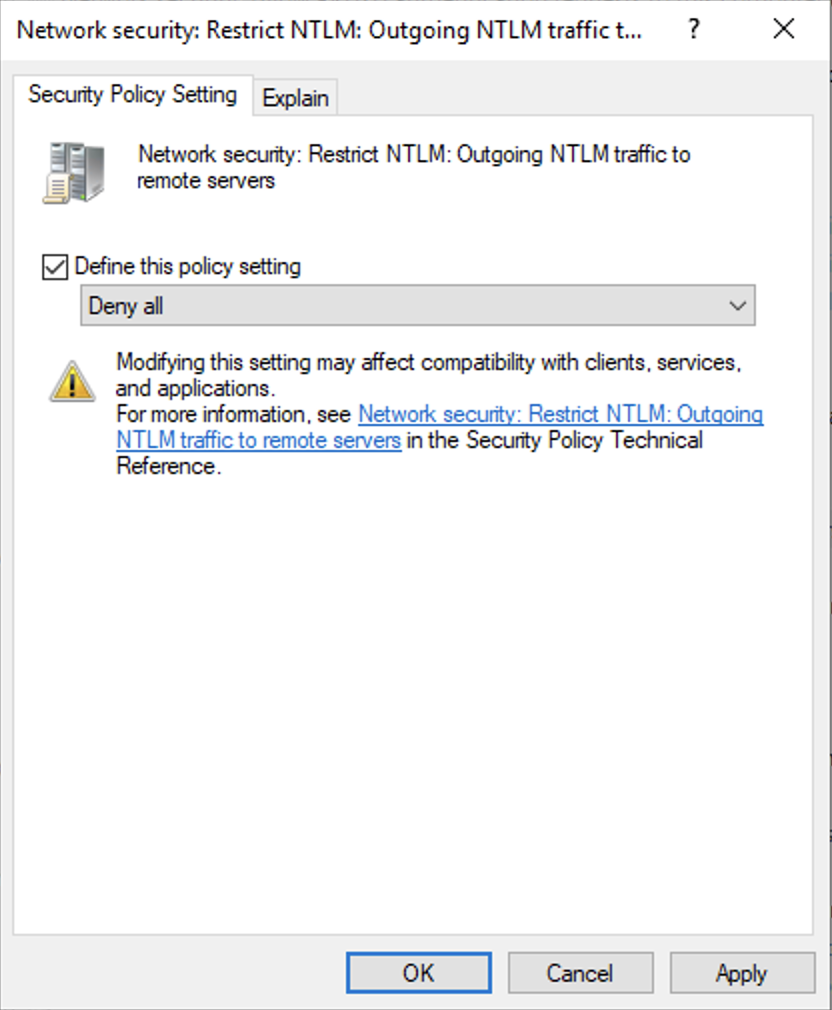
6. Choose Apply to save the security setting.
7. To set exceptions for NTLM connections to specific remote servers for the client, locate the Network security: Restrict NTLM: Add remote server exceptions. Open the context (right-click) menu, and choose Properties in the Local security setting tab.
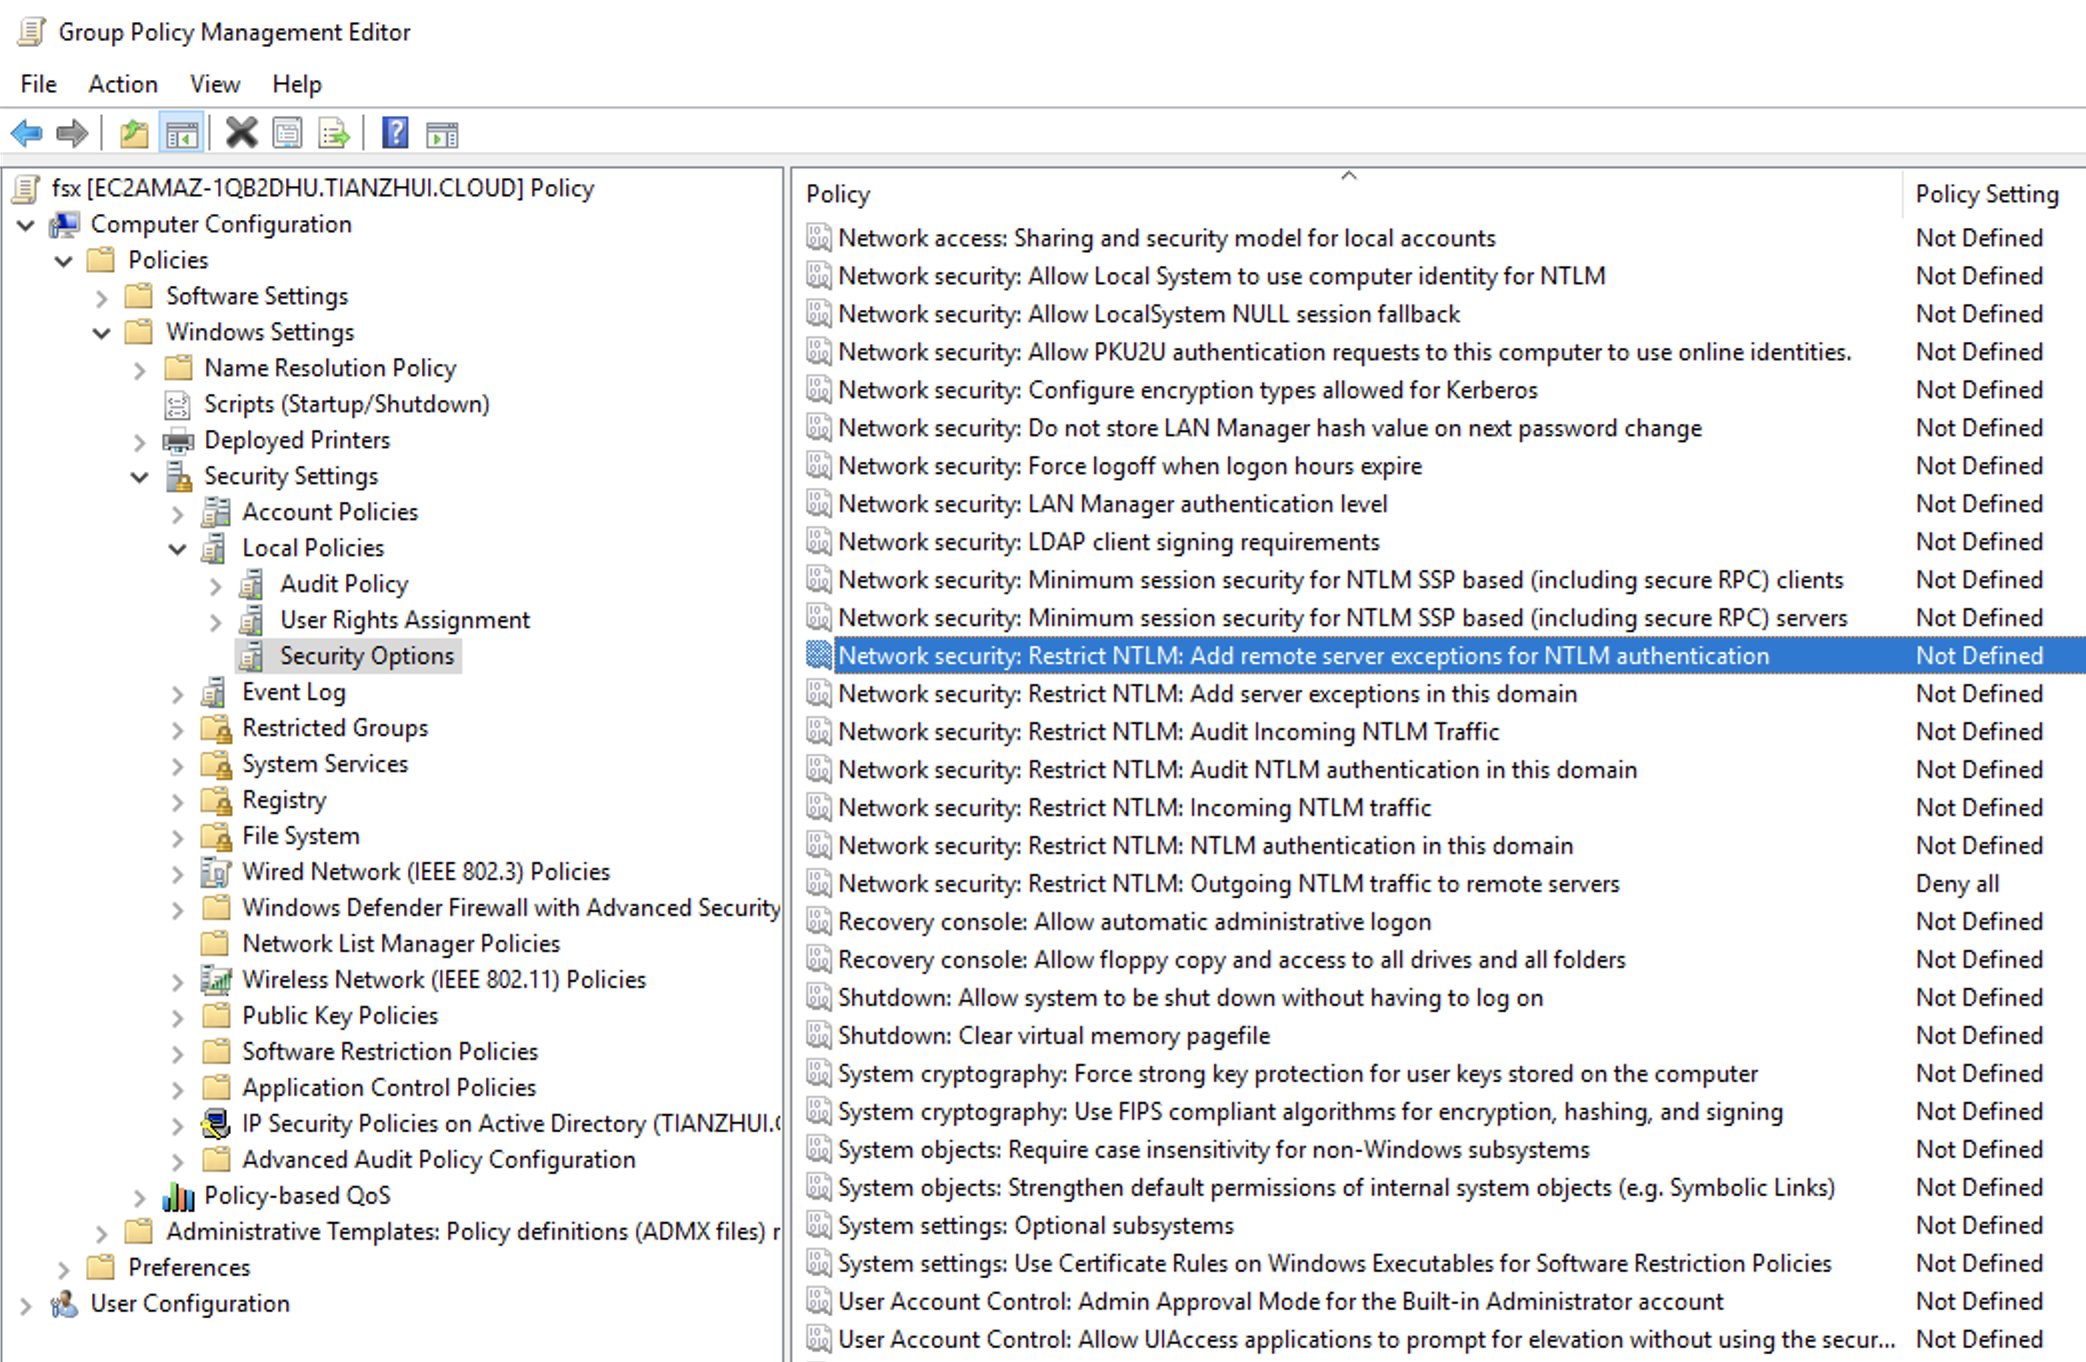
8. Enter the names of any servers to add to the exception list.
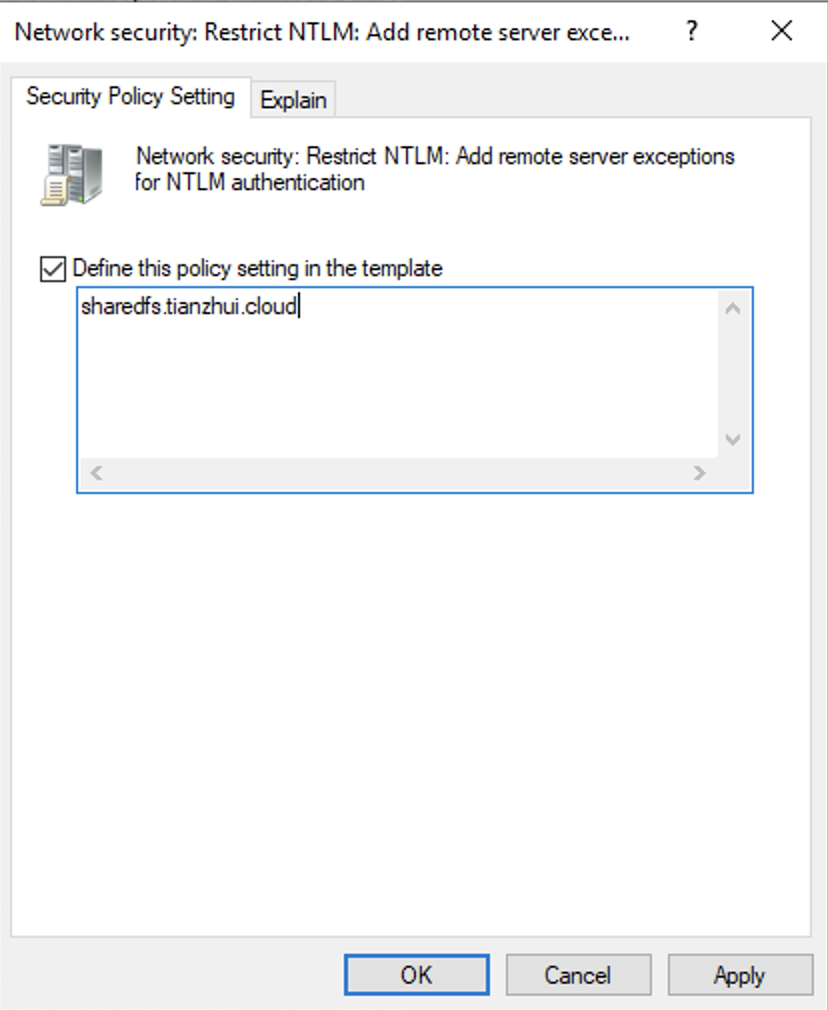
9. Choose Apply to save the security setting.
Link the GPO "fsx" to the domain. Here the domain is "tianzhui.cloud".
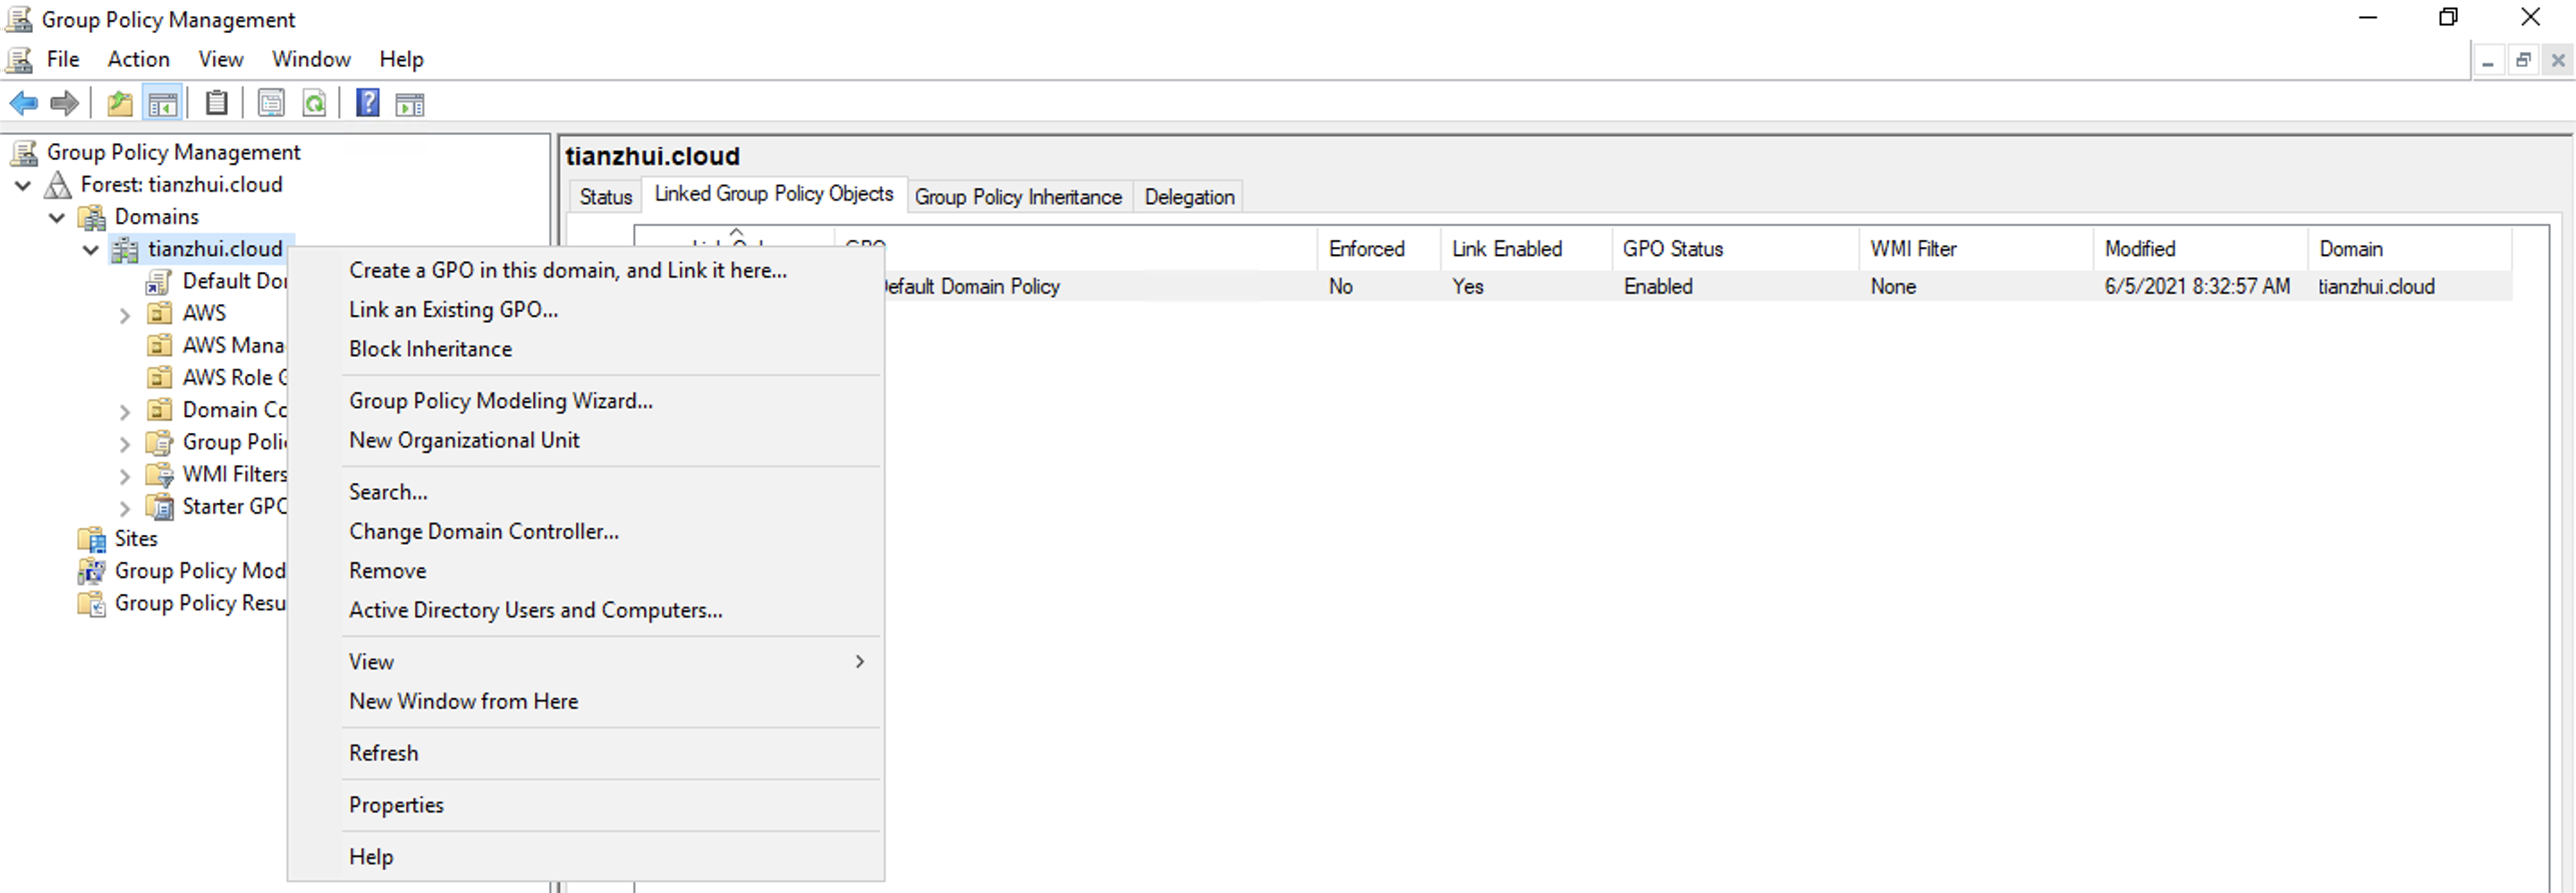
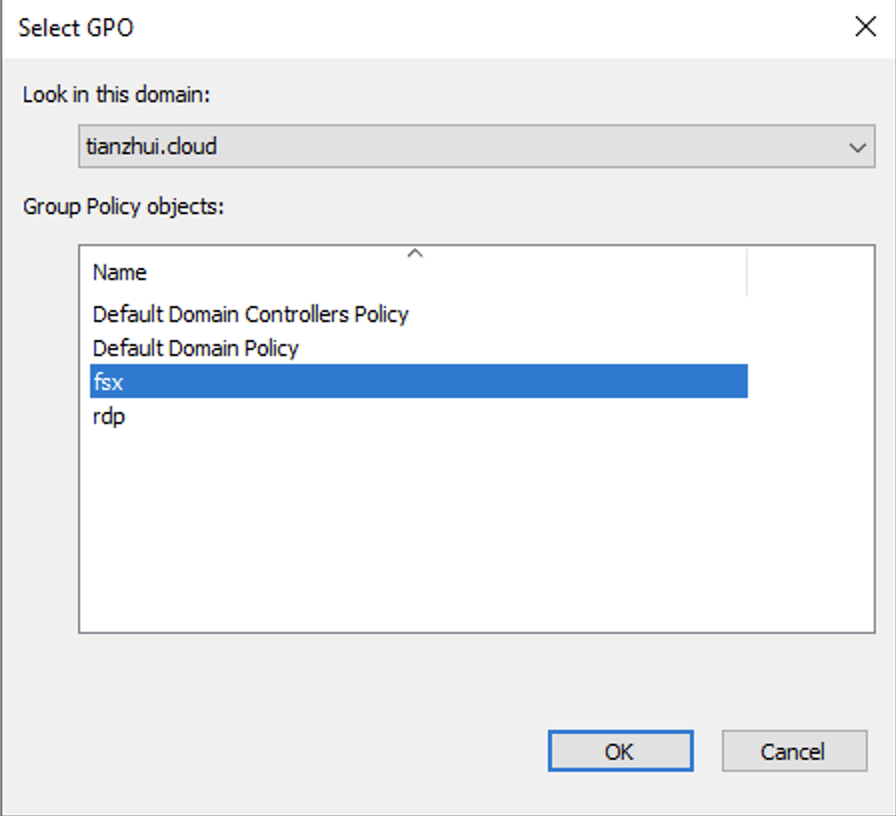
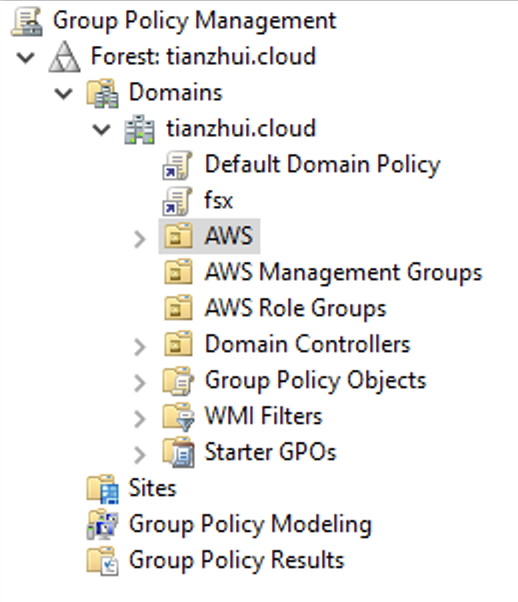
This policy updates your environment at the next policy refresh interval. To force the policy to apply immediately, run the gpupdate /force command on the target server.
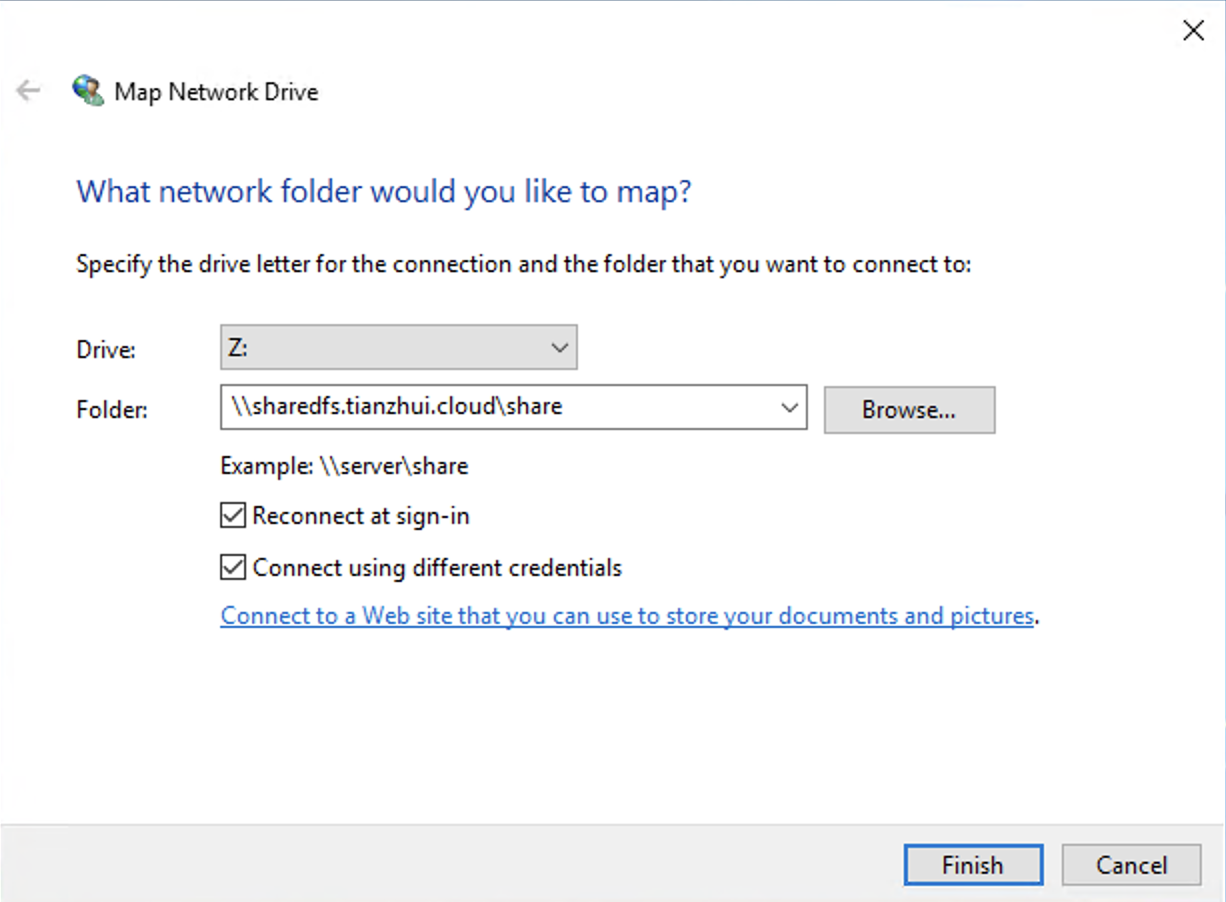
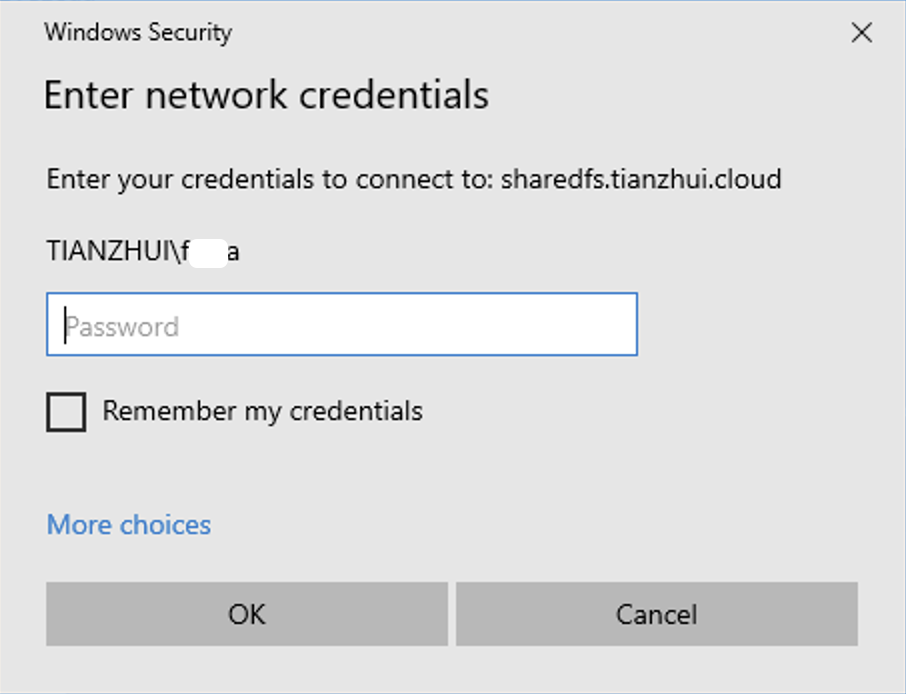
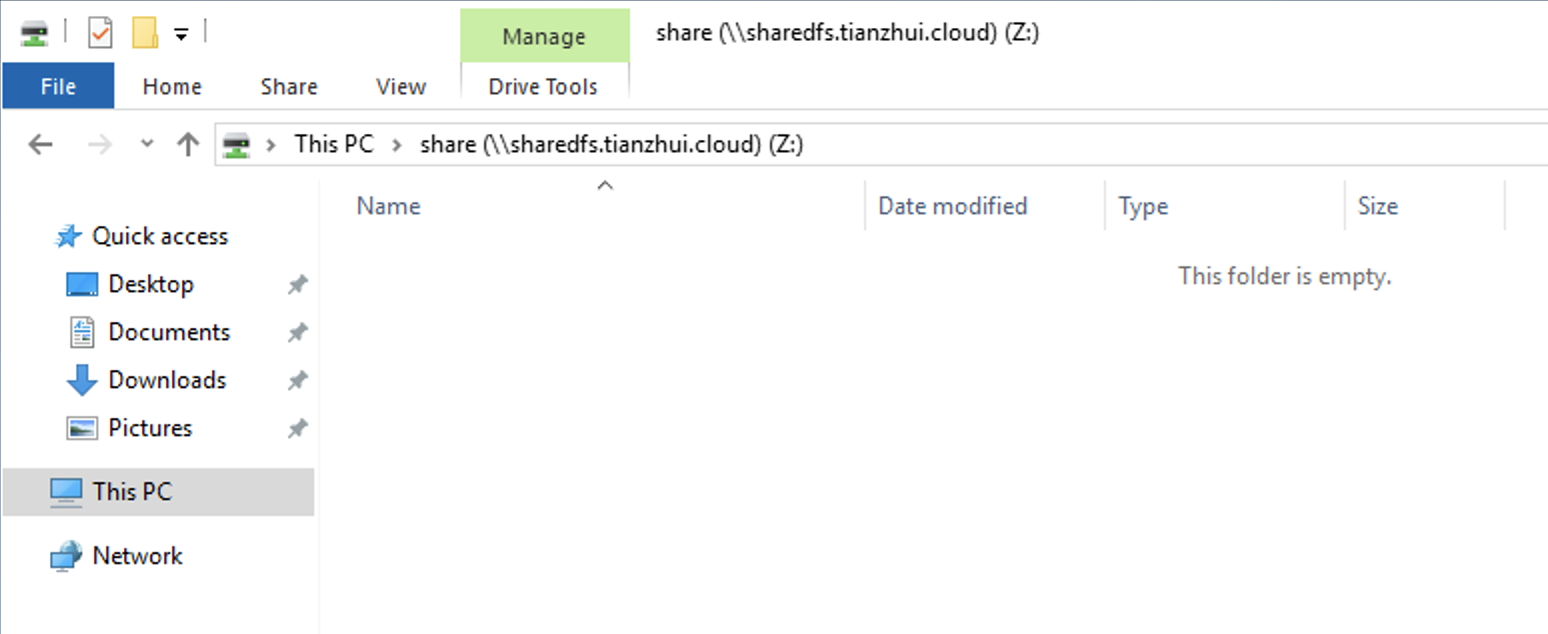
Mount using DNS alias name.
\\sharedfs.tianzhui.cloud\share
sharedfsa.tianzhui.cloud
gpupdate /forceReturn:
Updating policy...

Computer Policy update has completed successfully.
User Policy update has completed successfully.
Disconnect and try to mount again


References
Walkthrough 5: Using DNS aliases to access your file system
Set-ADComputer
-