Build Your-Own Multi-architecture container image with Your Own Infrastructure
2024年01月01日
Important Considerations
Resource Allocation: Be aware of the resources (CPU, memory) available on each node and how this might impact your builds.
Creating a Docker multi-node builder, also known as setting up a Docker buildx build environment with multiple nodes, allows you to build container images using the resources of several Docker hosts. This can be particularly useful for speeding up builds or building multi-platform images. Here's a general guide on how to set it up:
First, ensure you have Docker installed on your Ubuntu system. If Docker is not installed, you can install it with the following commands:
1. Update the apt package index:
sudo apt-get update
2. Install packages to allow apt to use a repository over HTTPS:
3. Add Docker's official GPG key:
curl -fsSL https://download.docker.com/linux/ubuntu/gpg | sudo gpg --dearmor -o /usr/share/keyrings/docker-archive-keyring.gpg
4. Set up the stable repository:
5. Install Docker Engine:
Repeat the above steps to install Docker on all nodes (1 management node and 2 worker nodes in this case).
Important
To simplify the demonstration, this article exposes Docker daemon on TCP port 2375. For my environment, since all there Docker nodes are deployed in the private subnets, exposing Docker daemon via TCP:2375 is just fine for me. In your production environment, I would still strongly recommend to expose Docker daemon on TCP port 2376, refer to Expose Docker daemon on TCP port 2376.
Security: When adding remote nodes, ensure your connection is secure, especially if you're using TCP connections to remote Docker daemons.
Repeat the following steps on all worker nodes.
1. Create
# vim /etc/docker/daemon.json
mkdir -p /etc/docker
echo "{\"hosts\": [\"tcp://0.0.0.0:2375\", \"unix:///var/run/docker.sock\"]}" > /etc/docker/daemon.json
2. Add
# mkdir -p /etc/systemd/system/docker.service.d
# vim /etc/systemd/system/docker.service.d/override.conf
3. Reload the systemd daemon:
# systemctl daemon-reload
4. Restart docker:
# systemctl restart docker.service
Key Points about Docker Contexts
Purpose: Docker contexts are primarily used to manage multiple Docker host environments. For instance, you might have one context for your local development environment, another for a staging environment on a remote server, and yet another for a production environment
Configuration: A Docker context contains information such as the Docker daemon endpoint (local socket or remote URL), TLS settings, and other metadata necessary to connect and authenticate with the Docker daemon.
On the manager node, execute the following commands to configure Docker context.
1. Create context: Create a new Docker context using the command line:
docker context create my-context --docker "host=tcp://example.com:2376"
This command creates a context named
# docker context create my-context-x86 --docker "host=tcp://10.0.z.xxx:2375"
# docker context create my-context-Arm --docker "host=tcp://10.0.z.yy:2375"
2. List context: You can see your existing contexts using:
docker context ls
3. Use context: You can switch between contexts using:
docker context use my-context
# docker context use my-context-x86
Default Context: By default, Docker commands are executed in the default context, which is your local Docker environment.
Remote Access: When setting up a context for remote access, you often need to configure TLS for secure communication with the remote Docker daemon. This might involve specifying certificates and keys.
URL in Context: The URL in a Docker context typically refers to the address of the Docker daemon. For local daemons, it's usually a Unix socket path. For remote daemons, it's a network address (
Use Cases
Important Consideration
Docker contexts: Docker contexts are a secure and convenient way to define remote Docker nodes. Use
1. Create a new builder instance
Start by creating a new builder instance that supports multi-architecture builds. Use the
docker buildx create --name mybuilder --use
2. Add additional build nodes
You can add nodes to this builder instance. Nodes can be local or remote Docker hosts. To add a remote node, you need the Docker context or the URL and certificate of the remote Docker daemon.
docker buildx create --name mybuilder --append <remote-docker-context-or-URL>
# docker buildx create --name mybuilder --append my-context-Arm
Repeat this step for each worker node you want to add.
3. Inspect your builder
To see all the nodes in your builder, use:
# docker buildx inspect mybuilder --bootstrap
Check the version:
# docker buildx version
List available builders:
# docker buildx ls
If you see output from these commands,
Use base images that are available for multiple architectures, like those provided by official images.
Prepare Dockerfile and application code
# git clone git@github.com:xxx/yyy.git
# cd yyy
# git clone git@github.com:xxx/zzz.git app
aws ecr get-login-password --region
Replace
# docker login -u AWS -p $(aws ecr get-login-password --region <Region-code>) <AWS-account-ID>.dkr.ecr.<Region-code>.amazonaws.com
When building multi-architecture images using Docker buildx, you don't need to manually update the manifest file for ECR to recognize it as such. Docker buildx handles the creation of a multi-architecture manifest and pushes this manifest along with the respective architecture-specific images to the registry.
Here's a general process on how to build and push a multi-architecture image to AWS ECR using Docker buildx:
# docker buildx build --platform linux/amd64,linux/arm64 -t <AWS-account-ID>.dkr.ecr.<Region-code>.amazonaws.com/<repo-name>:<tag> --push .
This command will use the resources from all the nodes in
By following these steps, Docker buildx automatically handles the creation of a multi-architecture manifest. AWS ECR recognizes this manifest and allows you to pull the appropriate architecture for the platform where the image is being run.
Note
Additional Notes
Tips
By following these steps, you can leverage Docker buildx to create a multi-node builder setup, potentially improving your build performance and enabling more complex build scenarios, like multi-platform builds.
By following these steps, you can create a Docker container image that is compatible with multiple CPU architectures, enhancing the portability and flexibility of your applications.
References
Enable TCP port 2375 for external connection to Docker
Building a multi-architecture container involves creating a container image that can run on different CPU architectures (like amd64, arm64, etc.). This is particularly useful for ensuring compatibility across various environments, like local development machines, CI/CD pipelines, and production servers. Here's a general approach to building a multi-architecture container:
Environment:
- Compute resource: Amazon EC2
- 1 EC2 instance for management (t4g.nano -> t4g.small, Ubuntu Server 22.04, 8GiB EBS, IAM role for Session Manager and ECR upload) (management node)
- 1 EC2 instance for building x86_64 architecture images (t3a.micro, Ubuntu Server 22.04, 10Gib EBS, IAM role for Session Manager) (worker node #1)
- 1 EC2 instance for building Arm_64 architecture images (t4g.micro -> t4g.small, Ubuntu Server 22.04, 10Gib EBS, IAM role for Session Manager) (worker node #2)
- Container registry: Amazon Elastic Container Registry (ECR)
Important Considerations
Resource Allocation: Be aware of the resources (CPU, memory) available on each node and how this might impact your builds.
1. Set Up Your Environment for Docker Multi-node Builder
Installbuildx tool for building multi-architecture images. buildx is a Docker CLI plugin for extended build capabilities.Creating a Docker multi-node builder, also known as setting up a Docker buildx build environment with multiple nodes, allows you to build container images using the resources of several Docker hosts. This can be particularly useful for speeding up builds or building multi-platform images. Here's a general guide on how to set it up:
Prerequisites
- Docker Engine 19.03 or later.
- The
docker buildxplugin, which is included in Docker 19.03 and later. - Multiple Docker hosts (nodes) with Docker installed, network-accessible from the machine where you're running the build.
Install Docker and buildx Tool
To install thebuildx tool on Ubuntu, you need to follow a few steps. buildx is a Docker CLI plugin that extends the capabilities of Docker, specifically with features needed for building multi-architecture images. As of Docker 19.03, buildx comes bundled with Docker, so you might already have it installed. Here's how to install or verify the installation:First, ensure you have Docker installed on your Ubuntu system. If Docker is not installed, you can install it with the following commands:
1. Update the apt package index:
sudo apt-get update
2. Install packages to allow apt to use a repository over HTTPS:
sudo apt-get install -y \
  apt-transport-https \
  ca-certificates \
  curl \
  gnupg \
  lsb-release
3. Add Docker's official GPG key:
curl -fsSL https://download.docker.com/linux/ubuntu/gpg | sudo gpg --dearmor -o /usr/share/keyrings/docker-archive-keyring.gpg
4. Set up the stable repository:
echo \
  "deb [arch=$(dpkg --print-architecture) signed-by=/usr/share/keyrings/docker-archive-keyring.gpg] https://download.docker.com/linux/ubuntu \
  $(lsb_release -cs) stable" | sudo tee /etc/apt/sources.list.d/docker.list > /dev/null
5. Install Docker Engine:
sudo apt-get update
sudo apt-get install -y docker-ce docker-ce-cli containerd.io
Repeat the above steps to install Docker on all nodes (1 management node and 2 worker nodes in this case).
Expose Docker Daemon
The following steps expose Docker daemon on TCP port 2375.Important
To simplify the demonstration, this article exposes Docker daemon on TCP port 2375. For my environment, since all there Docker nodes are deployed in the private subnets, exposing Docker daemon via TCP:2375 is just fine for me. In your production environment, I would still strongly recommend to expose Docker daemon on TCP port 2376, refer to Expose Docker daemon on TCP port 2376.
Security: When adding remote nodes, ensure your connection is secure, especially if you're using TCP connections to remote Docker daemons.
Repeat the following steps on all worker nodes.
1. Create
daemon.json file in /etc/docker:# vim /etc/docker/daemon.json
{"hosts": ["tcp://0.0.0.0:2375", "unix:///var/run/docker.sock"]}
mkdir -p /etc/docker
echo "{\"hosts\": [\"tcp://0.0.0.0:2375\", \"unix:///var/run/docker.sock\"]}" > /etc/docker/daemon.json
2. Add
/etc/systemd/system/docker.service.d/override.conf # mkdir -p /etc/systemd/system/docker.service.d
# vim /etc/systemd/system/docker.service.d/override.conf
[Service]
ExecStart=
ExecStart=/usr/bin/dockerd
3. Reload the systemd daemon:
# systemctl daemon-reload
4. Restart docker:
# systemctl restart docker.service
Create Docker Context
A Docker context is a concept introduced in Docker to allow you to store configuration options for connecting to different Docker environments. Each context stores the configuration to connect to a specific Docker daemon, whether it's local or remote. This makes it easier to manage and switch between different Docker environments without having to manually reconfigure settings or environment variables each time.Key Points about Docker Contexts
Purpose: Docker contexts are primarily used to manage multiple Docker host environments. For instance, you might have one context for your local development environment, another for a staging environment on a remote server, and yet another for a production environment
Configuration: A Docker context contains information such as the Docker daemon endpoint (local socket or remote URL), TLS settings, and other metadata necessary to connect and authenticate with the Docker daemon.
On the manager node, execute the following commands to configure Docker context.
1. Create context: Create a new Docker context using the command line:
docker context create my-context --docker "host=tcp://example.com:2376"
This command creates a context named
my-context that connects to a Docker daemon running at example.com on port 2376.# docker context create my-context-x86 --docker "host=tcp://10.0.z.xxx:2375"
my-context-x86
Successfully created context "my-context-x86"
Replace 10.0.z.xxx with IP address of the worker node with x86 CPU architecture.
# docker context create my-context-Arm --docker "host=tcp://10.0.z.yy:2375"
my-context-Arm
Successfully created context "my-context-Arm"
Replace 10.0.z.yy with IP address of the worker node with x86 ARM architecture.
2. List context: You can see your existing contexts using:
docker context ls
NAME             DESCRIPTION                               DOCKER ENDPOINT               ERROR
default *        Current DOCKER_HOST based configuration   unix:///var/run/docker.sock
my-context-Arm                                             tcp://10.0.z.yy:2375
my-context-x86                                             tcp://10.0.z.xxx:2375
This command lists all available Docker contexts and shows the current active context.
3. Use context: You can switch between contexts using:
docker context use my-context
my-context
Current context is now "my-context"
After executing this command, all subsequent Docker commands will be executed against the Docker daemon defined in
my-context.# docker context use my-context-x86
my-context-x86
Current context is now "my-context-x86"
Default Context: By default, Docker commands are executed in the default context, which is your local Docker environment.
Remote Access: When setting up a context for remote access, you often need to configure TLS for secure communication with the remote Docker daemon. This might involve specifying certificates and keys.
URL in Context: The URL in a Docker context typically refers to the address of the Docker daemon. For local daemons, it's usually a Unix socket path. For remote daemons, it's a network address (
tcp://<host>:<port>).Use Cases
- Multiple Environments: Switching between local, staging, and production environments without modifying environment variables or Docker configurations.
- Remote Management: Managing containers on remote hosts directly from your local machine.
- CI/CD Pipelines: Automating deployments and container management in different environments.
Important Consideration
Docker contexts: Docker contexts are a secure and convenient way to define remote Docker nodes. Use
docker context create to set up contexts for each of your nodes.Steps to Create a Docker Multi-Node Builder
On the manager node, execute the following commands to configure Docker builder.1. Create a new builder instance
Start by creating a new builder instance that supports multi-architecture builds. Use the
buildx command with Docker:docker buildx create --name mybuilder --use
2. Add additional build nodes
You can add nodes to this builder instance. Nodes can be local or remote Docker hosts. To add a remote node, you need the Docker context or the URL and certificate of the remote Docker daemon.
docker buildx create --name mybuilder --append <remote-docker-context-or-URL>
# docker buildx create --name mybuilder --append my-context-Arm
mybuilder
Repeat this step for each worker node you want to add.
3. Inspect your builder
To see all the nodes in your builder, use:
# docker buildx inspect mybuilder --bootstrap
[+] Building 4.3s (1/1) FINISHED
 => [internal] booting buildkit                                                                                                                                                      4.3s
 => => pulling image moby/buildkit:buildx-stable-1                                                                                                                                   3.4s
 => => creating container buildx_buildkit_mybuilder1                                                                                                                                 0.9s
Name:          mybuilder
Driver:        docker-container
Last Activity: 2024-01-01 11:17:00 +0000 UTC

Nodes:
Name:      mybuilder0
Endpoint:  my-context-x86
Status:    running
Buildkit:  v0.12.4
Platforms: linux/amd64, linux/amd64/v2, linux/amd64/v3, linux/386
Labels:
 org.mobyproject.buildkit.worker.executor:         oci
 org.mobyproject.buildkit.worker.hostname:         3ab89ea121bd
 org.mobyproject.buildkit.worker.network:          host
 org.mobyproject.buildkit.worker.oci.process-mode: sandbox
 org.mobyproject.buildkit.worker.selinux.enabled:  false
 org.mobyproject.buildkit.worker.snapshotter:      overlayfs
GC Policy rule#0:
 All:           false
 Filters:       type==source.local,type==exec.cachemount,type==source.git.checkout
 Keep Duration: 48h0m0s
 Keep Bytes:    488.3MiB
GC Policy rule#1:
 All:           false
 Keep Duration: 1440h0m0s
 Keep Bytes:    953.7MiB
GC Policy rule#2:
 All:        false
 Keep Bytes: 953.7MiB
GC Policy rule#3:
 All:        true
 Keep Bytes: 953.7MiB

Name:      mybuilder1
Endpoint:  my-context-Arm
Status:    running
Buildkit:  v0.12.4
Platforms: linux/arm64, linux/arm/v7, linux/arm/v6
Labels:
 org.mobyproject.buildkit.worker.executor:         oci
 org.mobyproject.buildkit.worker.hostname:         731ae36b52eb
 org.mobyproject.buildkit.worker.network:          host
 org.mobyproject.buildkit.worker.oci.process-mode: sandbox
 org.mobyproject.buildkit.worker.selinux.enabled:  false
 org.mobyproject.buildkit.worker.snapshotter:      overlayfs
GC Policy rule#0:
 All:           false
 Filters:       type==source.local,type==exec.cachemount,type==source.git.checkout
 Keep Duration: 48h0m0s
 Keep Bytes:    488.3MiB
GC Policy rule#1:
 All:           false
 Keep Duration: 1440h0m0s
 Keep Bytes:    953.7MiB
GC Policy rule#2:
 All:        false
 Keep Bytes: 953.7MiB
GC Policy rule#3:
 All:        true
 Keep Bytes: 953.7MiB
Verify Docker Buildx Installation
buildx should be included in the Docker installation. To verify, you can check the version or list the available builders.Check the version:
# docker buildx version
github.com/docker/buildx v0.11.2 9872040
List available builders:
# docker buildx ls
AME/NODE            DRIVER/ENDPOINT      STATUS    BUILDKIT   PLATFORMS
mybuilder*           docker-container
 \_ mybuilder0        \_ my-context-x86   running   v0.20.0    linux/amd64 (+4), linux/386
 \_ mybuilder1        \_ my-context-Arm   running   v0.20.0    linux/arm64, linux/arm (+2)
default              docker
 \_ default           \_ default          running   v0.20.0    linux/arm64, linux/arm (+2)
my-context-Arm       docker
 \_ my-context-Arm    \_ my-context-Arm   running   v0.20.0    linux/arm64, linux/arm (+2)
my-context-x86       docker
 \_ my-context-x86    \_ my-context-x86   running   v0.20.0    linux/amd64 (+4), linux/386
If you see output from these commands,
buildx is installed and working.Prepare Your Dockerfile and Application Code
Ensure your Dockerfile is architecture-agnostic. Avoid hard-coded values or scripts that are specific to a single architecture.Use base images that are available for multiple architectures, like those provided by official images.
Prepare Dockerfile and application code
# git clone git@github.com:xxx/yyy.git
# cd yyy
# git clone git@github.com:xxx/zzz.git app
Login to AWS ECR
First, authenticate Docker with your ECR registry. You'll need the AWS CLI installed and configured for this step.aws ecr get-login-password --region
<Region-code> | docker login --username AWS --password-stdin <AWS-account-ID>.dkr.ecr.<Region-code>.amazonaws.comReplace
Region-code and AWS-account-ID with your AWS region and account ID respectively.# docker login -u AWS -p $(aws ecr get-login-password --region <Region-code>) <AWS-account-ID>.dkr.ecr.<Region-code>.amazonaws.com
WARNING! Using --password via the CLI is insecure. Use --password-stdin.
WARNING! Your password will be stored unencrypted in /root/.docker/config.json.
Configure a credential helper to remove this warning. See
https://docs.docker.com/engine/reference/commandline/login/#credentials-store

Login Succeeded
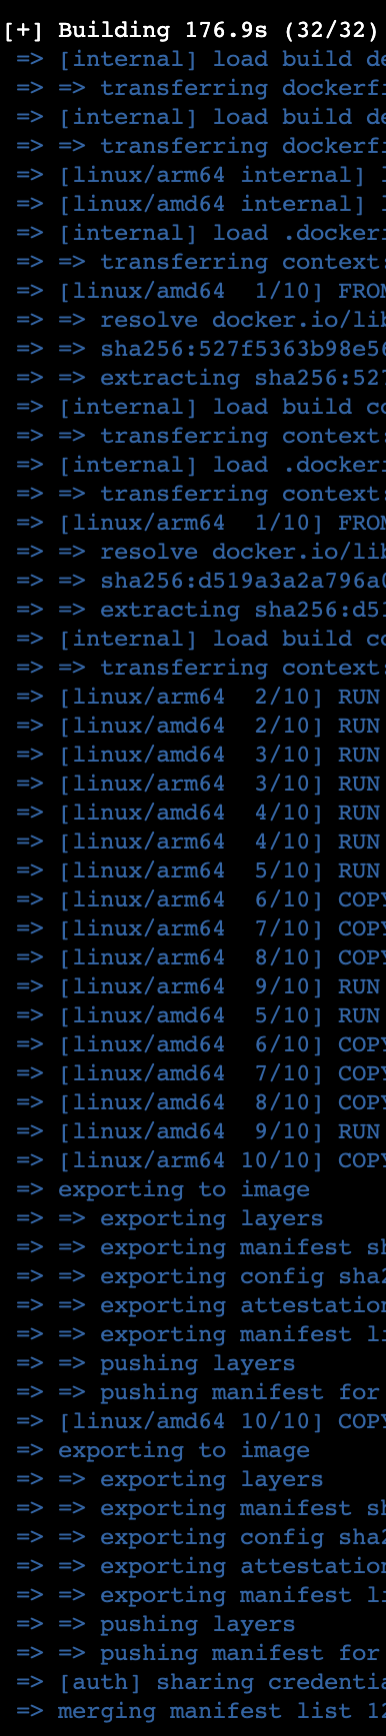
Start Building
Now you can start a build that uses all the nodes you've added.When building multi-architecture images using Docker buildx, you don't need to manually update the manifest file for ECR to recognize it as such. Docker buildx handles the creation of a multi-architecture manifest and pushes this manifest along with the respective architecture-specific images to the registry.
Here's a general process on how to build and push a multi-architecture image to AWS ECR using Docker buildx:
Start a Buildx Builder for Multi-platform Builds and Push the Image
Use Docker buildx to build and push your image. The following command builds the image for bothamd64 and arm64 architectures and pushes them, along with the multi-architecture manifest, to the specified ECR repository.# docker buildx build --platform linux/amd64,linux/arm64 -t <AWS-account-ID>.dkr.ecr.<Region-code>.amazonaws.com/<repo-name>:<tag> --push .
This command will use the resources from all the nodes in
mybuilder to build the image, start a build for a multi-architecture image, assuming you have a Dockerfile in the current directory.By following these steps, Docker buildx automatically handles the creation of a multi-architecture manifest. AWS ECR recognizes this manifest and allows you to pull the appropriate architecture for the platform where the image is being run.
Note
- Use
docker buildx buildto start the build process. - Specify the target platforms (like amd64, arm64, etc.) using the
--platformflag. For example,--platform linux/amd64,linux/arm64to target amd64 and arm64 architectures. - Include additional flags as necessary, such as
-tfor tagging the image. - If you want to push the image to a container registry, use the
--pushflag during the build process. This will create and push a multi-architecture manifest to the registry. - Ensure your nodes support the architectures you are building for.
4. Verify on AWS ECR
After pushing the image, you can verify its presence and its multi-architecture nature in the AWS ECR console. AWS ECR will show the image with multiple architectures under the same tag.Additional Notes
- IAM Permissions: Ensure your AWS user has the necessary permissions to push images to ECR.
- Buildx Limitations: Docker buildx needs to run on a system that can execute the architectures you're building for. You can use emulation (e.g., QEMU) for architectures not natively supported by your build system.
- Dockerfile Compatibility: Make sure your Dockerfile and application are compatible with all the architectures you're building for.
Tips
- Regularly update your base images and dependencies to maintain security and compatibility.
- If using specific binaries or scripts, ensure they are compatible with all target architectures.
- Utilize multi-stage builds to optimize the size and layers of your images.
By following these steps, you can leverage Docker buildx to create a multi-node builder setup, potentially improving your build performance and enabling more complex build scenarios, like multi-platform builds.
By following these steps, you can create a Docker container image that is compatible with multiple CPU architectures, enhancing the portability and flexibility of your applications.
References
Enable TCP port 2375 for external connection to Docker