Schedule Kubernetes Pods across AWS EC2 Instances of Different Purchase Options
2024年02月08日
Kubernetes, EKS, pod scheduling, node groups, EC2 instances, on-demand, spot instances, taints, tolerations, node selectors.
In this section, I will provide an overview of the Kubernetes setup under consideration.
The application functonality is served by the Kubernetes Pods which is hosted by Amazon Elastic Kubernetes Service (EKS).
The EKS cluster is composed of multiple node groups, utilizing distinct purchase options of EC2 instances - some leverage on-demand instances, while others employ spot instances. This is the most cost-efficient combination for purchase option of EC2 compute cost when applying appropirate Savings Plans to the on-demand instances.
The following example assumes that the AWS Region is Oregon, OS is using Linux, and EC2 instance type and size is t4g.medium:
A key aspect to highlight is the characteristics of the Pods within this setup; they are inherently stateless. These pods are deployed through Kubernetes deployment mechanism. Therefore, the corresponding pods could be scaled out into multiple replicas via replica set. I will devide them into non-interruptable workload and interruptable ones. Such grouping methodology simplifies our future cost-related dicussion and considerations.
This necessary background sets the stage for understanding the cluster's architecture and implementation and lays the groundwork for the pod scheduling strategies that I will explore in detail in the subsequent sections.
In my previous posts, I've covered a wide range of topics related to this Kubernetes cluster setup from other aspects. For further information, please refer to those entries. Consequently, this article will avoid repeating the content already discussed in those posts.
For the convenience of my readers, below is a curated, though not exhaustive, list of recent posts.
Increasing the amount of available IP addresses for the EC2 nodes
- Stability: application should be hosted by pods stably without being interrupted.
- Scalability: For stable performance, the pods should scale-out to serve increasing web requests.
- Accuracy: Pods should be scheduled correctly accroding to our defined strategy.
- Decoupling: the application tier and the infrastructure layer should function independently. In other words, although the pods are scheduled using different mechanisms, they should equally serve web traffic for the application.
Note
Currently, I only keep one Pod running as the non-interruptable workload.
1. AWS account and EKS cluster.
2. The EKS cluster has node groups both of on-demnad and spot capacity types.
3. Stateless Pods. The pods could be scaled-in and scaled-out across multiple node groups of different capacity types. The scaling activities will not influence the application's functionality.
4. The traffic to the pods are load balanced with advanced cloud-native mechanisms. In my scenario, I'm using Istio to route the traffic using Istio's ingress gateway, destination rule, virtual service and Kubernetes service mechanisms.
To accurately schedule the pods, the first replica of the pods (the non-interruptable workload) should be scheduled and only scheduled onto the on-demand node group. Additional replicas of the pods (the interruptable workloads) should be scheduled and only scheduled to the spot node group.
The web traffic will be equally routed to the pods based on an existing label on the pods. This label is configured on the Kubernetes deployment template, and inherited to all replicas of the pods.
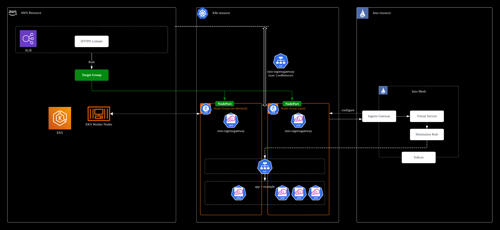
The following diagram shows the entire traffic flow path from cloud resource, Kubernetes and Istio perspective.
Note
Affinity and anti-affinity expands the types of constraints you can define. Some of the benefits of affinity and anti-affinity include:
- The affinity/anti-affinity language is more expressive. nodeSelector only selects nodes with all the specified labels. Affinity/anti-affinity gives you more control over the selection logic.
- You can indicate that a rule is soft or preferred, so that the scheduler still schedules the Pod even if it can't find a matching node.
- You can constrain a Pod using labels on other Pods running on the node (or other topological domain), instead of just node labels, which allows you to define rules for which Pods can be co-located on a node.
At the current stage, the node selector mechanism is selected to contrain the pods, which is enough simple and capable meet the pod scheduling requirements.
Taints and tolerations allow a node to repel a set of pods.
Tolerations are applied to pods. Tolerations allow the scheduler to schedule pods with matching taints.
PS: Tolerations allow scheduling but don't guarantee scheduling: the scheduler also evaluates other parameters as part of its function.
Taints and tolerations work together to ensure that pods are not scheduled onto inappropriate nodes. One or more taints are applied to a node; this marks that the node should not accept any pods that do not tolerate the taints.
A taint could be added to a node using kubectl taint, or, in this case, I will configure the taint under EKS node group, so that all nodes of this group will automatically have this taint added.
In the EKS console, add the Kubernetes taint.
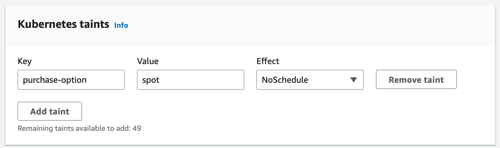
Here I use a key-value pair
Check the label and taint configurations on the node.
% k describe node <node name> | sed -n -e '/Labels:/,/Annotations:/{/Annotations:/!p;}' -e '/Taints:/,/Unschedulable:/{/Unschedulable:/!p;}'
Node groups of spot capacity type will be labelled as
Here's an example deployment configuration:
On the Kubernetes node side, identify the nodes of spot capacity type. Such node groups are labelled with
The combination of the toleration and node selector will ensure that these pods are only scheduled on the spot node group.
With the combined configuration of taint and toleration, it is guaranteed that only pods with specific toleration will be scheduled on to the nodes with specific taint. Other pods will not be scheduled on these nodes due to the taint. This combined configuration does not ensure that these pods should not be scheduled to other nodes. This is why we need the node selector specification.
With node selector, it is guaranteed that these pods will be scheduled to the target nodes with the matching label.
Istio destination rule configuration:
% kubectl get pods -o wide
After implementing this solution, we became technically ready to launch more spot instances as worker nodes for interruptable containers in the future.
Amazon EC2 Spot Instances Pricing
Compute and EC2 Instance Savings Plans
Assigning Pods to Nodes
Taints and Tolerations
Abstractions
The following are 10 key words that are abstracted from this article by GPT.Kubernetes, EKS, pod scheduling, node groups, EC2 instances, on-demand, spot instances, taints, tolerations, node selectors.
Introducation
Hi, this is Leo, principal architect of tianzhui.cloud. Today, in this blog post, I will delve into the specifics of configuring Kubernetes, with a particular focus on Amazon Elastic Kubernetes Service (EKS), to enable the precise scheduling of pods to nodes within a designated node group. This detailed guide will walk you through the necessary steps to ensure your pods are allocated to the appropriate node group, optimizing resource utilization and efficiency in your Kubernetes environment.Background
In this section, I will provide an overview of the Kubernetes setup under consideration.
The application functonality is served by the Kubernetes Pods which is hosted by Amazon Elastic Kubernetes Service (EKS).
The EKS cluster is composed of multiple node groups, utilizing distinct purchase options of EC2 instances - some leverage on-demand instances, while others employ spot instances. This is the most cost-efficient combination for purchase option of EC2 compute cost when applying appropirate Savings Plans to the on-demand instances.
The following example assumes that the AWS Region is Oregon, OS is using Linux, and EC2 instance type and size is t4g.medium:
| On-demand with Savings Plan | Spot lowest price | |
| Additional assumptions | Savings Plan type is EC2 Instance Savings Plan, term length is 1 year, payment option is All Upfront | N/A |
| Hourly rate per instance | $ 0.0197 | $ 0.0113 |
| Monthly cost per instance | $ 14.381 | $ 8.249 |
A key aspect to highlight is the characteristics of the Pods within this setup; they are inherently stateless. These pods are deployed through Kubernetes deployment mechanism. Therefore, the corresponding pods could be scaled out into multiple replicas via replica set. I will devide them into non-interruptable workload and interruptable ones. Such grouping methodology simplifies our future cost-related dicussion and considerations.
This necessary background sets the stage for understanding the cluster's architecture and implementation and lays the groundwork for the pod scheduling strategies that I will explore in detail in the subsequent sections.
In my previous posts, I've covered a wide range of topics related to this Kubernetes cluster setup from other aspects. For further information, please refer to those entries. Consequently, this article will avoid repeating the content already discussed in those posts.
For the convenience of my readers, below is a curated, though not exhaustive, list of recent posts.
Increasing the amount of available IP addresses for the EC2 nodes
Requirements
In this section, I will explain the requirments that this solution want to achieve from the following aspects:- Stability: application should be hosted by pods stably without being interrupted.
- Scalability: For stable performance, the pods should scale-out to serve increasing web requests.
- Accuracy: Pods should be scheduled correctly accroding to our defined strategy.
- Decoupling: the application tier and the infrastructure layer should function independently. In other words, although the pods are scheduled using different mechanisms, they should equally serve web traffic for the application.
Application Stability
To avoide interrupted by cloud resource capacity fluctuation, there should be always at least one Pod running on the worker nodes, which are not expected to be scaled-in unintentionally or interrupted by AWS underlying infrastructure behavior. Such pods are considered as non-interruptable and are expected to only run on the on-demand node groups.Note
Currently, I only keep one Pod running as the non-interruptable workload.
Application Performance and Scalability
For better performance and scalability, the Kubernetes deployment of this Pod could be scaled out as multiple replicas. These additional pods are considered as interruptable and are expected to only run on the spot node groups.Pod Scheduling Accuracy
The spot node group should only accept interruptable Pods, and the on-demand node group should only accept non-interruptable pods.Decoupling the Pod Scheduling with Application Functionality
Despite the fact that the fleet of Pods are running across on-demand node groups and spot ones, the web traffic will be forwarded to these pods equally.Prerequisites
That being said, I will list the prerequisites to proceed the discussion of design and implementation of this solution.1. AWS account and EKS cluster.
2. The EKS cluster has node groups both of on-demnad and spot capacity types.
3. Stateless Pods. The pods could be scaled-in and scaled-out across multiple node groups of different capacity types. The scaling activities will not influence the application's functionality.
4. The traffic to the pods are load balanced with advanced cloud-native mechanisms. In my scenario, I'm using Istio to route the traffic using Istio's ingress gateway, destination rule, virtual service and Kubernetes service mechanisms.
Design
In this section, I will explain how the solution is designed to meet the aforementioned requirements based on the above listed prerequisites.To accurately schedule the pods, the first replica of the pods (the non-interruptable workload) should be scheduled and only scheduled onto the on-demand node group. Additional replicas of the pods (the interruptable workloads) should be scheduled and only scheduled to the spot node group.
The web traffic will be equally routed to the pods based on an existing label on the pods. This label is configured on the Kubernetes deployment template, and inherited to all replicas of the pods.
Architecture Diagrams
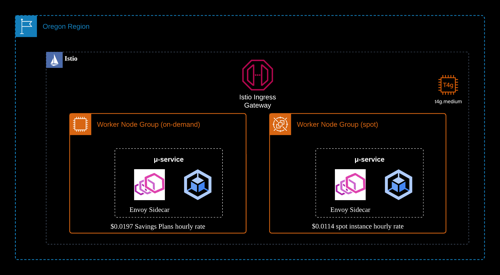
The following diagram depicts the Kubernetes setup that will be realized and explained in this article.
The following diagram shows the entire traffic flow path from cloud resource, Kubernetes and Istio perspective.

Strategies for K8s Pod Scheduling
The node selector mechanism is the simplest way to constrain pods to be restricted to run on nodes with specific labels.Note
Affinity and anti-affinity expands the types of constraints you can define. Some of the benefits of affinity and anti-affinity include:
- The affinity/anti-affinity language is more expressive. nodeSelector only selects nodes with all the specified labels. Affinity/anti-affinity gives you more control over the selection logic.
- You can indicate that a rule is soft or preferred, so that the scheduler still schedules the Pod even if it can't find a matching node.
- You can constrain a Pod using labels on other Pods running on the node (or other topological domain), instead of just node labels, which allows you to define rules for which Pods can be co-located on a node.
At the current stage, the node selector mechanism is selected to contrain the pods, which is enough simple and capable meet the pod scheduling requirements.
Taints and tolerations allow a node to repel a set of pods.
Tolerations are applied to pods. Tolerations allow the scheduler to schedule pods with matching taints.
PS: Tolerations allow scheduling but don't guarantee scheduling: the scheduler also evaluates other parameters as part of its function.
Taints and tolerations work together to ensure that pods are not scheduled onto inappropriate nodes. One or more taints are applied to a node; this marks that the node should not accept any pods that do not tolerate the taints.
Implementation
To configure a spot worker node group to only accept pods with a specific label and ensure that these pods are only scheduled to this node group, you can use Kubernetes taints and tolerations in combination with node selectors. Here's how you can achieve this:Taint the Spot Instance Node Group
Apply a taint to the spot node group. This taint ensures that only Pods with a matching toleration will be scheduled on these nodes.A taint could be added to a node using kubectl taint, or, in this case, I will configure the taint under EKS node group, so that all nodes of this group will automatically have this taint added.
In the EKS console, add the Kubernetes taint.
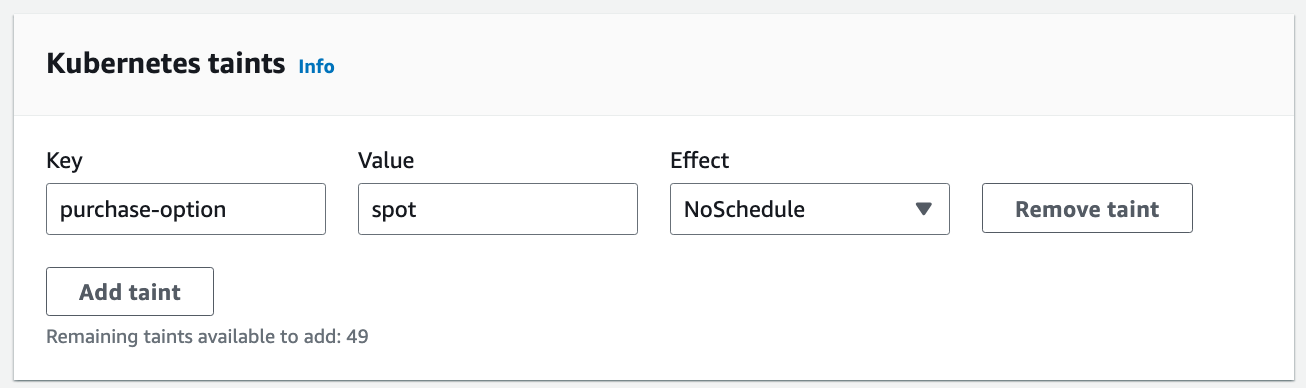
Here I use a key-value pair
purchase-option=spot as the taint I want to apply.Check the label and taint configurations on the node.
% k describe node <node name> | sed -n -e '/Labels:/,/Annotations:/{/Annotations:/!p;}' -e '/Taints:/,/Unschedulable:/{/Unschedulable:/!p;}'
Labels:             beta.kubernetes.io/arch=arm64
                    beta.kubernetes.io/instance-type=t4g.medium
                    beta.kubernetes.io/os=linux
                    eks.amazonaws.com/capacityType=SPOT
                    eks.amazonaws.com/nodegroup=t4gmedium-spot
                    eks.amazonaws.com/nodegroup-image=ami-0d***d6
                    eks.amazonaws.com/sourceLaunchTemplateId=lt-04***16
                    eks.amazonaws.com/sourceLaunchTemplateVersion=3
                    failure-domain.beta.kubernetes.io/region=us-west-2
                    failure-domain.beta.kubernetes.io/zone=us-west-2a
                    k8s.io/cloud-provider-aws=93***6b
                    kubernetes.io/arch=arm64
                    kubernetes.io/hostname=ip-10-0-xx-yy.us-west-2.compute.internal
                    kubernetes.io/os=linux
                    node.kubernetes.io/instance-type=t4g.medium
                    topology.ebs.csi.aws.com/zone=us-west-2a
                    topology.kubernetes.io/region=us-west-2
                    topology.kubernetes.io/zone=us-west-2a
Taints:             purchase-option=spot:NoSchedule
NoteNode groups of spot capacity type will be labelled as
eks.amazonaws.com/capacityType: SPOT by Kubernetes automatically. Configure Pods with Tolerations and Node Selector
In the pod specification (or in the Pod template of Kubernetes deployments, stateful sets, etc.), add a toleration for the taint you applied to the spot node group. Also, add a node selector to ensure the pods are scheduled on nodes with the specific label.Here's an example deployment configuration:
apiVersion: apps/v1
kind: Deployment
spec:
  template:
    spec:
      nodeSelector:
        eks.amazonaws.com/capacityType: SPOT
        ...
      tolerations:
      - effect: NoSchedule
        key: purchase-option
        operator: Equal
        value: spot
...
On the Kubernetes node side, identify the nodes of spot capacity type. Such node groups are labelled with
eks.amazonaws.com/capacityType: SPOT by Kubernetes automatically.The combination of the toleration and node selector will ensure that these pods are only scheduled on the spot node group.
With the combined configuration of taint and toleration, it is guaranteed that only pods with specific toleration will be scheduled on to the nodes with specific taint. Other pods will not be scheduled on these nodes due to the taint. This combined configuration does not ensure that these pods should not be scheduled to other nodes. This is why we need the node selector specification.
With node selector, it is guaranteed that these pods will be scheduled to the target nodes with the matching label.
Review the Istio Routing Configuration
Istio virtual service configuration:apiVersion: networking.istio.io/v1beta1
kind: VirtualService
spec:
http:
- route:
- destination:
host: ***.***.svc.cluster.local
port:
number: 80
subset: example
weight: 100
...
Istio destination rule configuration:
apiVersion: networking.istio.io/v1beta1
kind: DestinationRule
spec:
  host: ***.***.svc.cluster.local
  subsets:
  - labels:
      app: example
    name: example
...
Kubernetes deployment configuration:apiVersion: apps/v1
kind: Deployment
spec:
template:
metadata:
labels:
app: example
...
Verification
After deployment, usekubectl get pods -o wide to verify that your pods are being scheduled on the spot nodes as expected.% kubectl get pods -o wide
NAME                       READY   STATUS    RESTARTS   AGE   IP           NODE                                       NOMINATED NODE   READINESS GATES
example-6d68d5bf76-zxsnl   2/2     Running   0          21m   10.0.x.yy    ip-10-0-xx-yy.us-west-2.compute.internal   <none>           <none>
Conclusion
With the aforementioned steps, the pods will be ensured to be accurately scheduled to the target node groups.After implementing this solution, we became technically ready to launch more spot instances as worker nodes for interruptable containers in the future.
References
Amazon EC2 Spot Instances Pricing
Compute and EC2 Instance Savings Plans
Assigning Pods to Nodes
Taints and Tolerations