Author AWS Glue jobs with JetBrains DataSpell using AWS Glue interactive sessions (remote Jupyter)
AWS Glue interactive sessions allows programmers to build, test, and run data preparation and analytics applications. Interactive sessions provide access to run fully managed serverless Apache Spark using an on-demand model. AWS Glue interactive sessions also provide advanced users the same Apache Spark engine as AWS Glue 2.0 or AWS Glue 3.0, with built-in cost controls and speed. Additionally, development teams immediately become productive using their existing development tool of choice.
In this post, we walk you through how to use AWS Glue interactive sessions with DataSpell to author AWS Glue jobs.
Solution overview
This post provides a step-by-step walkthrough that builds on the instructions in Getting started with AWS Glue interactive sessions. It guides you through the following steps:
- Create an AWS IAM policy with limited Amazon S3 read privileges and associated role for AWS Glue.
- Configure access to a development environment. You can use a desktop computer or an OS running on the AWS Cloud using Amazon EC2.
- Integrate AWS Glue interactive sessions with DataSpell IDE.
Create an IAM policy
The first step is to create an IAM policy that limits read access to the S3 bucket s3://awsglue-datasets, which has the AWS Glue public datasets. You use IAM to define the policies and roles for access to AWS Glue.
Create policy in IAM.
{
    "Version": "2012-10-17",
    "Statement": [
        {
            "Effect": "Allow",
            "Action": [
                "s3:Get*",
                "s3:List*",
                "s3-object-lambda:Get*",
                "s3-object-lambda:List*"
            ],
            "Resource": ["arn:aws:s3:::awsglue-datasets/*"]
        }
    ]
}
For Policy name, enter
glue_interactive_policy_limit_s3.Create an IAM role for AWS Glue
Create a role for AWS Glue with limited Amazon S3 read privileges.
Choose Create role in IAM.
For Trusted entity type, select AWS service.
For Use cases for other AWS services, choose Glue.
On the Add permissions page, search and choose the AWS managed permission policies "
AWSGlueServiceRole " and "glue_interactive_policy_limit_s3"For Role name, enter "
glue_interactive_role".arn:aws:iam::<111122223333>:role/glue_interactive_role
Set up development environment access
This secondary level of access configuration needs to occur on the developer’s environment. The development environment can be a desktop computer running Mac etc., or similar OSs running on the AWS Cloud using Amazon EC2.
The following steps walk through each client access configuration. You can select the configuration path that is applicable to your environment.
Set up a desktop computer
To set up a desktop computer, we recommend completing the steps in Getting started with AWS Glue interactive sessions.
These sections describe how to run AWS Glue interactive sessions locally.
Prerequisites for setting up interactive sessions locally
The following are prerequisites for installing interactive sessions:
- Supported Python versions are 3.6 - 3.9
Setup EC2 as Jupyter server
Installing Jupyter and AWS Glue interactive sessions Jupyter kernels.
Create role. For Trusted entity type¸ select AWS service. For Common use cases, select EC2.
Add the
AWSGlueServiceRole policy to the newly created role.On the Add permissions menu, choose Create inline policy.
Save the new role as
ec2_glue_demo.On the Add permissions menu, choose Create inline policy.
Create an inline policy that allows the instance profile role to pass or assume
glue_interactive_role.{
"Version": "2012-10-17",
"Statement": [
{
"Effect": "Allow",
"Action": "iam:PassRole",
"Resource": "arn:aws:iam::<111122223333>:role/glue_interactive_role"
},
{
"Effect": "Allow",
"Action": "sts:AssumeRole",
"Resource": "arn:aws:iam::<111122223333>:role/glue_interactive_role"
}
]
}
Edit the trust relationship for
glue_interactive_role.Add
“AWS”: [“arn:aws:iam::<111122223333>:user/glue_interactive_user”,”arn:aws:iam::<111122223333>:role/ec2_glue_demo”] to the principal JSON key.{
"Version": "2012-10-17",
"Statement": [
{
"Effect": "Allow",
"Principal": {
"AWS": [
"arn:aws:iam::<111122223333>:role/ec2_glue_demo"
],
"Service": "glue.amazonaws.com"
},
"Action": "sts:AssumeRole"
}
]
}
Launch EC2 instance.
t3a.micro t4g.nano
Amazon Linux 2
IAM role:
ec2_glue_demo.Associate key pair.
Public accessible.
Only for t4g.nanno:
# yum install -y gcc python3-devel
SSH to the EC2 instance.
Install
jupyter boto3 and aws-glue-sessions with pip. Jupyter Lab is also compatible and can be installed instead.# pip3 install --upgrade jupyter boto3 aws-glue-sessions
Use
pip to identify the installation location for aws-glue-sessions. The associated botocore then installs the Jupyter kernels.# SITE_PACKAGES=$(pip3 show aws-glue-sessions | grep Location | awk '{print $2}')
# jupyter kernelspec install $SITE_PACKAGES/aws_glue_interactive_sessions_kernel/glue_pyspark
[InstallKernelSpec] Installed kernelspec glue_pyspark in /usr/local/share/jupyter/kernels/glue_pyspark# jupyter kernelspec install $SITE_PACKAGES/aws_glue_interactive_sessions_kernel/glue_spark
[InstallKernelSpec] Installed kernelspec glue_spark in /usr/local/share/jupyter/kernels/glue_spark
PS: For how to use install a local Jupyter server, refer to post (not published to public yet).
Configuring session credentials and region
AWS Glue interactive sessions requires the same IAM permissions as AWS Glue Jobs and Dev Endpoints. Specify the role used with interactive sessions in one of two ways:
- With the
%iam_roleand%regionmagics - With an additional line in
~/.aws/credentials
Configuring a session role with magic
In the first cell, type
%iam_role <YourGlueServiceRole> in the first cell executed.%iam_role arn:aws:iam::<111122223333>:role/glue_interactive_role
Current iam_role is None
iam_role has been set to arn:aws:iam::<111122223333>:role/glue_interactive_role.
Configuring a session role with
~/.aws/credentialsAWS Glue Service Role for interactive sessions can either be specified in the notebook itself or stored alongside the AWS CLI config. If you have a role you typically use with AWS Glue Jobs this will be that role. If you do not have a role you use for AWS Glue jobs, please follow this guide, Setting up IAM permissions for AWS Glue, to set one up.
To set this role as the default role for interactive sessions:
- With a text editor, open
~/.aws/credentials. - Look for the profile you use for AWS Glue. If you don't use a profile, use the
[Default]profile. - Add a line in the profile for the role you intend to use like
glue_role_arn=<AWSGlueServiceRole>. - [Optional]: If your profile does not have a default region set, I recommend adding one with
region=us-east-1, replacingus-east-1with your desired region. - Save the config.
Running Jupyter notebook
Run the following command to launch Jupyter Notebook.
# jupyter notebook --port 8889 --allow-root --no-browser
[I 12:03:29.833 NotebookApp] Writing notebook server cookie secret to /root/.local/share/jupyter/runtime/notebook_cookie_secret
[I 12:03:30.154 NotebookApp] Serving notebooks from local directory: /root
[I 12:03:30.155 NotebookApp] Jupyter Notebook 6.5.2 is running at:
[I 12:03:30.155 NotebookApp] http://localhost:8889/?token=c7e0****dd9b
[I 12:03:30.155 NotebookApp]  or http://127.0.0.1:8889/?token=c7e0****dd9b
[I 12:03:30.155 NotebookApp] Use Control-C to stop this server and shut down all kernels (twice to skip confirmation).
[C 12:03:30.160 NotebookApp]

    To access the notebook, open this file in a browser:
        file:///root/.local/share/jupyter/runtime/nbserver-2594-open.html
    Or copy and paste one of these URLs:
        http://localhost:8889/?token=c7e0*****dd9b
     or http://127.0.0.1:8889/?token=c7e0****dd9b
在本地执行下面命令,配置端口转发。
% ssh -L 8080:localhost:8889 -i <path-to-keypair.pem> ec2-user@<Jupyter-EC2-PublicIP>
PS: 如果本地环境有问题,新建一个Python interpreter,重新配置一下环境。
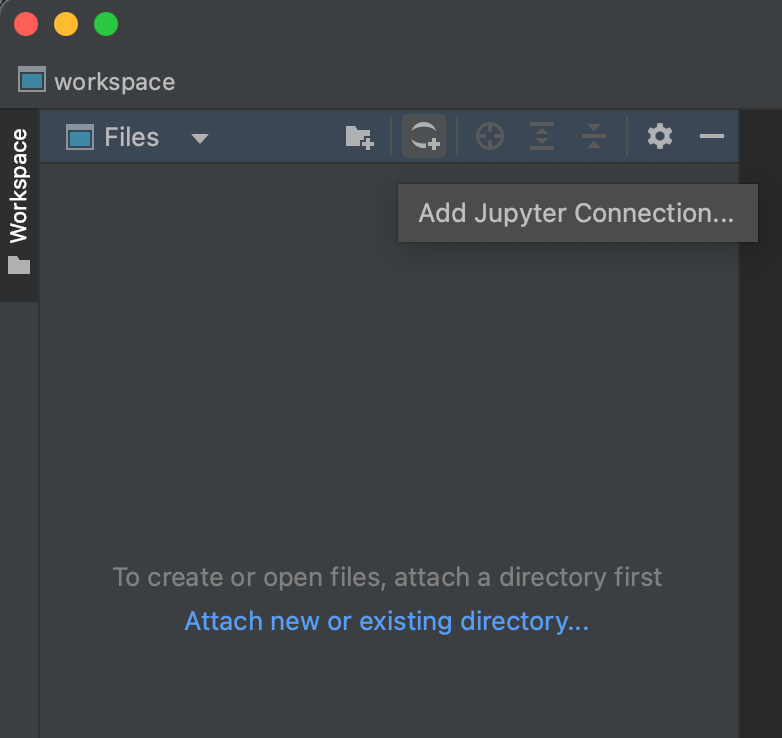
Choose New.
Choose one of the AWS Glue kernels to begin coding against AWS Glue. Here, I chose the "Glue PySpark".
Create interpreter


Integrate AWS Glue interactive sessions with an IDE
Set up and validate your DataSpell integration with AWS Glue interactive sessions.
On the welcome page, choose New Project.
For Location, enter the location of your project
glue-interactive-demo.Expand Python Interpreter.
Select Previously configured interpreter and choose the virtual environment you created earlier.
Choose Create.
The following screenshot shows the New Project page on a Mac computer.
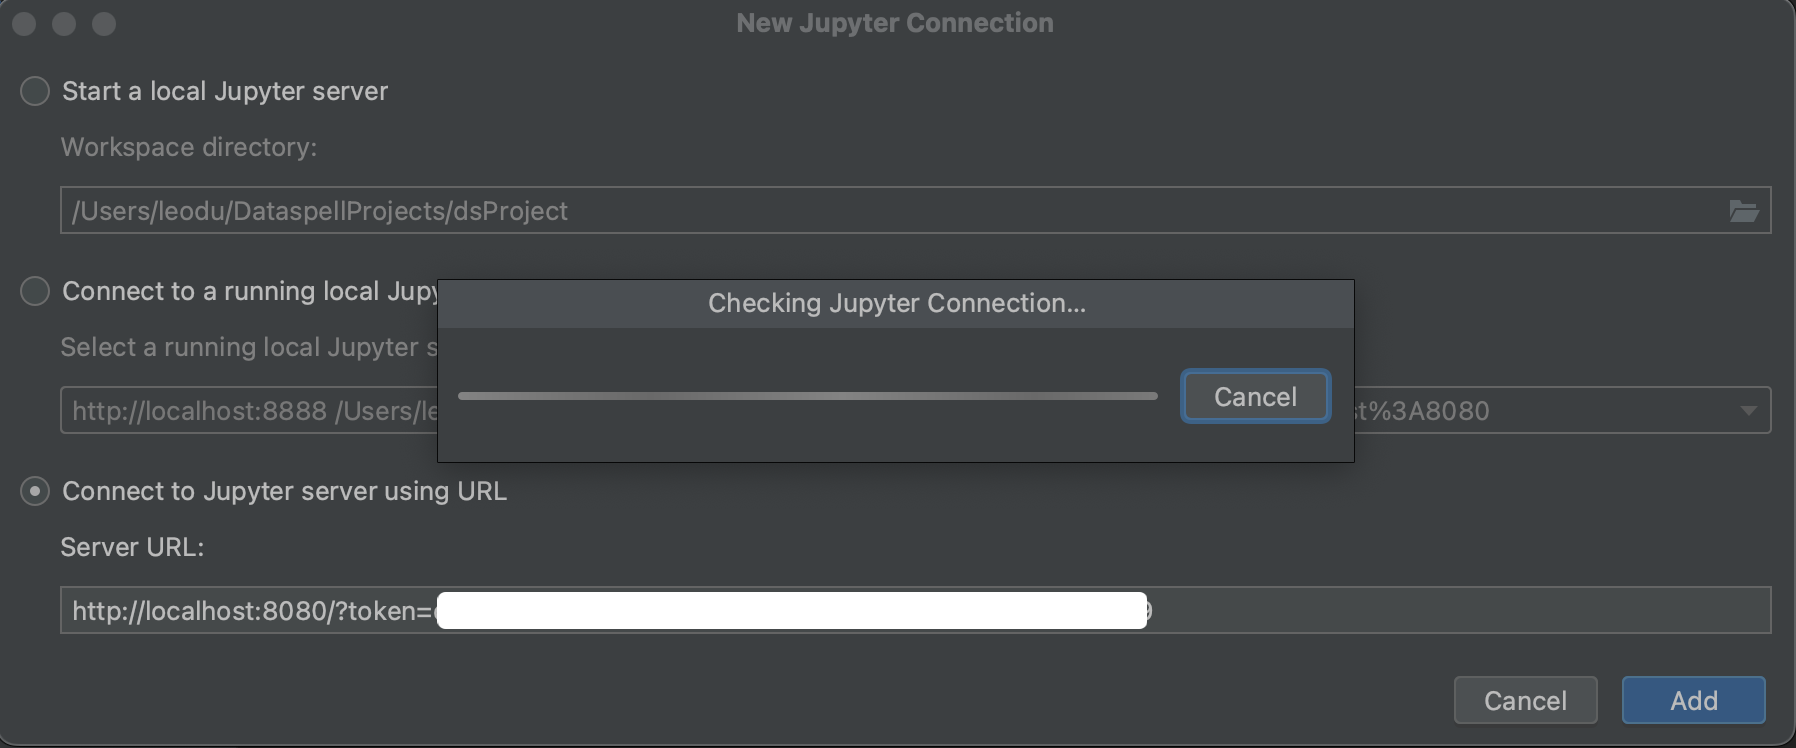
token是从jupyter notebook命令的返回结果获取的。
端口替换成我们端口转发使用的port number,这里是8080.
Choose the project (right-click) and on the New menu, choose Jupyter Notebook.
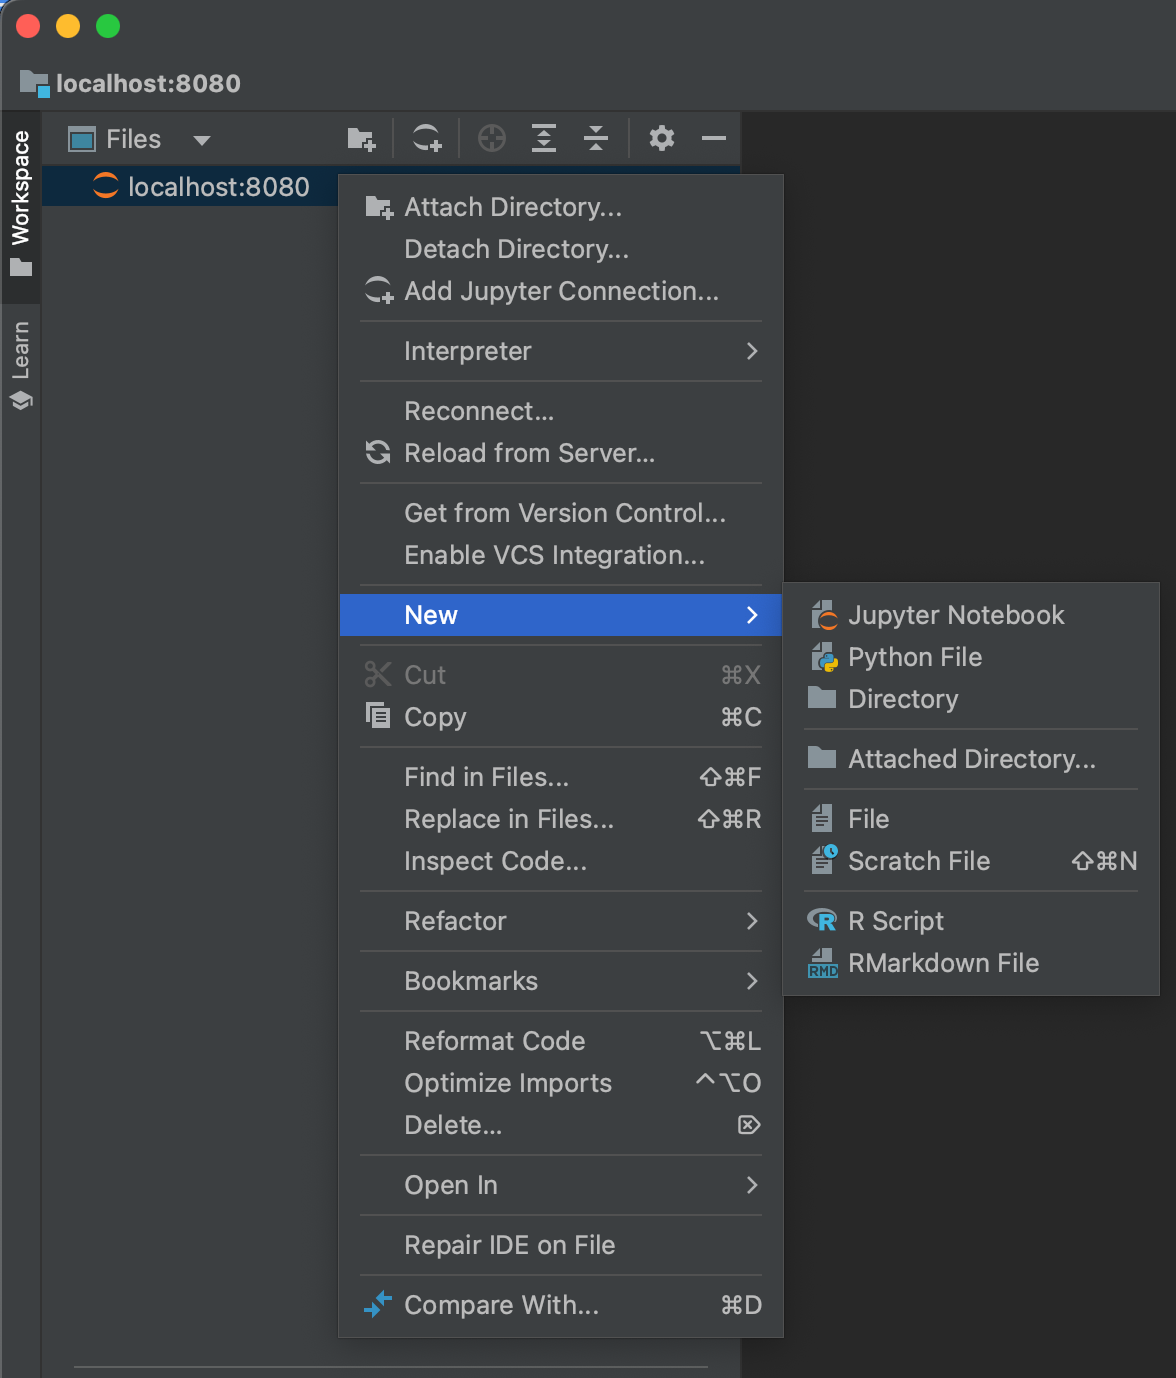
Name the notebook "
Validate_Glue_Interactive_Sessions".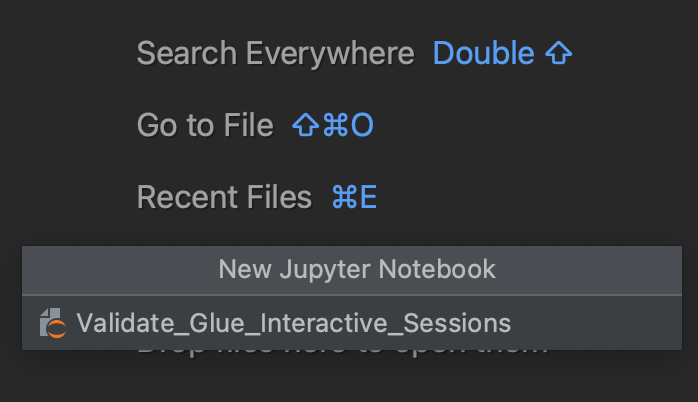
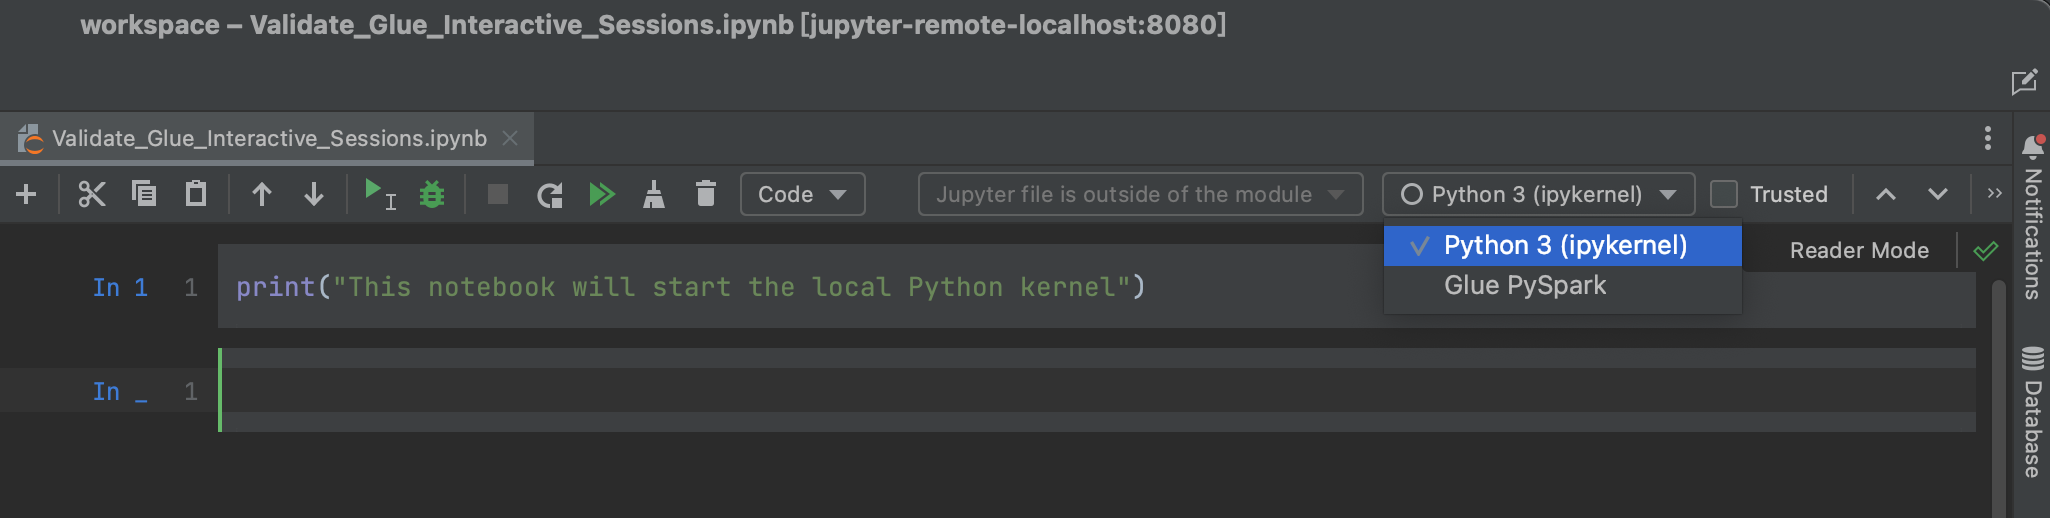
The notebook has a drop-down called Managed Jupyter server: auto-start, which means the Jupyter server automatically starts when any notebook cell is run. Check the "Trusted" checkbox.
Run the following code:
print("This notebook will start the local Python kernel")

You can observe that the Jupyter server started running the cell.

On the Python 3 (ipykernal) drop-down, choose Glue PySpark.
Run the following code to start a Spark session:
spark
Welcome to the Glue Interactive Sessions Kernel
For more information on available magic commands, please type %help in any new cell.

Please view our Getting Started page to access the most up-to-date information on the Interactive Sessions kernel: https://docs.aws.amazon.com/glue/latest/dg/interactive-sessions.html
Authenticating with profile=default
glue_role_arn retrieved from profile: arn:aws:iam::<111122223333>:role/glue_interactive_role
Trying to create a Glue session for the kernel.
Worker Type: G.1X
Number of Workers: 5
Session ID: 6efddcdf-***-a8e292e1939c
Job Type: glueetl
Applying the following default arguments:
--glue_kernel_version 0.37.2
--enable-glue-datacatalog true
Waiting for session 6efddcdf-***-a8e292e1939c to get into ready status...
Session 6efddcdf-***-a8e292e1939c has been created.
<pyspark.sql.session.SparkSession object at 0x7fd214bad1d0>
Wait to receive the message that a session ID has been created.
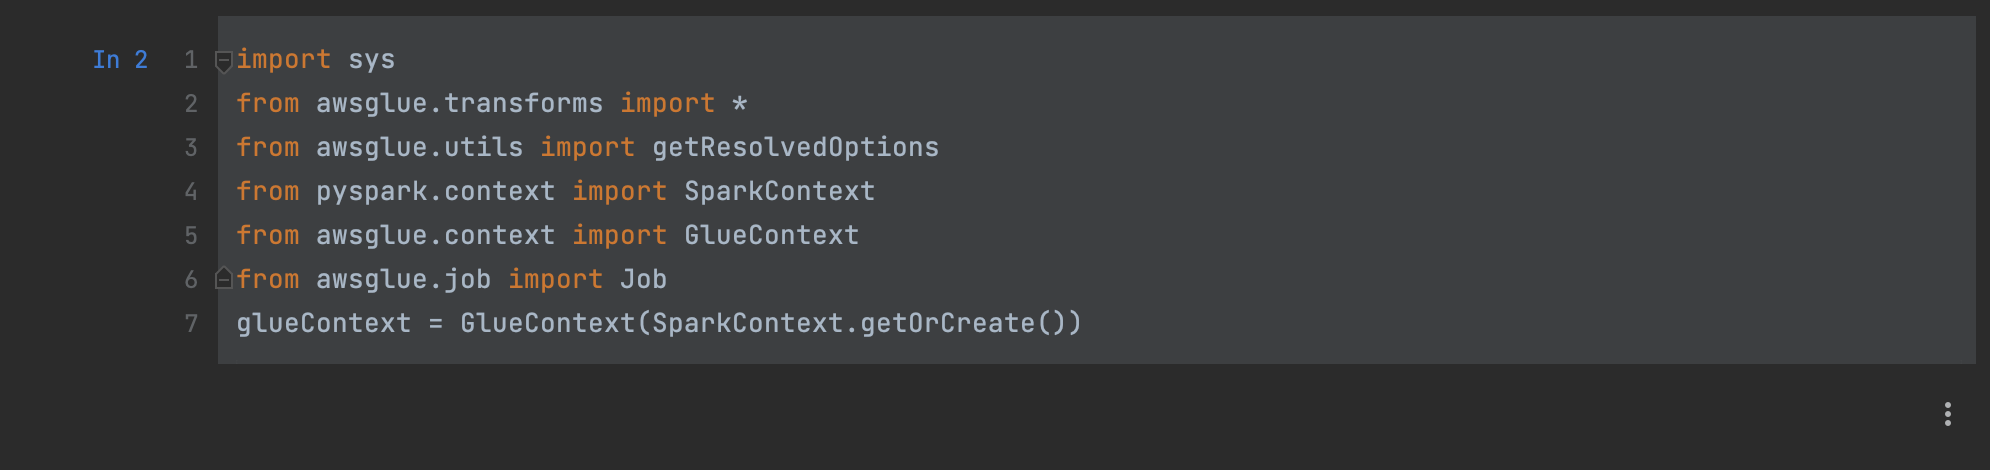
Run the following code in each cell, which is the boilerplate syntax for AWS Glue:
import sys
from awsglue.transforms import *
from awsglue.utils import getResolvedOptions
from pyspark.context import SparkContext
from awsglue.context import GlueContext
from awsglue.job import Job
glueContext = GlueContext(SparkContext.getOrCreate())
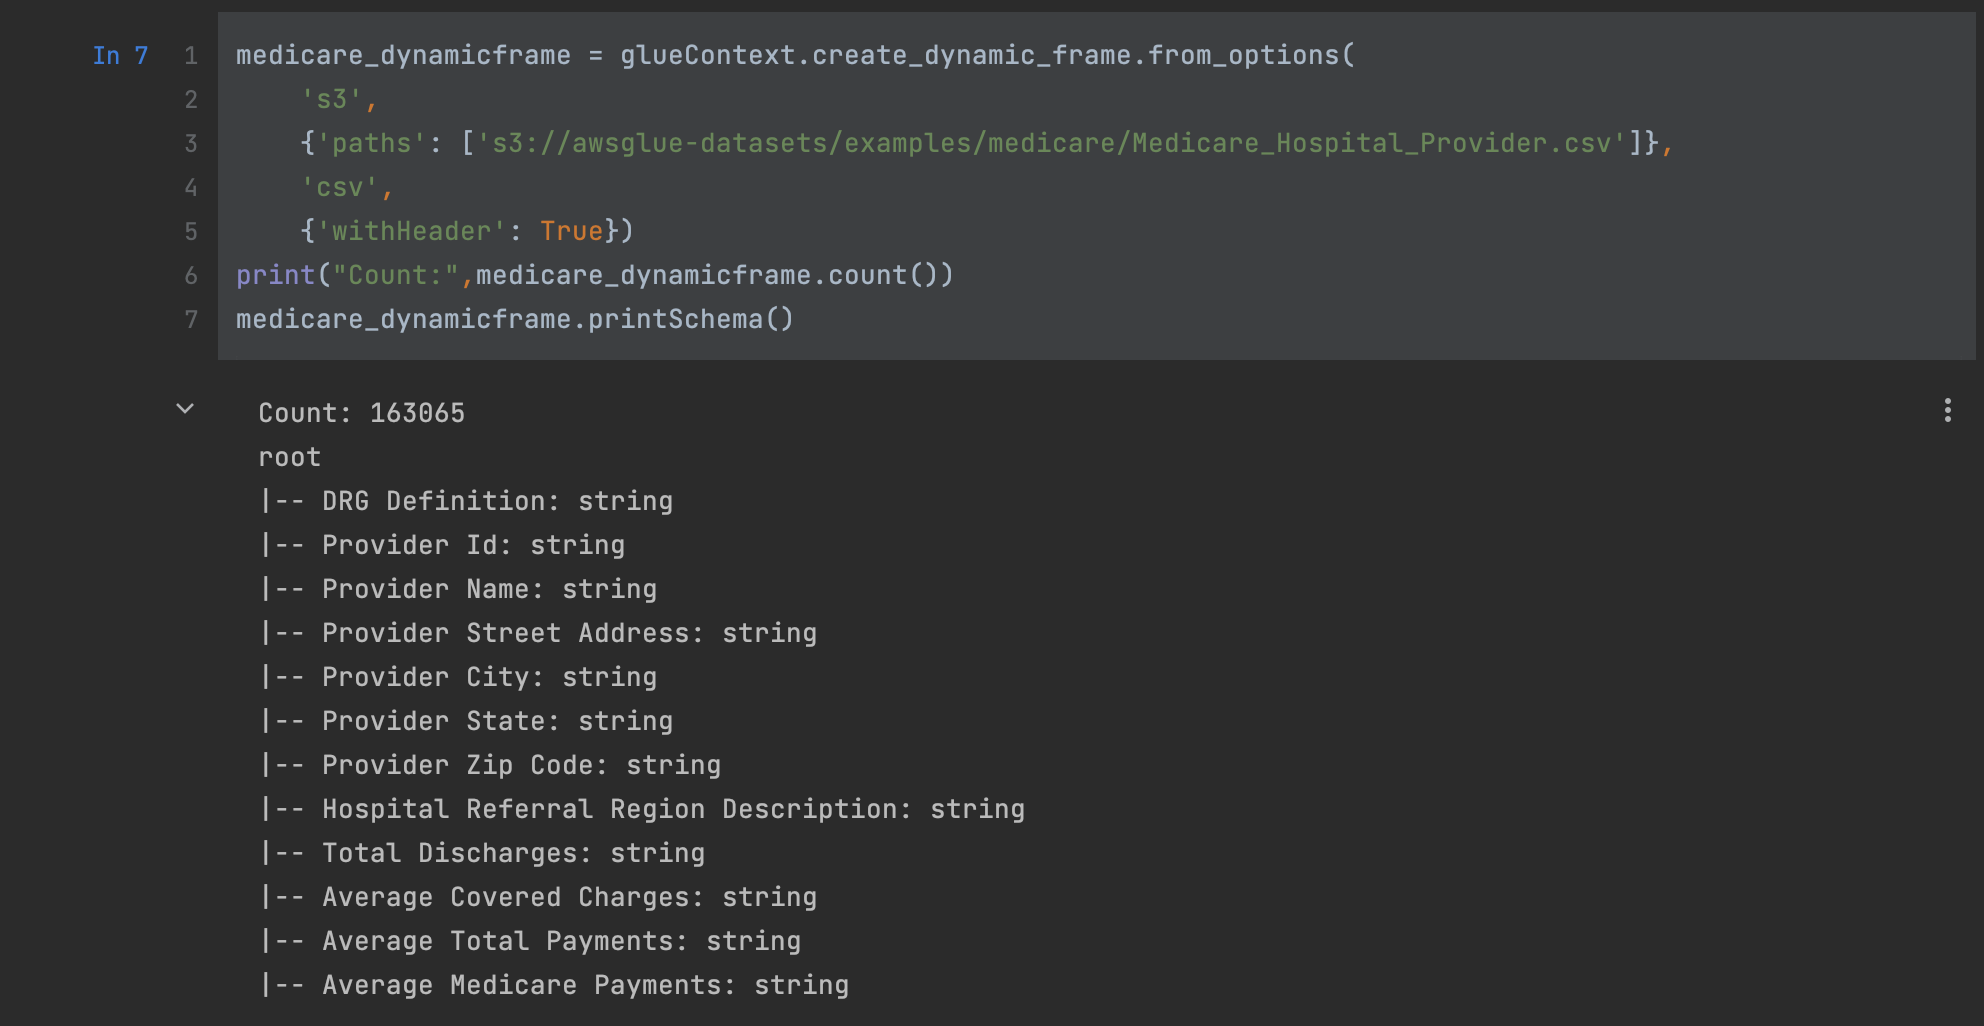
Read the publicly available Medicare Provider payment data in the AWS Glue data preparation sample document:
medicare_dynamicframe = glueContext.create_dynamic_frame.from_options(
    's3',
    {'paths': ['s3://awsglue-datasets/examples/medicare/Medicare_Hospital_Provider.csv']},
    'csv',
    {'withHeader': True})
print("Count:",medicare_dynamicframe.count())
medicare_dynamicframe.printSchema()
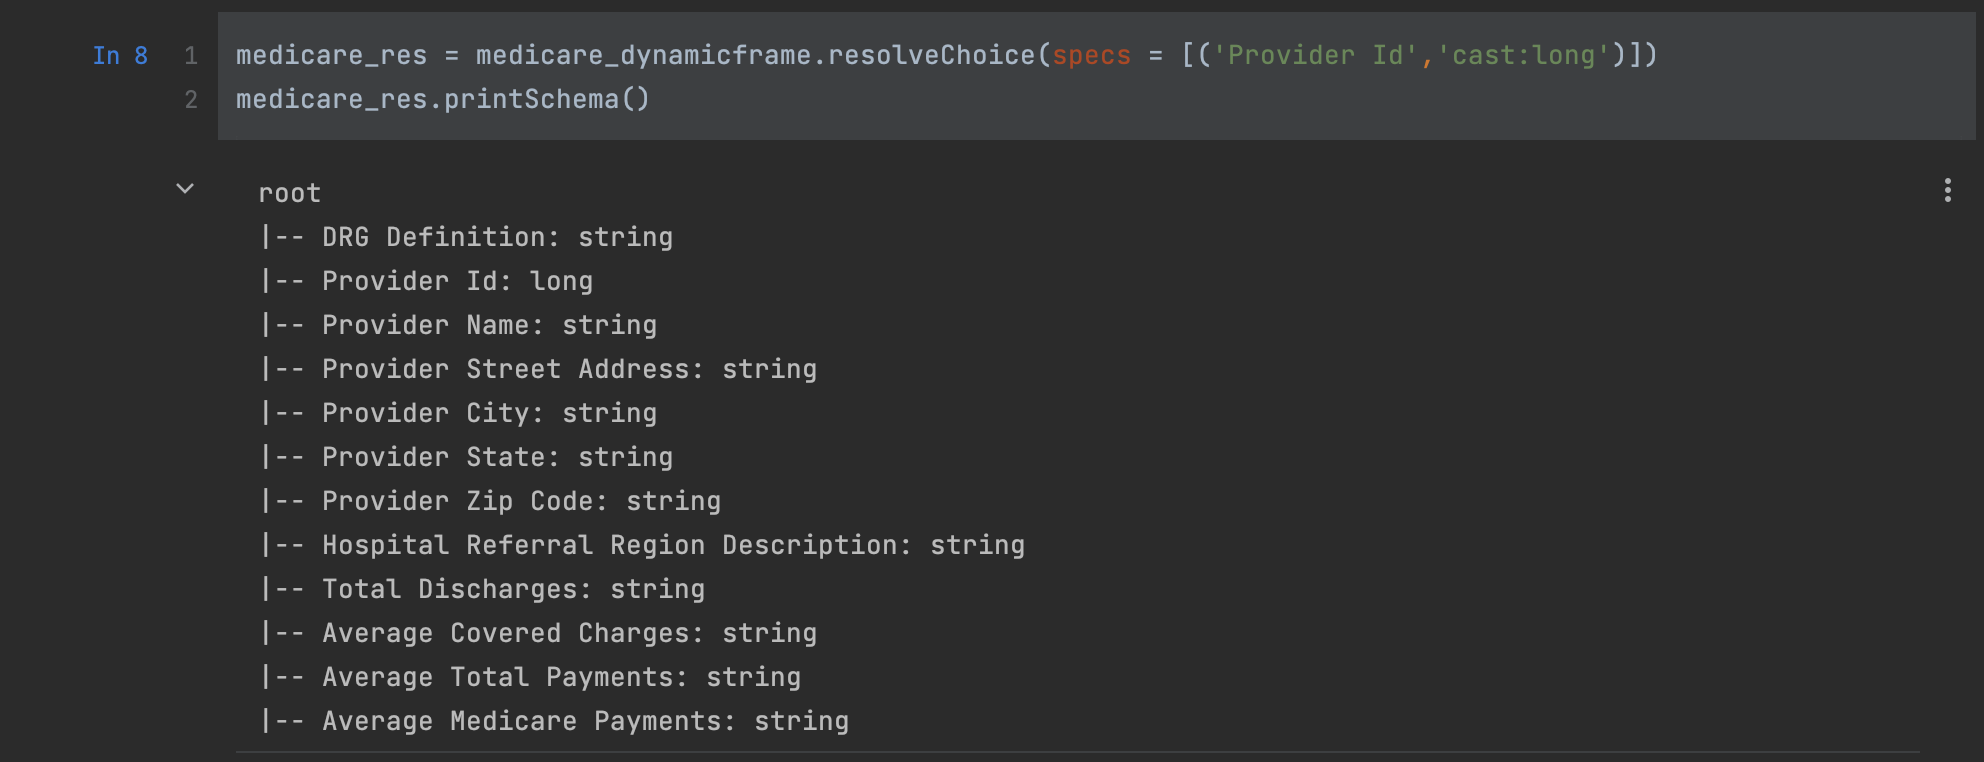
Change the data type of the provider ID to
long to resolve all incoming data to long:medicare_res = medicare_dynamicframe.resolveChoice(specs = [('Provider Id','cast:long')])
medicare_res.printSchema()
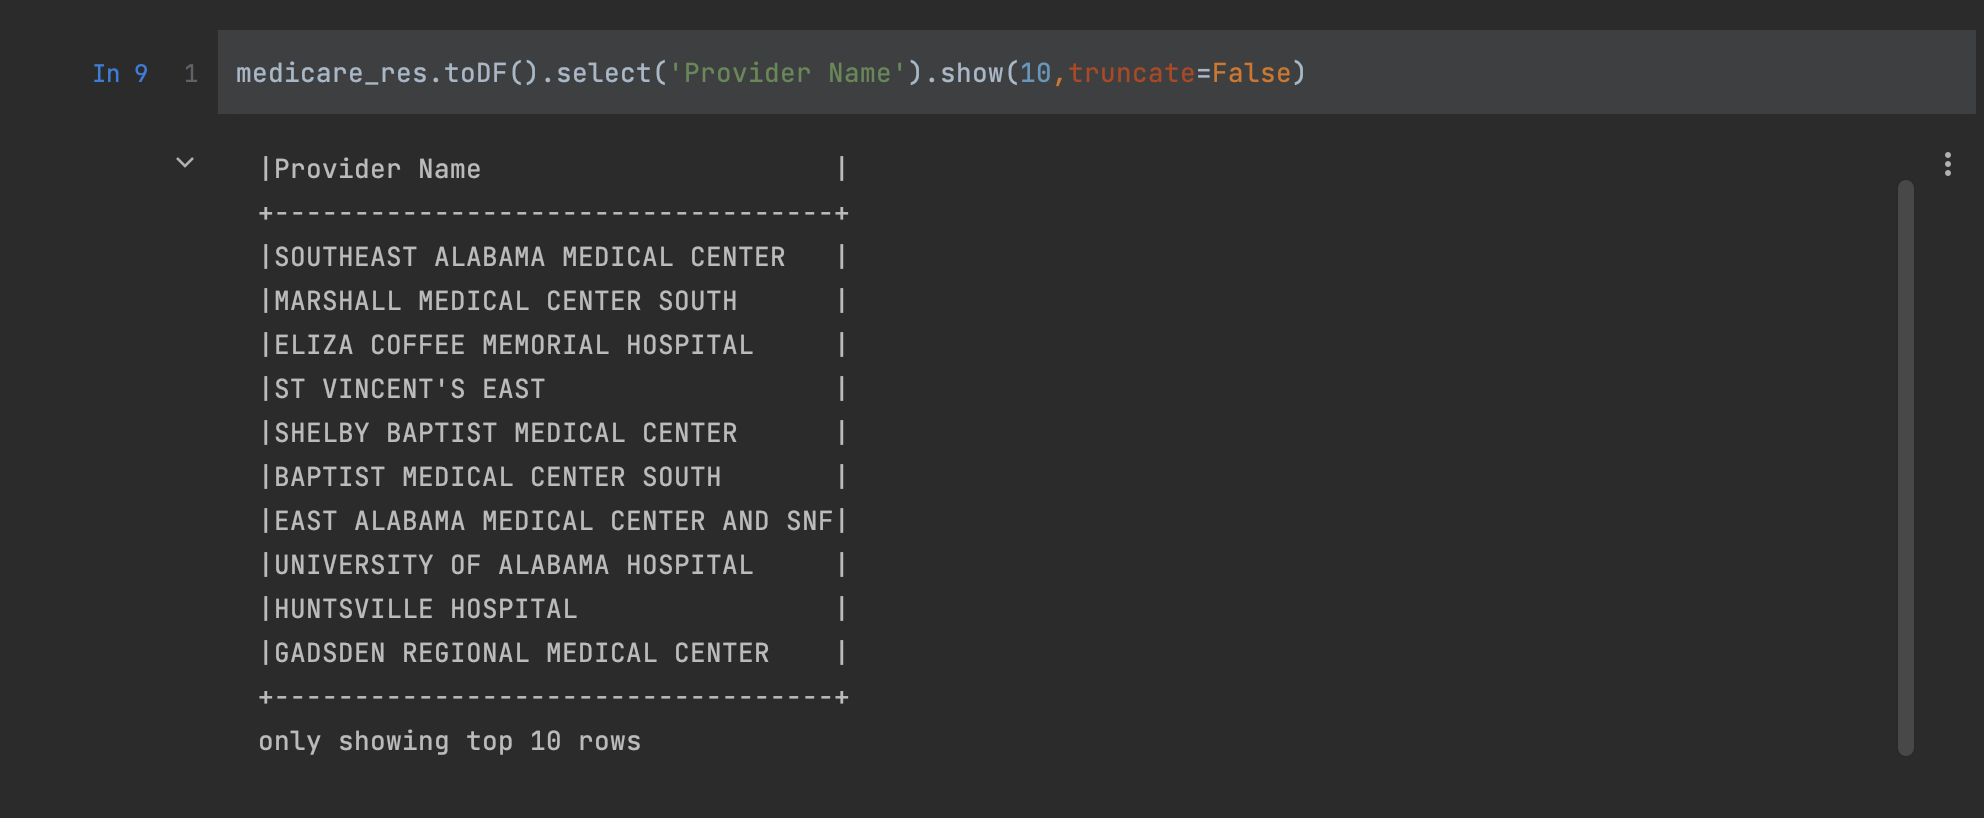
Display the providers:
medicare_res.toDF().select('Provider Name').show(10,truncate=False)
Clean up
You can run
%delete_session which deletes the current session and stops the cluster, and the user stops being charged. Have a look at the AWS Glue interactive sessions magics. Also please remember to delete IAM policy and role once you are done.References
Author AWS Glue jobs with PyCharm using AWS Glue interactive sessions
Getting started with AWS Glue interactive sessions
Code example: Data preparation using ResolveChoice, Lambda, and ApplyMapping
Running Jupyter Notebook on a remote server
Manage Jupyter notebook servers
-